27 Must-Have Thanksgiving Appetizers for a Festive Holiday

I used to think Thanksgiving appetizers were just a fancy way to make everyone wait for the turkey. But then I realized—they’re the real stars that kick off the feast!
From warm, cheesy bites to crispy little snacks, these dishes bring everyone together before the main event.
Ready to wow your guests before dinner even starts? Let’s get started!
1. Cranberry Brie Bites
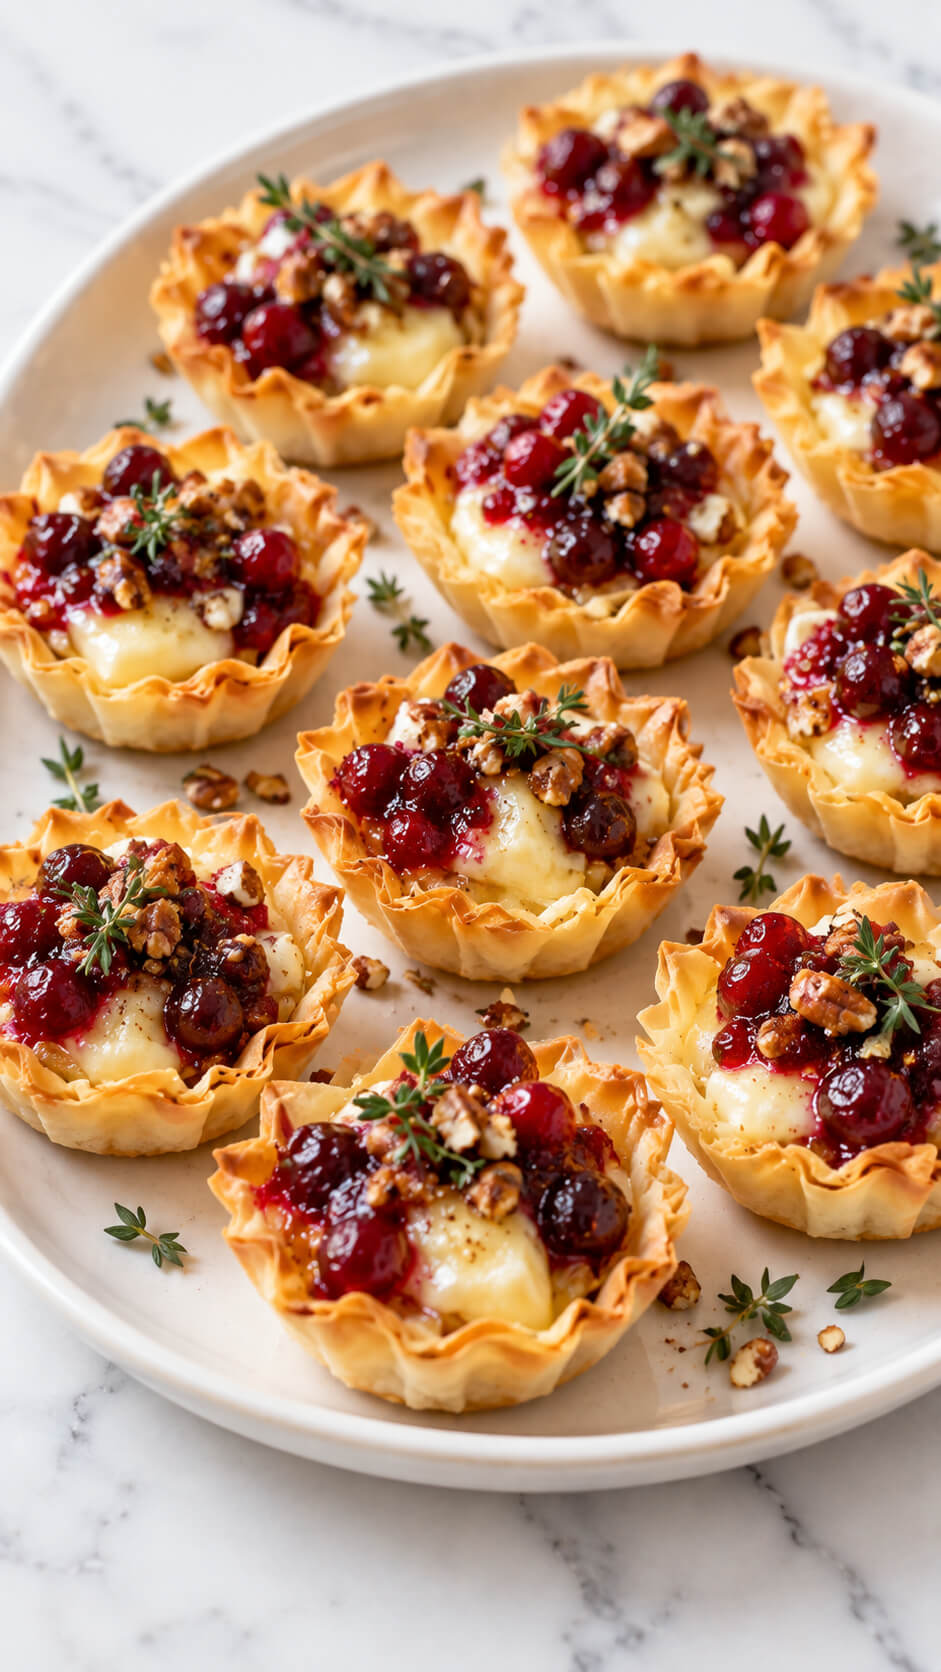
If Thanksgiving had a personality, these would be it—warm, gooey, and a little fancy.
Puff pastry squares cradle creamy brie and a spoonful of cranberry sauce, baked until bubbly and golden.
A drizzle of honey and a sprinkle of rosemary make them sweet, savory, and perfectly festive.
They vanish fast—trust me.
Ingredients
- 1 package (15 ounces) frozen phyllo shells, about 15 shells
- 6 ounces Brie cheese, cut into small cubes
- ½ cup cranberry sauce or cranberry relish
- ¼ cup chopped pecans or walnuts
- 1 tablespoon fresh thyme leaves
- ¼ teaspoon freshly ground black pepper
- Honey, for drizzling, optional
Instructions
1. Preheat the oven
Preheat the oven to 350°F (175°C). Arrange the frozen phyllo shells on a baking sheet, leaving a little space between each one so they bake evenly.
2. Fill the phyllo shells
Place a small cube of Brie into each phyllo shell, making sure the cheese sits comfortably inside without overflowing.
3. Add the cranberry sauce
Spoon about 1 teaspoon of cranberry sauce over each piece of Brie. Keep the filling slightly below the top of the shell to prevent it from spilling over as it melts.
4. Add the pecans and seasoning
Sprinkle the chopped pecans evenly over the filled shells. Add a small pinch of black pepper and a few fresh thyme leaves to each bite.
5. Bake the bites
Bake for 12–15 minutes, or until the phyllo shells are crisp and golden and the Brie is melted and creamy. Watch them closely during the final few minutes so the pastry does not become too dark.
6. Garnish the bites
Remove the bites from the oven and let them cool for 2–3 minutes. Finish with a few fresh thyme leaves and, if desired, a very light drizzle of honey.
7. Serve the appetizers
Transfer the warm cranberry Brie bites to a serving platter and serve immediately while the cheese is soft and melted.
Tip
For an especially festive flavor, use whole-berry cranberry sauce and toast the chopped pecans in a dry skillet for 3–4 minutes before adding them to the bites.
2. Sweet Potato Rounds with Goat Cheese
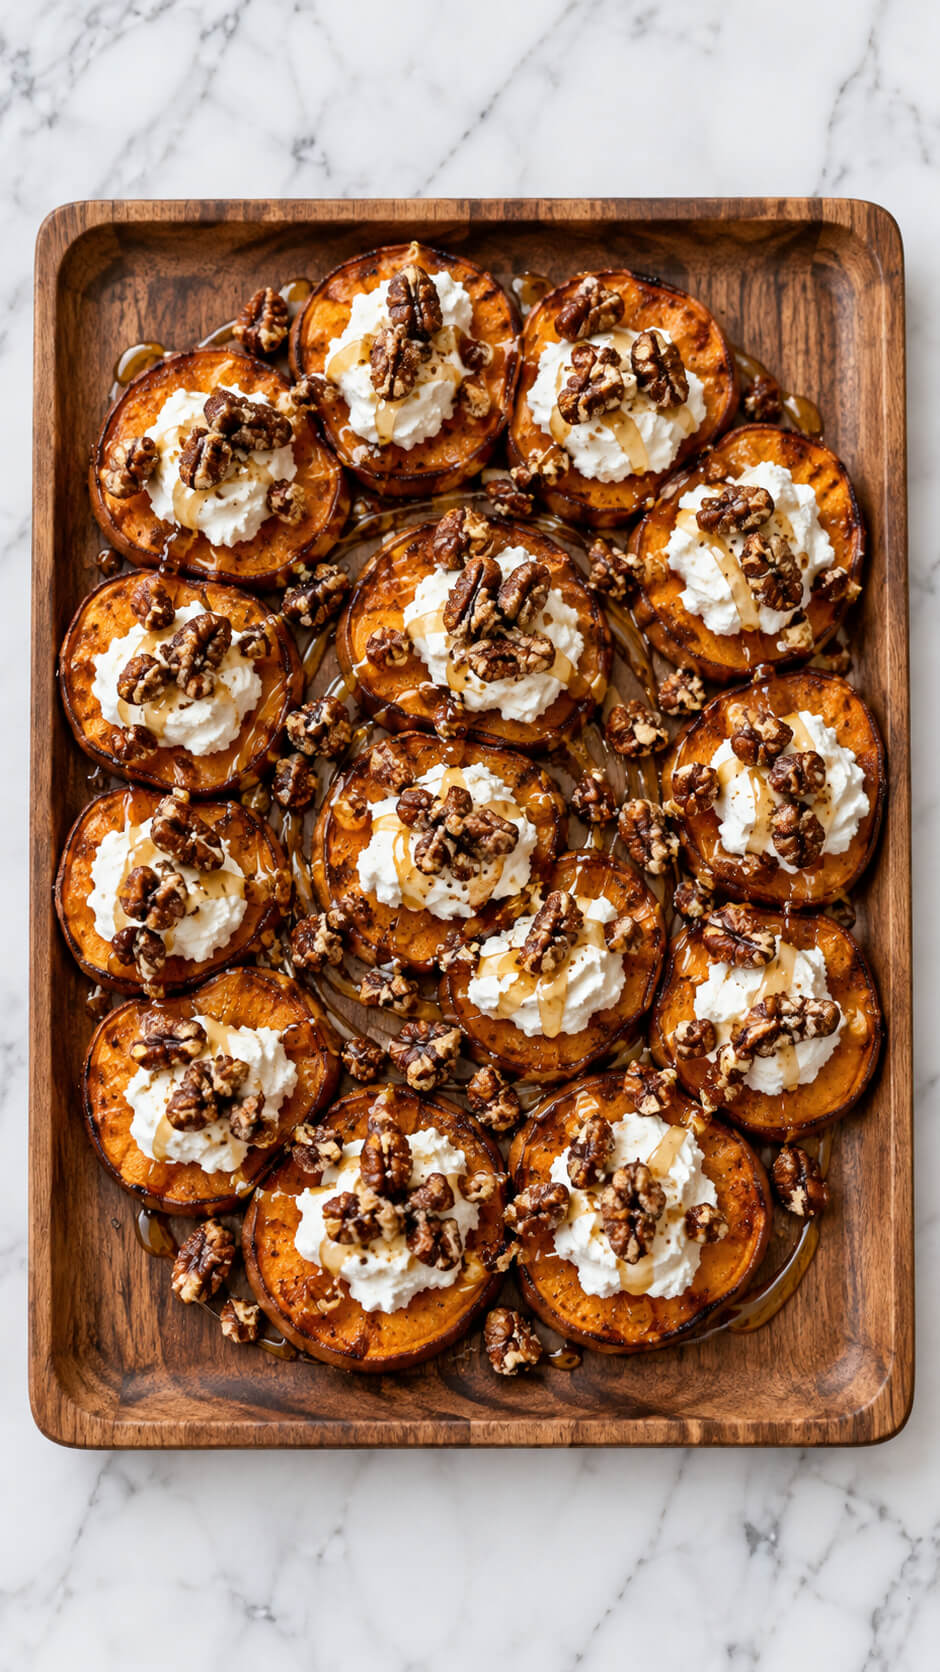
These elegant little bites are autumn on a platter.
Roasted sweet potato slices become the base for whipped goat cheese, toasted pecans, and a drizzle of maple syrup.
The mix of creamy, crunchy, and sweet makes them addictive.
Plus, they’re naturally gluten-free and easy to make ahead.
Ingredients
- 3 medium sweet potatoes, washed and sliced into ½-inch-thick rounds
- 2 tablespoons olive oil
- ½ teaspoon salt
- ¼ teaspoon black pepper
- ½ teaspoon smoked paprika (optional)
- 6 ounces (170 g) soft goat cheese
- 2 tablespoons cream cheese
- 1 tablespoon heavy cream or milk
- ½ cup candied pecans, coarsely chopped
- 2–3 tablespoons pure maple syrup
- 1 teaspoon fresh thyme leaves (optional)
Instructions
1. Preheat the oven
Preheat your oven to 425°F (220°C). Line a large baking sheet with parchment paper to prevent the sweet potato rounds from sticking and to make cleanup easier.
2. Prepare the sweet potatoes
Wash and dry the sweet potatoes thoroughly, then slice them into rounds approximately ½ inch thick. Try to keep the slices uniform in thickness so they roast evenly and develop caramelized edges without becoming too soft.
3. Season the sweet potato rounds
Place the sweet potato slices in a large bowl and drizzle with olive oil. Add the salt, black pepper, and smoked paprika if using. Toss until each round is evenly coated with the seasoning.
4. Roast the sweet potatoes
Arrange the rounds in a single layer on the prepared baking sheet, leaving a little space between them. Roast for 25–35 minutes, flipping halfway through, until the edges are golden brown and caramelized and the centers are fork-tender.
5. Whip the goat cheese
While the sweet potatoes roast, combine the goat cheese, cream cheese, and heavy cream in a small bowl. Whip with a hand mixer or whisk until the mixture becomes smooth, creamy, and light enough to spoon onto the sweet potato rounds. Add a little more cream if needed to achieve a soft, spreadable consistency.
6. Chop the candied pecans
Coarsely chop the candied pecans into small pieces. Keep a mixture of fine crumbs and larger chunks for a combination of sweetness and crunch. Set them aside until the sweet potato rounds are ready.
7. Arrange the roasted sweet potatoes
Remove the sweet potatoes from the oven and allow them to cool for about 3–5 minutes. Arrange the rounds in a circular pattern on a rectangular wooden serving tray, overlapping them slightly if desired, while keeping the caramelized surfaces visible.
8. Add the whipped goat cheese
Place approximately one tablespoon of whipped goat cheese on top of each sweet potato round. Use a spoon to create soft, decorative dollops. The slight warmth of the roasted sweet potatoes will soften the cheese just enough to make every bite creamy and delicious.
9. Sprinkle the candied pecans
Scatter the chopped candied pecans evenly over the goat cheese and sweet potato rounds. Distribute both the larger pieces and smaller crumbs across the tray so every serving gets a satisfying crunch.
10. Drizzle with maple syrup
Drizzle the maple syrup in a thin, glistening spiral pattern over the entire arrangement. Use a spoon or a small squeeze bottle to control the flow, allowing some syrup to fall over the goat cheese and pecans for a beautiful finish.
11. Garnish and serve
Finish with fresh thyme leaves if desired. Serve the sweet potato rounds warm or at room temperature, arranged on the wooden tray for an attractive presentation. They are delicious as a holiday appetizer, a party snack, or a flavorful side dish.
Tip
For the best texture, roast the sweet potatoes until their edges are deeply caramelized but their centers still hold their shape. Add the whipped goat cheese, candied pecans, and maple syrup shortly before serving to keep the pecans crunchy and prevent the toppings from becoming too soft. If preparing ahead, roast the sweet potatoes and whip the goat cheese separately, then assemble just before serving.
3. Pumpkin Hummus
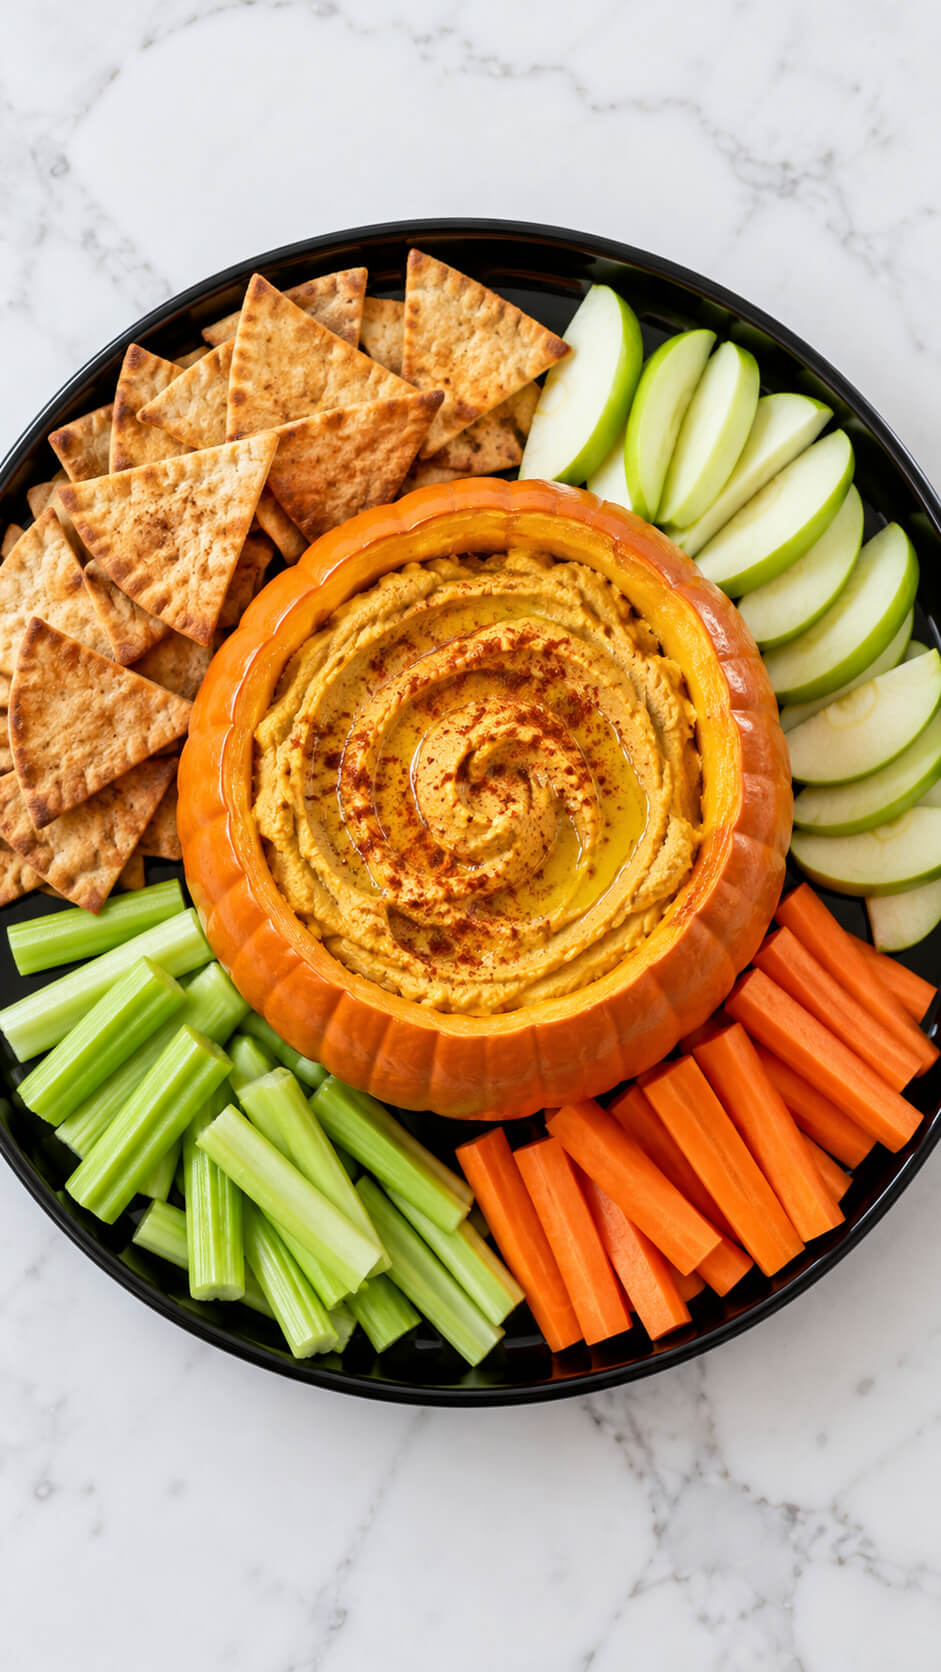
Pumpkin spice meets savory comfort in this twist on classic hummus.
Blend chickpeas with roasted pumpkin, garlic, and a dash of cumin for a creamy, fall-inspired dip.
Serve it in a hollowed mini pumpkin for wow factor.
Pita chips, crackers, or apple slices all pair beautifully.
Ingredients
- 1 small orange pumpkin, for serving
- 1 cup (240 g) pumpkin purée, unsweetened
- 1 can (15 oz / 425 g) chickpeas, drained and rinsed
- ¼ cup tahini (sesame seed paste)
- 2 tablespoons extra-virgin olive oil, plus extra for drizzling
- 2 tablespoons fresh lemon juice
- 1–2 cloves garlic, peeled
- ½ teaspoon ground cumin
- ½ teaspoon paprika, plus extra for garnish
- ½ teaspoon salt, or to taste
- 2–4 tablespoons cold water, as needed
For serving
- 2 cups pita chips
- 1 green apple, sliced into thin wedges
- 3 celery sticks, cut into sticks
- 2 medium carrots, peeled and cut into sticks
Instructions
1. Prepare the pumpkin bowl
Wash and dry the small pumpkin thoroughly. Using a sharp knife, carefully cut a circle around the stem to create a lid. Remove the lid and scoop out the seeds and stringy pulp with a spoon. Scrape the inside until it is clean and smooth, leaving enough flesh to maintain the pumpkin’s shape. Set the hollowed pumpkin aside for serving.
2. Drain and rinse the chickpeas
Pour the canned chickpeas into a colander and rinse them under cold running water. Drain well to remove excess liquid. For an extra-smooth hummus, gently rub the chickpeas between your hands to loosen their skins, then discard the skins you remove.
3. Blend the hummus ingredients
Place the chickpeas, pumpkin purée, tahini, olive oil, lemon juice, garlic, cumin, paprika, and salt in a food processor. Blend for 1–2 minutes, stopping occasionally to scrape down the sides of the bowl. Continue blending until the mixture becomes thick, creamy, and evenly combined.
4. Adjust the hummus texture
Add cold water one tablespoon at a time while blending until the hummus reaches a smooth, spreadable consistency. Taste and adjust the seasoning with additional lemon juice, salt, or cumin if needed. Blend for another 30 seconds to create a silky texture.
5. Fill the pumpkin with hummus
Transfer the prepared hummus into the hollowed pumpkin using a spoon. Fill it nearly to the top, then use the back of the spoon to create decorative swirls across the surface. Smooth the edges slightly so the hummus looks neat and inviting.
6. Drizzle with olive oil and paprika
Pour a thin stream of extra-virgin olive oil over the hummus in a circular pattern, following the decorative swirls. Lightly dust the surface with paprika for a warm orange-red finish. Avoid adding too much paprika, as a light sprinkle provides color without overpowering the flavor.
7. Prepare the pita chips and vegetables
Arrange the pita chips in a neat pile on one section of a large glossy black serving tray. Slice the green apple into thin wedges and cut the celery and carrots into evenly sized sticks. Pat the vegetables dry if necessary to remove excess moisture and keep the presentation fresh and crisp.
8. Arrange the serving platter
Place the filled pumpkin bowl in the center of the black tray. Arrange the golden-brown pita chips, green apple wedges, celery sticks, and carrot sticks in separate groups around it. Keep the colors distinct and distribute the ingredients evenly for an attractive, balanced presentation.
9. Serve the pumpkin hummus
Place the black tray on a clean white marble countertop and serve immediately. Invite guests to scoop the creamy pumpkin hummus with pita chips or use the fresh apple, celery, and carrot sticks for dipping. If preparing ahead, keep the hummus refrigerated until you are ready to serve.
Tip
For the creamiest pumpkin hummus, use plain pumpkin purée rather than pumpkin pie filling, which contains added sugar and spices. For extra flavor, roast the garlic before blending it into the hummus. You can prepare the hummus up to two days in advance and refrigerate it in an airtight container. Fill the pumpkin bowl shortly before serving for the freshest appearance, and slice the apple just before arranging the platter to minimize browning.
4. Bacon-Wrapped Brussels Sprouts
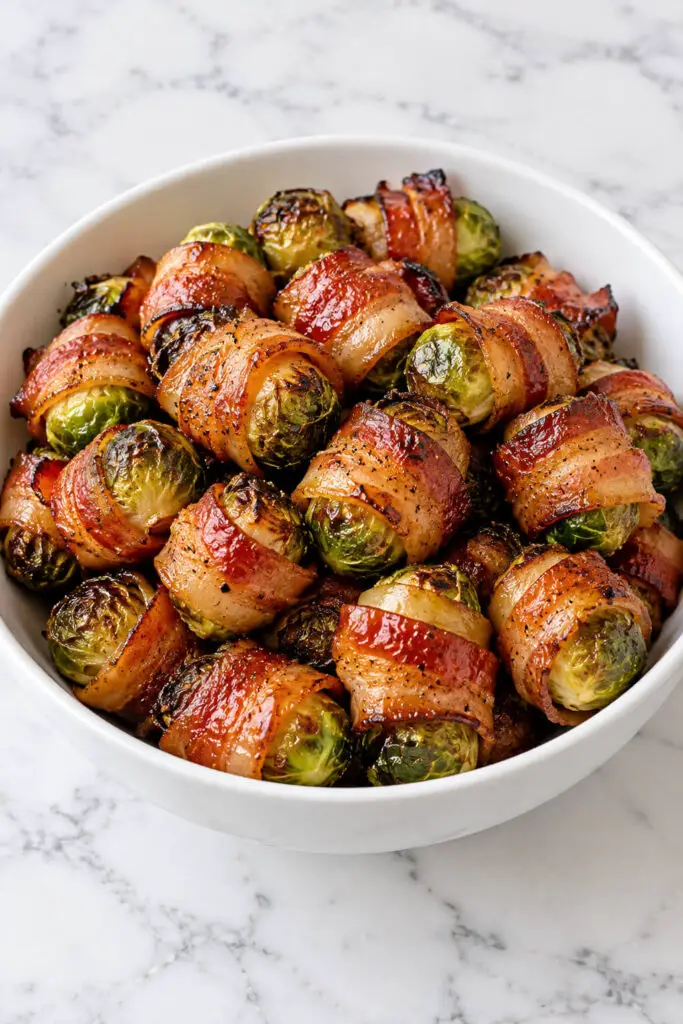
Even the “I don’t eat Brussels sprouts” crowd will go back for seconds.
Crispy bacon hugs tender sprouts, caramelizing as they roast.
Brush with a touch of maple syrup for a hint of sweetness.
They’re salty, smoky, and the perfect handheld bite of Thanksgiving magic.
Ingredients
- 1½ pounds (680 g) Brussels sprouts, trimmed
- 12–16 slices thin-cut bacon, cut in half crosswise as needed
- 2 tablespoons pure maple syrup
- 1 tablespoon olive oil
- ½ teaspoon garlic powder
- ¼ teaspoon smoked paprika
- ¼ teaspoon black pepper
- Toothpicks, for securing the bacon
Instructions
1. Preheat the oven
Preheat your oven to 400°F (200°C). Line a large baking sheet with parchment paper or aluminum foil, then place an oven-safe wire rack on top if available. The rack allows hot air to circulate around the bacon, helping it crisp evenly.
2. Prepare the Brussels sprouts
Wash the Brussels sprouts thoroughly, trim off the tough stem ends, and remove any loose or damaged outer leaves. Pat them completely dry with a clean kitchen towel. In a large bowl, toss the sprouts with olive oil, garlic powder, smoked paprika, and black pepper until evenly coated.
3. Wrap the Brussels sprouts with bacon
Cut the bacon slices in half if necessary to create pieces long enough to wrap around each sprout. Wrap one piece of bacon snugly around each Brussels sprout, slightly overlapping the ends. Secure the bacon with a toothpick to prevent it from unraveling during roasting.
4. Arrange the wrapped sprouts on the baking sheet
Place the bacon-wrapped Brussels sprouts seam-side down on the prepared baking sheet or wire rack. Leave a little space between each piece so the heat can circulate and the bacon can become crisp. Avoid overcrowding the tray, as excess moisture can prevent proper browning.
5. Roast until the bacon is crispy
Transfer the baking sheet to the preheated oven and roast for 25–30 minutes, turning the sprouts halfway through if they are on a flat baking sheet. Cook until the Brussels sprouts are tender when pierced with a fork and the bacon is golden brown and crisp. Add a few extra minutes if needed, checking frequently to prevent burning.
6. Brush with maple syrup
Remove the baking sheet from the oven and lightly brush the bacon-wrapped sprouts with maple syrup. Return them to the oven for another 3–5 minutes, allowing the syrup to caramelize and form a glossy glaze. Watch carefully during this stage because the sugar can burn quickly.
7. Check for doneness
Remove the sprouts from the oven when the bacon is crisp, the glaze is lightly caramelized, and the Brussels sprouts are tender inside. If using a food thermometer, ensure the bacon reaches a safe internal temperature of 145°F (63°C) under USDA guidance, with the Brussels sprouts fully tender. Let them rest for 3–5 minutes before serving.
8. Arrange and serve the appetizers
Transfer the bacon-wrapped Brussels sprouts to a clean, glossy white serving bowl. Arrange them in a generous pile so the golden bacon and roasted green sprouts are clearly visible. Serve warm as a Thanksgiving appetizer or holiday side dish.
Tip
For the crispiest bacon, use thin-cut bacon and dry the Brussels sprouts thoroughly before wrapping. If you prefer a more savory flavor, add a small pinch of cayenne pepper to the seasoning. For a beautiful glossy finish, brush on the maple syrup near the end of cooking rather than at the beginning, which helps prevent the glaze from burning.
5. Butternut Squash Soup Shooters
Think cozy soup—but make it party-friendly.
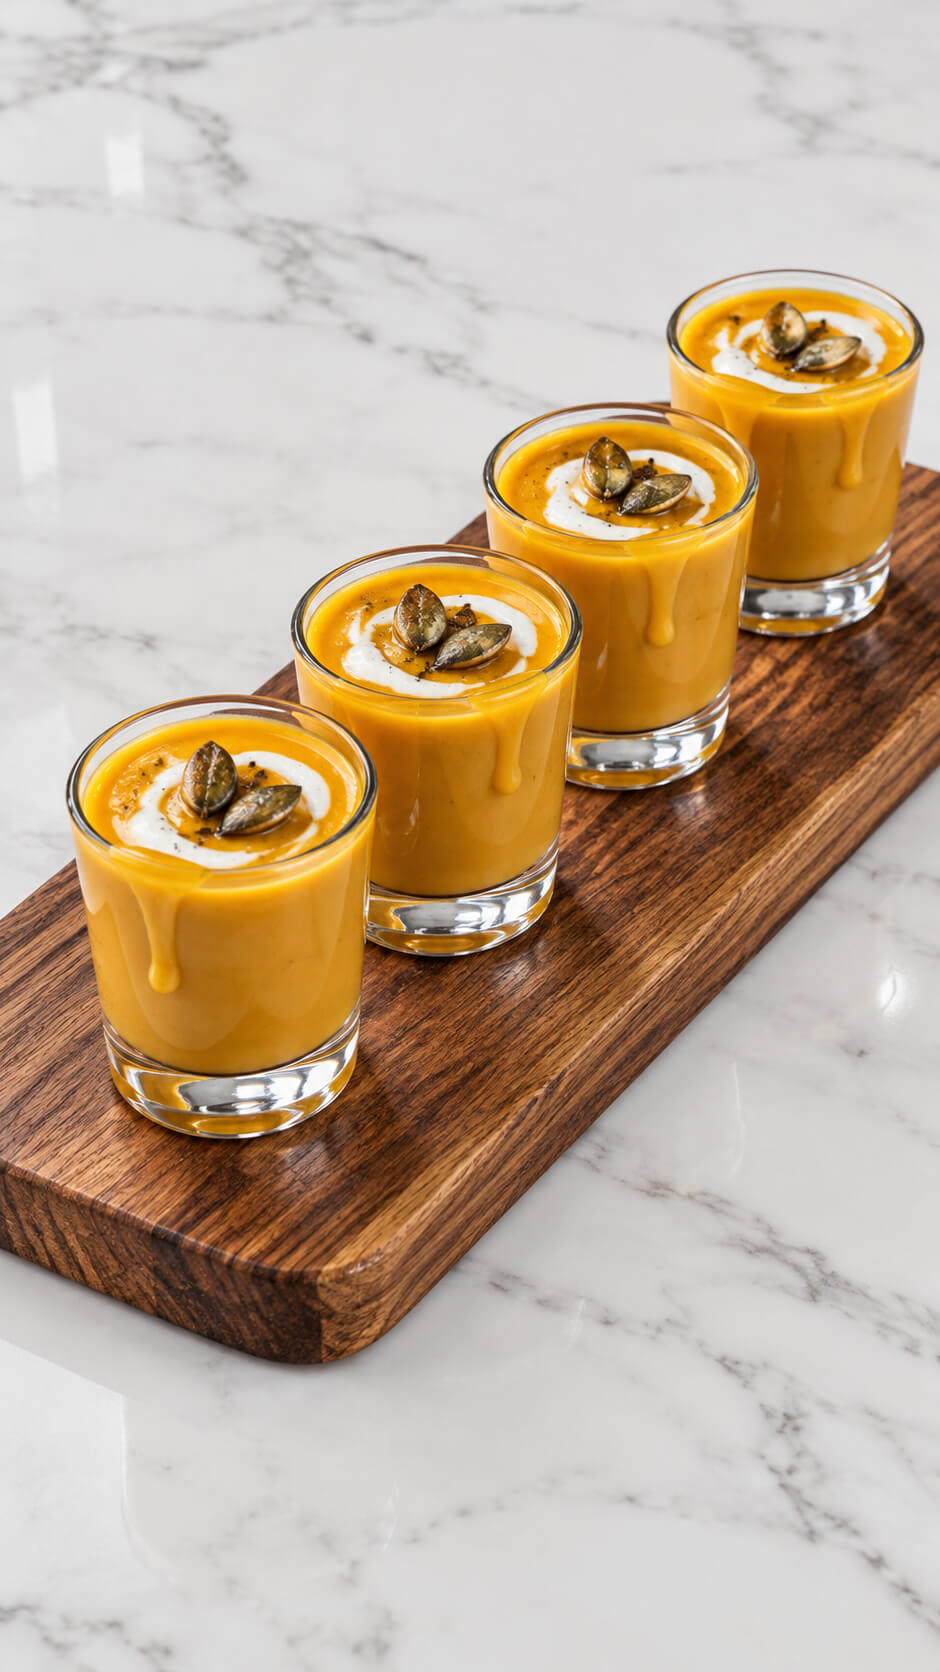
Velvety butternut squash soup is served in tiny cups or shot glasses, topped with a swirl of cream and toasted pumpkin seeds.
It’s comforting, elegant, and looks straight out of a food magazine. Sip, smile, repeat.
Ingredients
- 1 medium butternut squash (about 2 pounds), peeled, deseeded, and cubed
- 1 tablespoon olive oil
- 1 small onion, chopped
- 2 cloves garlic, minced
- 3 cups vegetable stock or chicken stock
- ½ cup heavy cream, plus extra for garnish
- ½ teaspoon salt, or to taste
- ¼ teaspoon black pepper
- ¼ teaspoon ground nutmeg (optional)
- 1 tablespoon butter
- 12 toasted pumpkin seeds, for garnish
- 1 teaspoon olive oil, for garnish (optional)
Instructions
1. Roast the butternut squash
Preheat the oven to 400°F (200°C). Toss the cubed butternut squash with olive oil and spread it evenly on a baking tray. Roast for 25–35 minutes, turning halfway through, until the squash is tender and lightly caramelized around the edges. Roasting brings out the squash’s natural sweetness and gives the soup a richer flavor.
2. Sauté the onion and garlic
Melt the butter in a large saucepan over medium heat. Add the chopped onion and cook for 4–5 minutes until softened and translucent. Stir in the minced garlic and cook for another 30–60 seconds until fragrant, taking care not to let it burn.
3. Simmer the soup
Add the roasted butternut squash to the saucepan and pour in the vegetable or chicken stock. Stir well and bring the mixture to a gentle boil. Reduce the heat and simmer for 10 minutes to allow the flavors to blend together.
4. Blend until smooth
Remove the saucepan from the heat and blend the mixture with an immersion blender until completely smooth. Alternatively, carefully transfer it to a countertop blender in batches. Return the soup to the pan if needed, then stir in the heavy cream, salt, black pepper, and optional nutmeg.
5. Adjust the consistency
Warm the soup over low heat for 2–3 minutes without allowing it to boil. If it is too thick for shot glasses, add a little extra stock or warm water until it reaches a silky, pourable consistency. Taste and adjust the seasoning as needed.
6. Fill the shot glasses
Allow the soup to cool slightly before carefully pouring it into four small, clear shot glasses, filling each approximately three-quarters to nearly full. Use a small jug or a spoon to avoid spilling, and wipe the outside of each glass with a clean cloth for a neat presentation.
7. Add the cream swirl
Pour a small amount of cream onto the surface of each soup shot. Use the tip of a toothpick or skewer to gently swirl the cream into a decorative pattern. Keep the swirl delicate so the golden-orange soup remains visible.
8. Garnish with toasted pumpkin seeds
Place three toasted pumpkin seeds on top of each soup shot, arranging them neatly in the center of the cream swirl. Add a tiny drop of olive oil or a light sprinkle of black pepper if desired for a refined finishing touch.
9. Arrange and serve the soup shots
Place the four glasses in a straight, evenly spaced row on a rectangular wooden serving board. If any soup drips down the sides, wipe the glasses clean for a polished appearance, or leave a few natural drips for a rustic presentation. Serve warm as an appetizer or allow the soup to cool slightly before serving.
Tip
For the smoothest, most elegant soup shots, blend the soup thoroughly and pass it through a fine-mesh sieve before adding the cream. Prepare the soup a day ahead if convenient, refrigerate it, and reheat gently before serving. Add the cream swirl and pumpkin seeds just before presentation to keep the garnish fresh and attractive.
6. Mini Stuffing Muffins
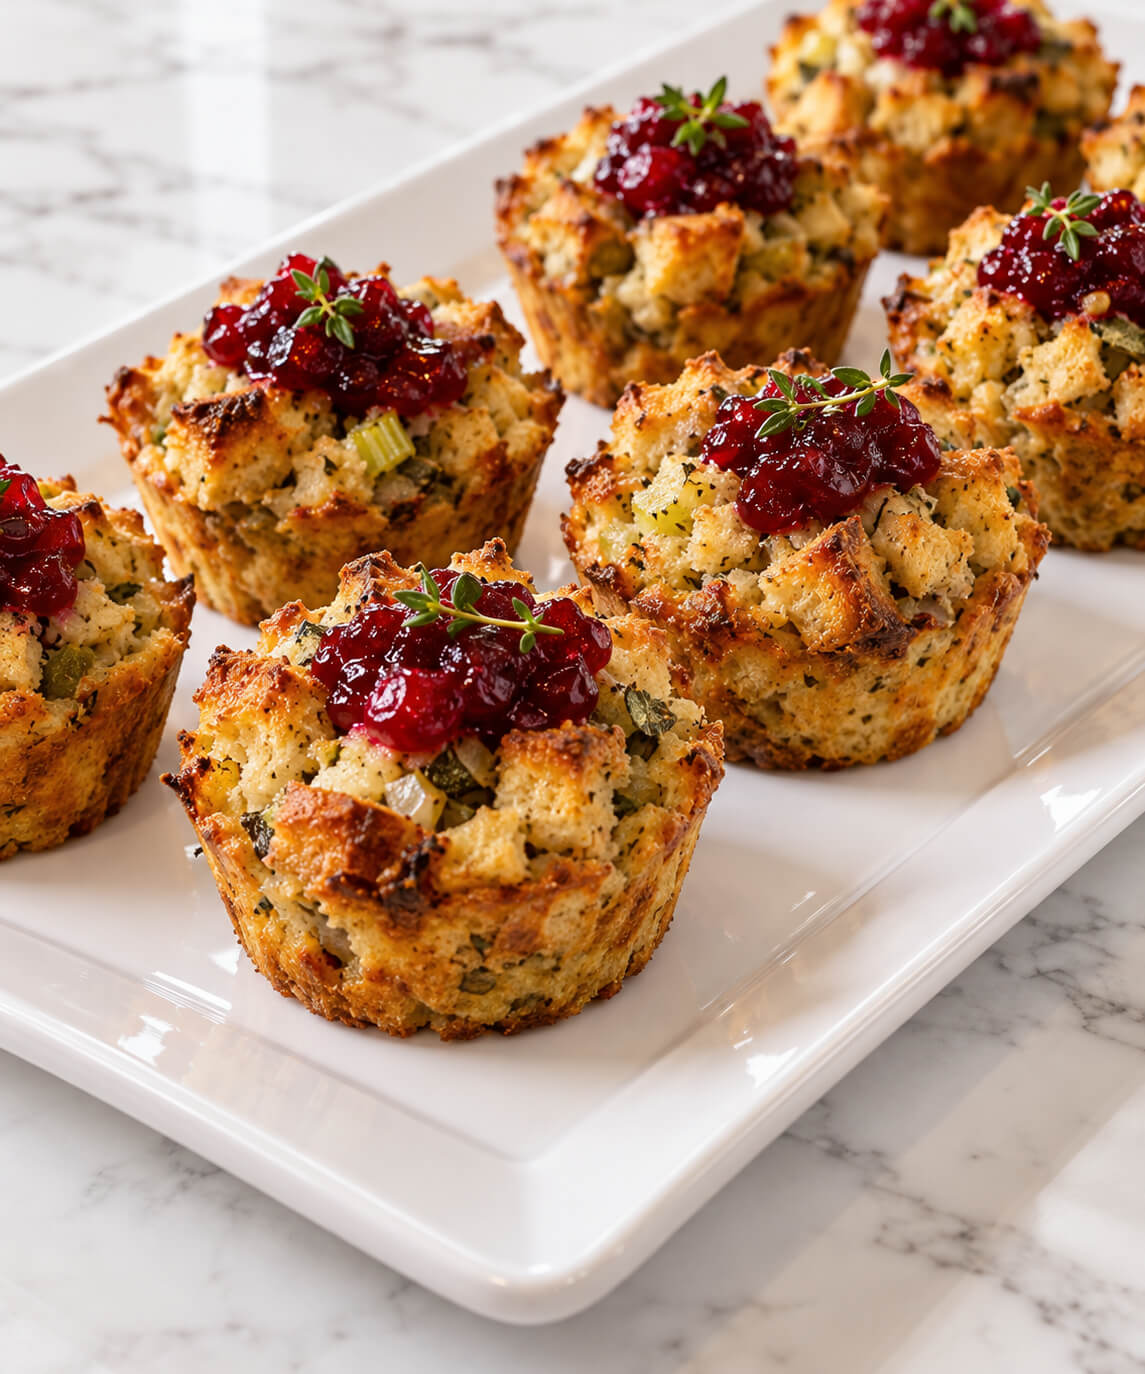
All the best parts of stuffing—crispy edges, herby flavor, and that buttery, savory goodness—baked into adorable little muffins.
These are easy to grab and perfect for mingling.
Serve them warm with a dab of cranberry sauce on top for an instant crowd favorite.
Ingredients
- 6 cups bread cubes, preferably day-old bread
- ½ cup unsalted butter
- 1 medium onion, finely chopped
- 2 celery stalks, finely chopped
- 2 cloves garlic, minced
- 1½ cups chicken or vegetable broth
- 2 large eggs, beaten
- 2 tablespoons fresh parsley, chopped
- 1 teaspoon fresh thyme leaves, or ½ teaspoon dried thyme
- 1 teaspoon dried sage
- ½ teaspoon salt, or to taste
- ¼ teaspoon black pepper
- ½ cup cranberry sauce, for topping
- Fresh thyme sprigs, for garnish (optional)
- Cooking spray or extra butter, for greasing the muffin tin
Instructions
1. Prepare the oven and muffin tin
Preheat the oven to 375°F (190°C). Lightly grease a 12-cup muffin tin with cooking spray or butter, making sure to coat the bottoms and sides. This helps the stuffing muffins develop golden edges and release easily after baking.
2. Toast the bread cubes
Spread the bread cubes on a baking sheet and toast them in the oven for 8–10 minutes until lightly crisp and dry. If your bread is already very dry, you can skip this step. Transfer the cubes to a large mixing bowl and allow them to cool slightly.
3. Sauté the vegetables
Melt the butter in a large skillet over medium heat. Add the chopped onion and celery and cook for 5–7 minutes, stirring occasionally, until softened. Stir in the minced garlic, thyme, and sage, then cook for another minute until fragrant. These vegetables and herbs create the classic savory flavor of stuffing.
4. Combine the stuffing ingredients
Pour the sautéed vegetable mixture over the toasted bread cubes. Add the chopped parsley, salt, and black pepper, then toss gently to distribute the ingredients evenly. In a separate bowl, whisk together the beaten eggs and broth before pouring the mixture over the bread. Stir until the bread is evenly moistened but not swimming in liquid.
5. Fill the muffin cups
Spoon the stuffing mixture into the prepared muffin tin, dividing it evenly among the 12 cups. Press each portion gently with the back of a spoon so the mixture holds together, while leaving the tops slightly uneven for a rustic, crispy finish.
6. Bake until golden and crisp
Bake for 25–30 minutes, or until the tops are golden brown and crisp and the centers are set. If you are using a food thermometer, ensure the center reaches 165°F (74°C). Allow the muffins to rest in the tin for 5 minutes so they firm up before removing them carefully.
7. Add the cranberry topping
Transfer the warm stuffing muffins to a serving plate or shiny white rectangular tray. Spoon a small dab of cranberry sauce onto the center of each muffin. The sweet-tart cranberry topping complements the buttery herbs and savory bread beautifully.
8. Garnish and serve
Finish with small sprigs of fresh thyme or a light sprinkle of chopped parsley. Arrange the mini stuffing muffins neatly on the tray and serve warm as a Thanksgiving appetizer or holiday party snack. They are easy to pick up and enjoy without needing cutlery.
Tip
For extra-crispy edges, press the stuffing mixture firmly into the muffin cups and brush the tops lightly with melted butter before baking. You can prepare the bread and vegetable mixture a day ahead, refrigerate it, and bake the muffins shortly before serving. Add the cranberry topping just before presenting them to keep the tops crisp and attractive.
7. Prosciutto-Wrapped Pears
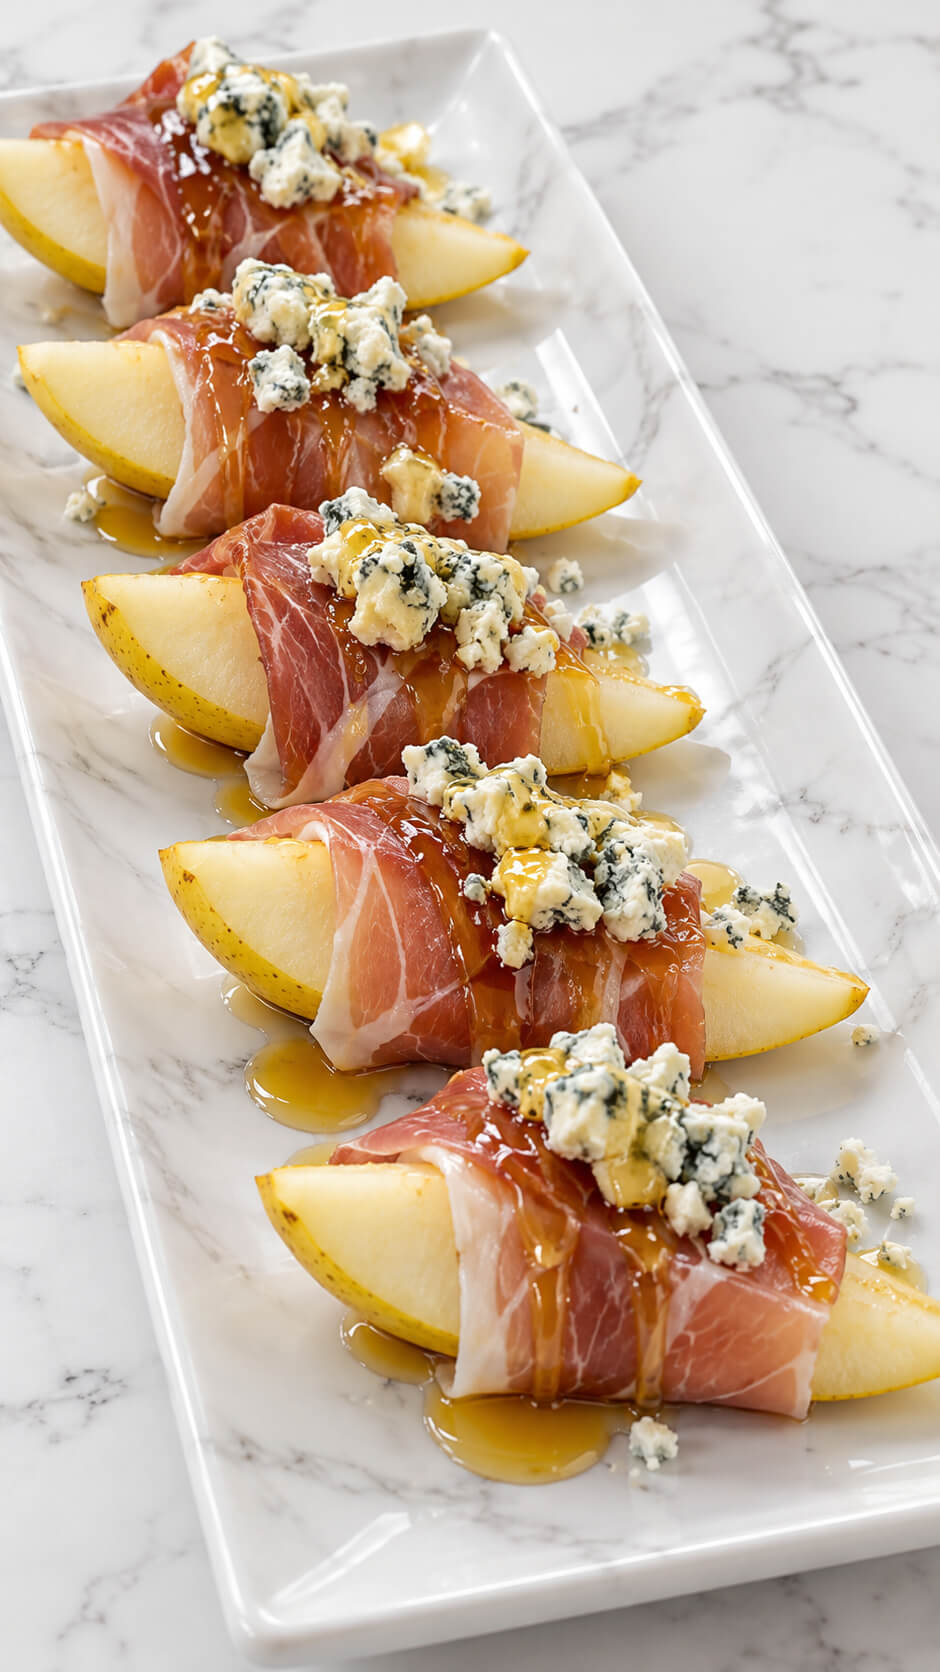
Sweet pear slices wrapped in silky prosciutto are the easiest way to look like a culinary genius.
Add a sprinkle of blue cheese or a drizzle of honey for extra sophistication.
The balance of salty, sweet, and creamy makes them utterly addictive—and totally elegant.
8. Deviled Eggs with a Twist
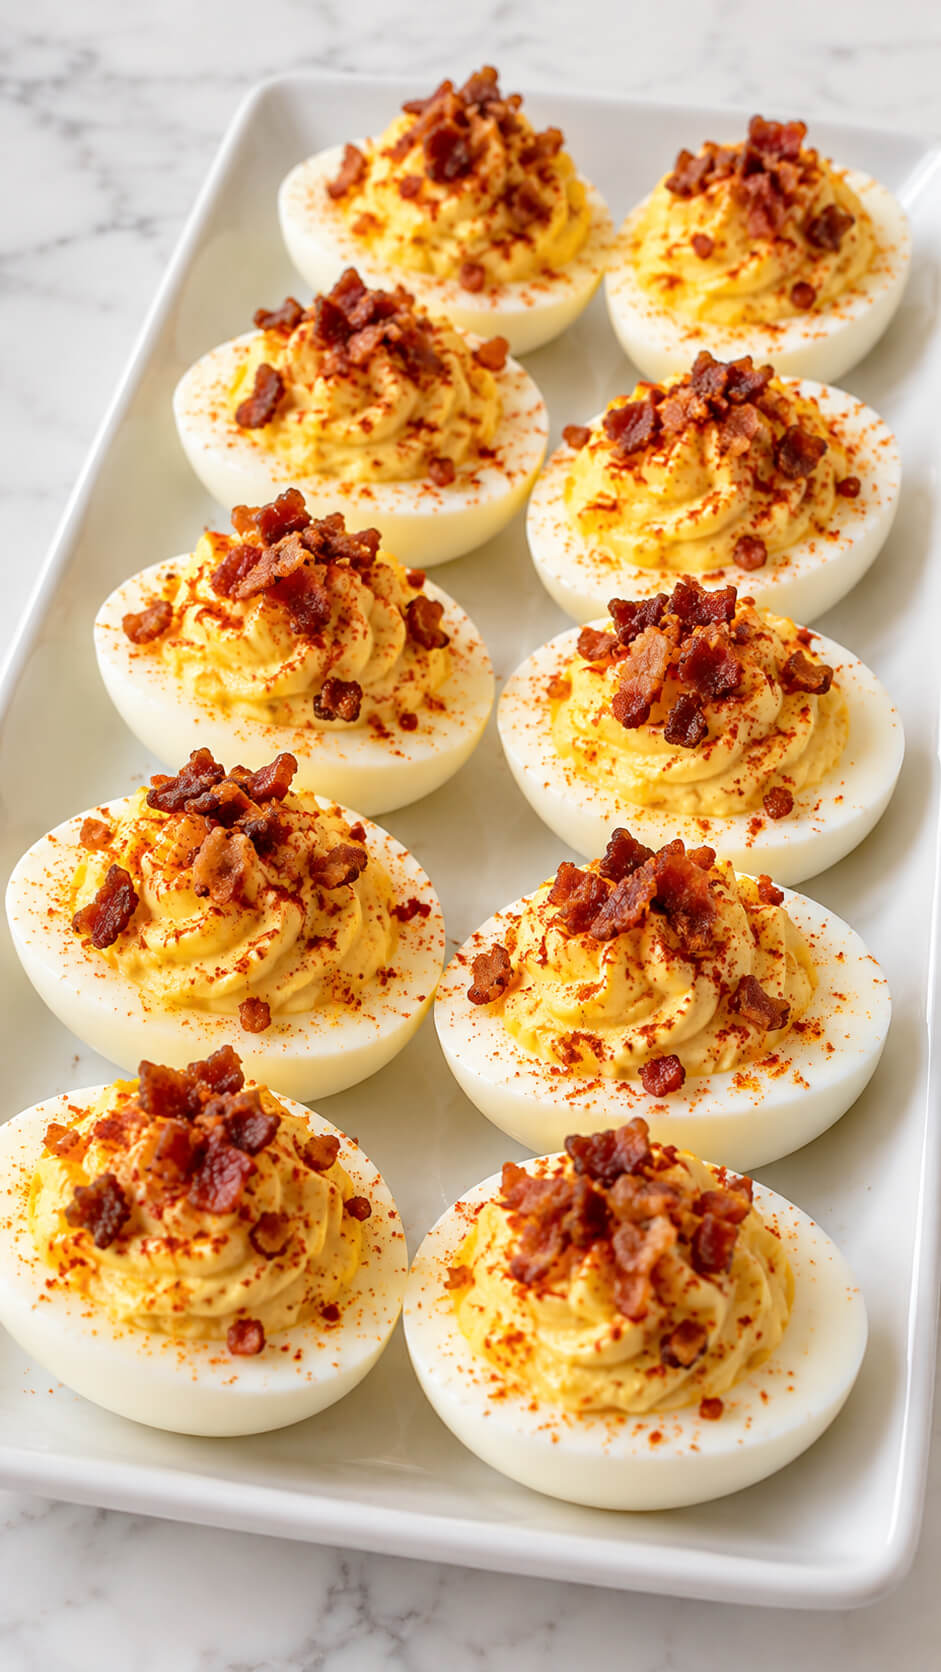
A Thanksgiving upgrade to a timeless favorite!
Mix your yolks with Dijon mustard, smoked paprika, and crispy bacon bits.
The result? Creamy, savory perfection with a little crunch.
Arrange them on a platter and watch them disappear faster than pumpkin pie.
Ingredients
- 6 large eggs
- 3 tablespoons mayonnaise
- 1 teaspoon Dijon mustard
- 1 teaspoon apple cider vinegar or lemon juice
- ¼ teaspoon salt, or to taste
- ⅛ teaspoon black pepper
- ¼ teaspoon smoked paprika, plus extra for garnish
- 3 slices bacon, cooked until crispy and finely chopped
- 1 teaspoon chopped fresh chives (optional)
Instructions
1. Boil the eggs
Place the eggs in a saucepan and cover them with cold water. Bring the water to a boil, then reduce the heat slightly and cook for 10–12 minutes until the eggs are hard-boiled. Transfer the eggs to a bowl of ice water and let them cool for about 5 minutes before peeling.
2. Prepare the crispy bacon
Cook the bacon in a skillet over medium heat for 6–8 minutes, turning occasionally until it is golden brown and crispy. Transfer it to a paper towel-lined plate to drain excess grease. Once cooled, chop the bacon into small pieces suitable for topping the eggs.
3. Cut and separate the eggs
Peel the cooled eggs and slice each one lengthwise in half. Carefully remove the yolks and place them in a medium bowl. Arrange the egg white halves on a clean serving plate or white ceramic tray, with the hollow centers facing upward.
4. Make the creamy yolk filling
Mash the egg yolks with a fork until they are fine and crumbly. Add the mayonnaise, Dijon mustard, apple cider vinegar, salt, black pepper, and ¼ teaspoon smoked paprika. Mix thoroughly until the filling is smooth, creamy, and evenly seasoned.
5. Fill the egg whites
Spoon the yolk mixture into the hollow centers of the egg whites. For a more polished presentation, transfer the filling to a piping bag fitted with a star-shaped nozzle and pipe a generous swirl into each egg half.
6. Add the bacon and paprika
Sprinkle the crispy bacon bits evenly over the creamy filling. Finish each egg with a light dusting of smoked paprika for a warm reddish color and smoky flavor. Add a little chopped fresh chives if desired.
7. Arrange and serve the deviled eggs
Arrange the finished eggs neatly in rows on a white ceramic tray. Keep the tray simple so the golden filling, crisp bacon, and paprika stand out. Serve chilled or slightly cool for a delicious Thanksgiving appetizer.
Tip
For the smoothest filling, mash the yolks thoroughly before adding the other ingredients, or press them through a fine-mesh sieve. Prepare the eggs and filling a day ahead, then refrigerate them in an airtight container. Add the crispy bacon and final paprika garnish just before serving to preserve the bacon’s crunch.
9. Mini Crab Cakes with Lemon Aioli
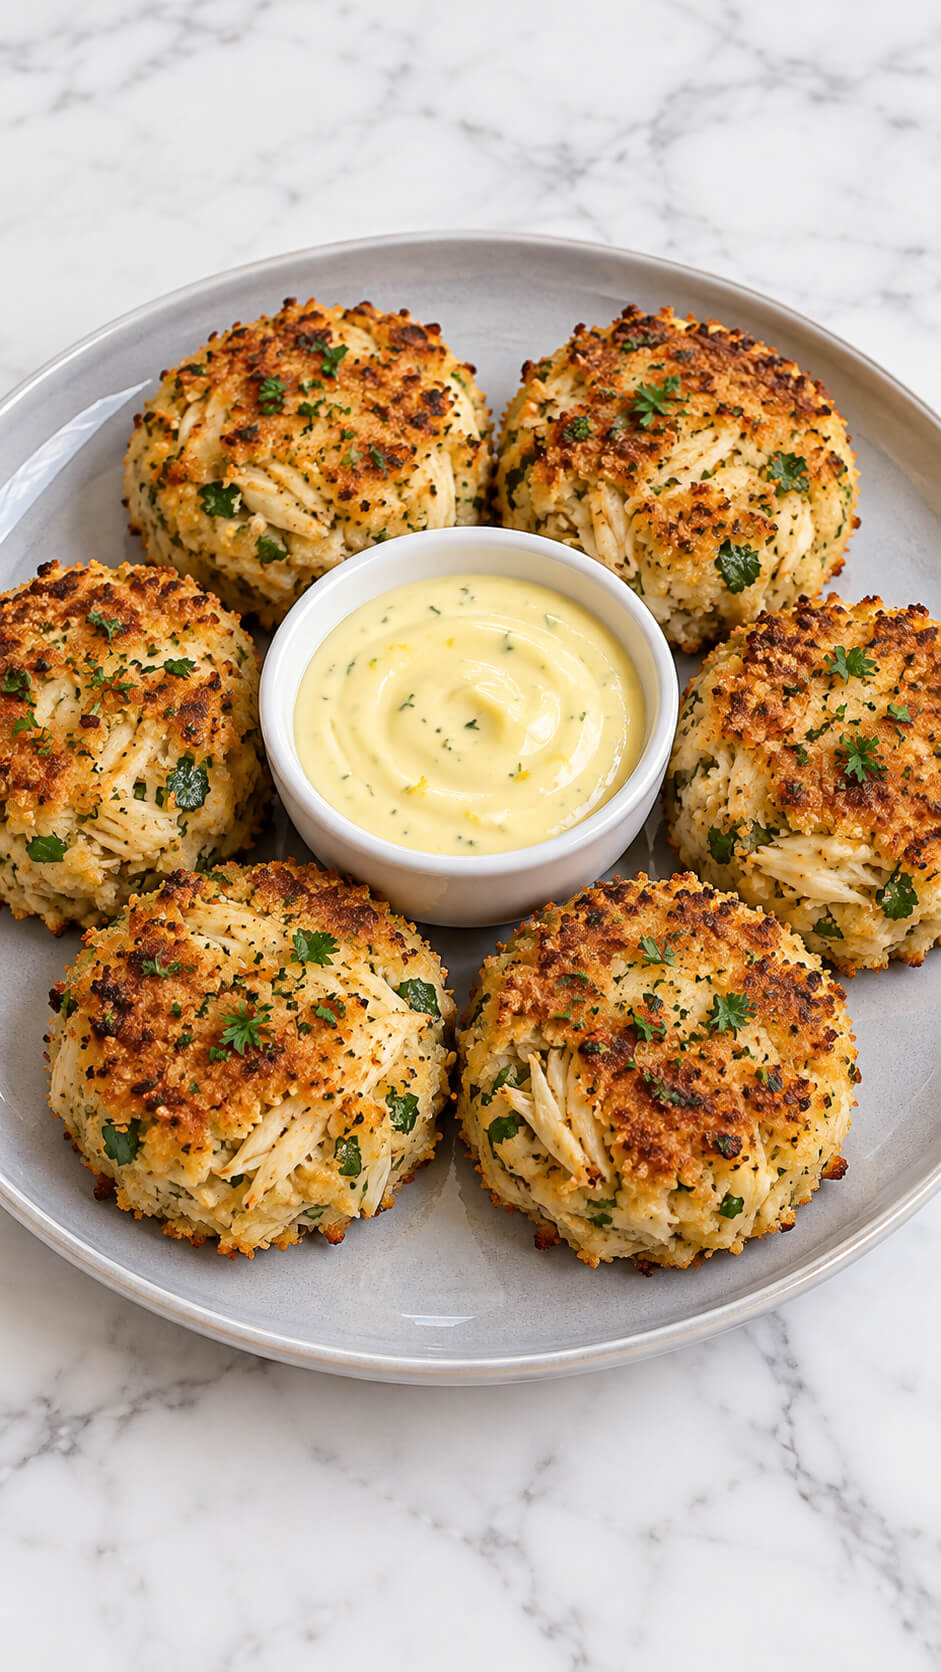
Golden, crispy crab cakes in bite-sized form feel luxurious but never fussy.
They’re tender inside, crunchy outside, and made even better with a zesty lemon aioli for dipping.
Serve them warm with a sprig of dill—your guests will think you hired a caterer.
Ingredients
- 1 lb (450 g) lump crab meat, drained and picked over for shells
- 1 cup panko breadcrumbs
- 1 large egg
- ¼ cup mayonnaise
- 1 tablespoon Dijon mustard
- 1 tablespoon fresh lemon juice
- 2 tablespoons finely chopped fresh parsley
- 1 tablespoon finely chopped fresh chives
- 1 teaspoon Worcestershire sauce
- ½ teaspoon paprika
- ¼ teaspoon garlic powder
- ½ teaspoon salt, or to taste
- ¼ teaspoon black pepper
- 3 tablespoons olive oil or butter, for frying
For the lemon aioli
- ½ cup mayonnaise
- 1 tablespoon fresh lemon juice
- 1 teaspoon lemon zest
- 1 small garlic clove, finely minced
- 1 teaspoon Dijon mustard
- ⅛ teaspoon salt
- ⅛ teaspoon black pepper
Instructions
1. Prepare the crab meat
Drain the crab meat thoroughly and gently pick through it to remove any remaining shell fragments. If the crab meat contains excess moisture, pat it dry with paper towels. Keep the meat in large pieces as much as possible to preserve its tender texture.
2. Mix the crab cake binder
In a large mixing bowl, whisk together the egg, mayonnaise, Dijon mustard, lemon juice, Worcestershire sauce, paprika, garlic powder, salt, and black pepper. Stir until the mixture is smooth and evenly combined.
3. Add the herbs and breadcrumbs
Fold the chopped parsley, chives, and panko breadcrumbs into the binder mixture. Add the crab meat and gently fold everything together with a spatula. Avoid overmixing, as keeping the crab meat in larger pieces gives the finished cakes a better texture.
4. Shape the crab cakes
Divide the mixture into six equal portions and shape each portion into a round cake about ¾ inch thick. Press each cake gently so it holds together without becoming too compact. Place the cakes on a lined plate or tray.
5. Chill the crab cakes
Refrigerate the shaped crab cakes for 20–30 minutes. Chilling helps the breadcrumbs absorb moisture and allows the cakes to firm up, making them easier to turn during cooking without breaking apart.
6. Prepare the lemon aioli
In a small bowl, combine the mayonnaise, lemon juice, lemon zest, minced garlic, Dijon mustard, salt, and black pepper. Stir until smooth and creamy. Taste and adjust the lemon juice or seasoning as desired, then refrigerate until ready to serve.
7. Heat the frying pan
Place a large nonstick or heavy-bottomed skillet over medium heat. Add the olive oil or butter and allow it to heat until shimmering. The pan should be hot enough to create a golden crust but not so hot that the breadcrumbs burn before the centers are warmed through.
8. Fry the crab cakes until golden brown
Arrange the crab cakes in the skillet without overcrowding the pan, working in batches if necessary. Cook for approximately 4–5 minutes on the first side, until a deep golden-brown crust forms. Carefully flip each cake and cook for another 4–5 minutes, until the second side is crisp and the centers are thoroughly heated. Transfer to a paper towel-lined plate briefly to remove excess oil.
9. Arrange the crab cakes on a serving plate
Place the six golden-brown crab cakes in a circular pattern on a large, light-gray ceramic serving plate. Position a small white bowl of lemon aioli in the center. Arrange the cakes evenly around the bowl, with their crisp surfaces and green herb flecks facing upward for an attractive presentation.
10. Serve the crab cakes
Serve the crab cakes immediately while the crust is crisp and the centers are tender. Place the lemon aioli in the middle so everyone can dip each cake into the creamy, tangy sauce. Add extra lemon wedges on the side if desired.
Tip
For the best crab cakes, use lump crab meat and handle it gently to preserve its natural texture. If the mixture feels too wet to hold its shape, add 1–2 tablespoons of panko breadcrumbs and chill it before frying. For an extra-crispy crust, use a combination of butter and olive oil, and avoid flipping the cakes before the first side is fully golden.
10. Caramelized Onion Tartlets
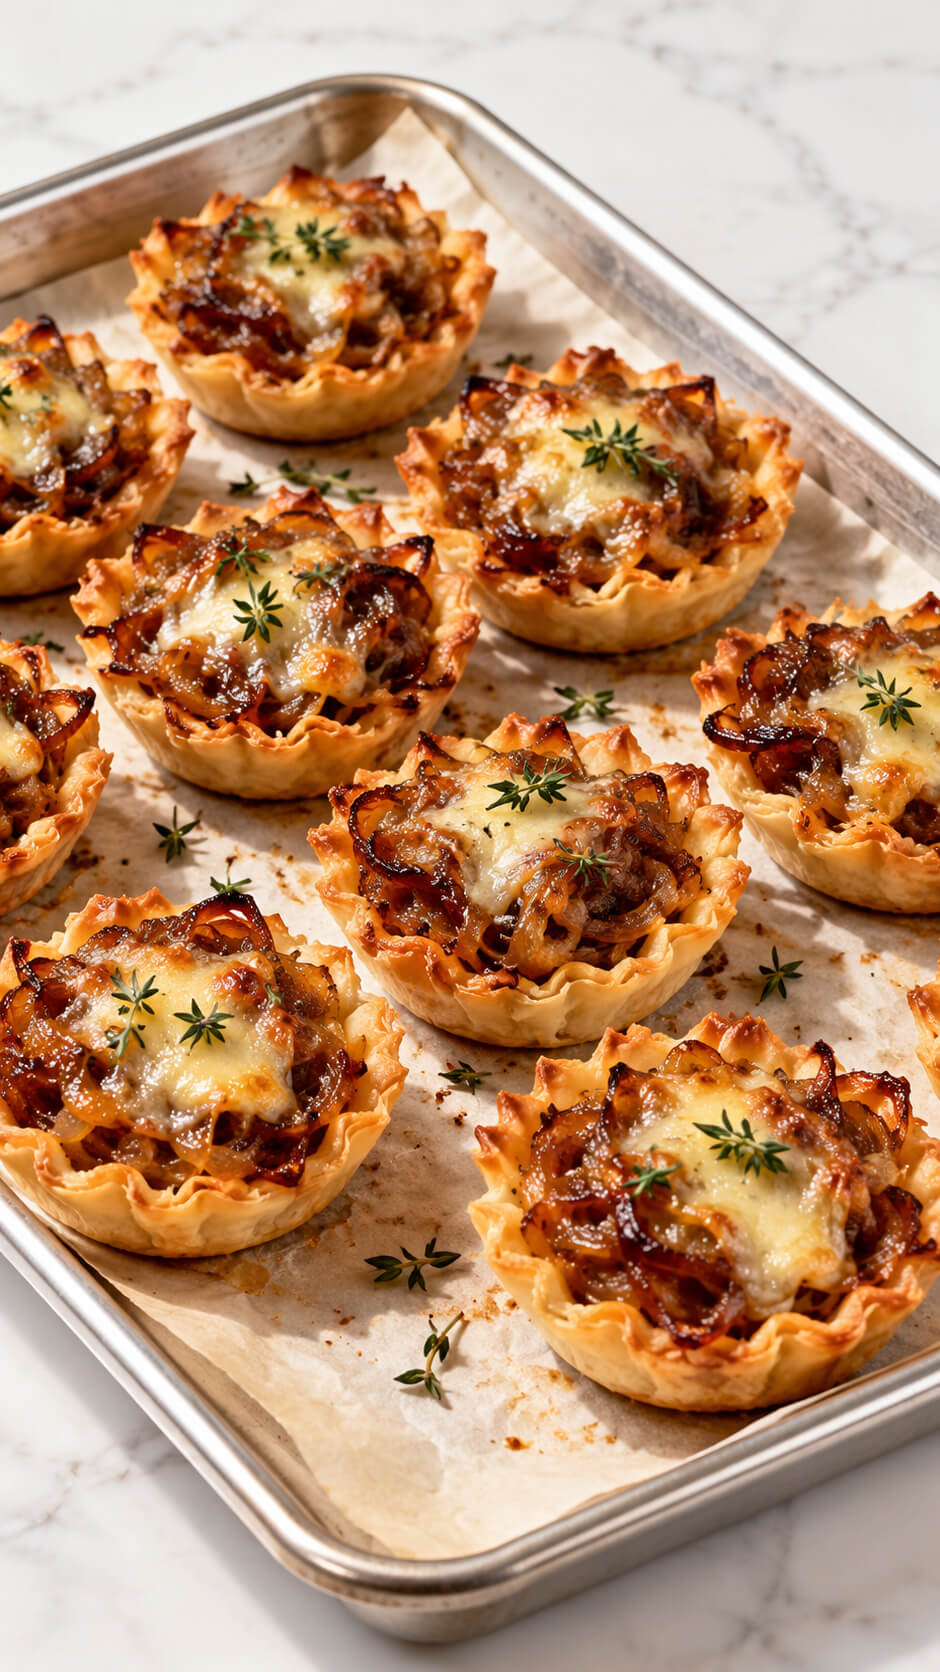
Rich, sweet caramelized onions and melty Gruyère cheese nestled in flaky pastry shells—these tartlets are tiny bites of pure comfort.
The buttery crust balances beautifully with the deep, savory filling.
Add a pinch of thyme, and you’ve got elegance in every bite.
Ingredients
- 1 sheet (about 250–320 g) frozen puff pastry, thawed
- 3 medium yellow onions, thinly sliced
- 1 tablespoon olive oil
- 2 tablespoons unsalted butter
- 1 teaspoon brown sugar (optional)
- 1 tablespoon balsamic vinegar
- 150 g Gruyère cheese, grated
- 1 teaspoon fresh thyme leaves, plus extra for garnish
- ½ teaspoon salt, or to taste
- ¼ teaspoon freshly ground black pepper
- 1 egg, beaten, for brushing the pastry
- 1 teaspoon all-purpose flour, for dusting the work surface
Equipment
- Baking tray
- Parchment paper
- Frying pan
- Small round pastry cutter or knife
- Pastry brush
Instructions
1. Prepare the pastry
Preheat the oven to 200°C (400°F). Line a baking tray with parchment paper. Lightly dust your work surface with flour, then unfold the thawed puff pastry and gently roll it out to an even thickness. Cut it into 18–24 small rounds or squares, approximately 5–6 cm wide, and arrange them on the prepared tray.
2. Slice the onions
Peel the onions and slice them thinly into even strips. Thin slices cook more evenly and soften into the tender, sweet filling that gives these tartlets their rich flavor.
3. Caramelize the onions
Heat the olive oil and butter in a large frying pan over medium-low heat. Add the sliced onions and salt, then cook for 25–30 minutes, stirring regularly, until the onions become soft, deeply golden brown, and sweet. Reduce the heat if they start browning too quickly.
4. Add the balsamic vinegar and thyme
Stir the brown sugar, if using, into the caramelized onions. Add the balsamic vinegar, black pepper, and fresh thyme leaves. Cook for another 2–3 minutes until the vinegar reduces and coats the onions. Remove the pan from the heat and allow the filling to cool slightly.
5. Prepare the pastry bases
Arrange the pastry pieces on the lined baking tray, leaving a little space between each one. Use a fork to prick the center of each piece several times, leaving a small border around the edges. This helps the centers remain flatter while the edges puff up during baking.
6. Add the caramelized onion filling
Spoon a small amount of the cooled onion mixture onto the center of each pastry piece. Spread the onions evenly without covering the edges. Keep the filling modest so the tartlets hold their shape and the pastry remains crisp.
7. Sprinkle with Gruyère cheese
Distribute the grated Gruyère cheese evenly over the caramelized onions. The cheese melts into the filling, creating a creamy, savory topping that complements the sweetness of the onions.
8. Brush the pastry edges
Lightly brush the exposed pastry borders with the beaten egg. This gives the tartlets a beautiful golden finish and helps the edges develop a crisp, flaky texture as they bake.
9. Bake the tartlets
Place the tray in the preheated oven and bake for 15–20 minutes, or until the pastry is puffed and golden brown and the Gruyère cheese is melted and lightly browned. Keep an eye on them during the final few minutes to prevent the edges from becoming too dark.
10. Garnish and serve
Remove the tartlets from the oven and let them rest on the tray for 3–5 minutes. Sprinkle with a few fresh thyme leaves, then transfer them to a serving platter. Serve warm while the pastry is crisp and the cheese is soft and melted.
Tip
For the best flavor, caramelize the onions slowly over medium-low heat rather than rushing them over high heat. Their natural sugars develop gradually, producing a deeper sweetness and richer color. You can prepare the onion filling a day ahead and refrigerate it, then assemble and bake the tartlets shortly before serving for a fresh, flaky finish.
11. Sausage-Stuffed Mushrooms
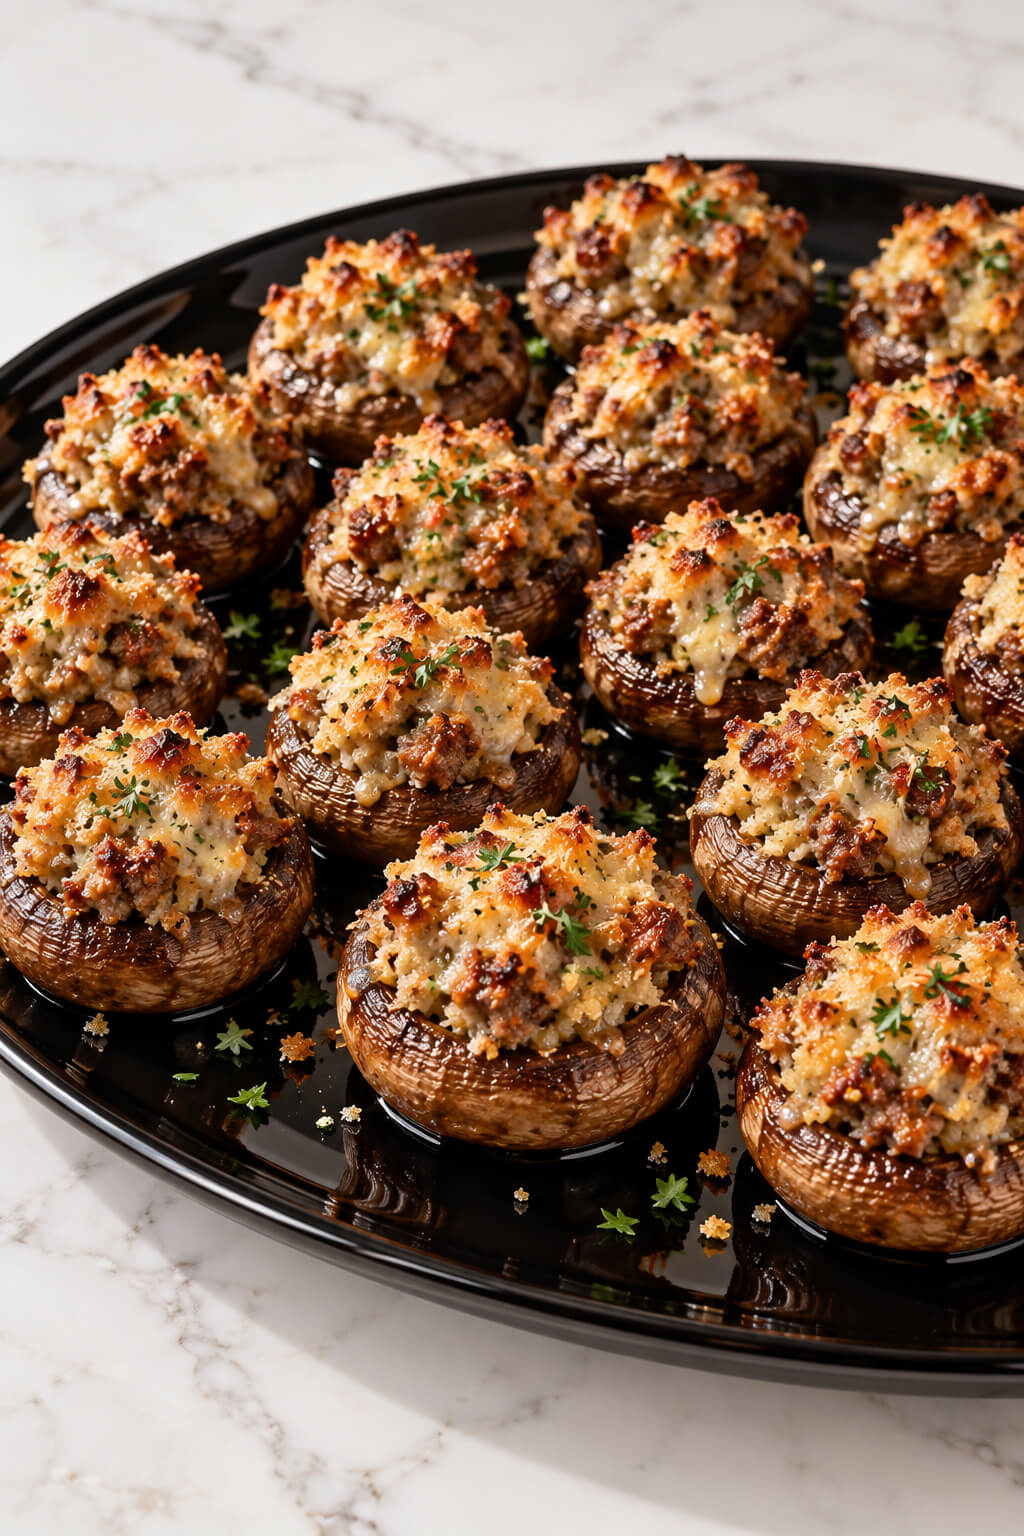
These are hearty, flavorful, and nearly impossible to stop eating.
Juicy mushrooms are filled with a mixture of herbed sausage, breadcrumbs, and Parmesan, then baked until golden.
They’re the kind of appetizer that earns you recipe requests year after year.
Ingredients
- 500 g (about 1 lb) medium-to-large button or cremini mushrooms
- 250 g (½ lb) Italian sausage, casings removed
- ½ cup breadcrumbs
- ½ cup freshly grated Parmesan cheese
- 2 cloves garlic, minced
- 2 tablespoons cream cheese, softened
- 2 tablespoons fresh parsley, finely chopped
- 1 teaspoon fresh thyme leaves
- 2 tablespoons olive oil
- ¼ teaspoon black pepper
- ¼ teaspoon salt, or to taste
- ¼ teaspoon red pepper flakes (optional)
Instructions
1. Preheat the oven
Preheat your oven to 190°C (375°F). Line a baking tray with parchment paper or lightly grease it with olive oil. This prevents the mushrooms from sticking and makes cleanup easier.
2. Clean and prepare the mushrooms
Gently wipe the mushrooms with a damp paper towel to remove any dirt. Twist or carefully remove the stems, leaving the mushroom caps intact. Finely chop the stems and set them aside to add extra flavor and texture to the sausage filling.
3. Cook the sausage
Heat a tablespoon of olive oil in a frying pan over medium heat. Add the sausage, breaking it into small pieces with a wooden spoon. Cook for 6–8 minutes until browned and cooked through, then transfer it to a bowl. Cooking the sausage first develops a rich, savory flavor for the filling.
4. Sauté the mushroom stems and garlic
Add the chopped mushroom stems to the same pan and cook for 3–4 minutes until softened and their moisture has mostly evaporated. Stir in the minced garlic and cook for another 30–60 seconds until fragrant. Allowing excess moisture to evaporate helps keep the filling from becoming soggy.
5. Mix the stuffing ingredients
Combine the cooked sausage, sautéed mushroom stems, garlic, breadcrumbs, Parmesan cheese, cream cheese, parsley, thyme, black pepper, and red pepper flakes if using. Mix until the ingredients are evenly distributed and the filling holds together when pressed. Taste and add salt if needed.
6. Fill the mushroom caps
Arrange the mushroom caps on the prepared baking tray with the hollow sides facing upward. Lightly brush them with the remaining olive oil, then spoon the sausage mixture into each cap. Gently mound the filling on top without packing it too tightly.
7. Bake the stuffed mushrooms
Bake for 20–25 minutes, until the mushrooms are tender, the filling is golden brown, and the sausage mixture is thoroughly heated. For extra color, switch to the oven grill or broiler for the final 1–2 minutes, watching carefully to prevent burning. The sausage filling should reach 71°C (160°F) if made with pork sausage.
8. Garnish and serve
Remove the mushrooms from the oven and let them rest for 3–5 minutes. Sprinkle with additional Parmesan cheese and chopped fresh parsley, if desired. Arrange them on a large, glossy black platter for an elegant presentation, and serve warm while the filling is juicy and flavorful.
Tip
For the best results, choose mushrooms of similar size so they cook evenly, and cook the chopped mushroom stems until most of their moisture has evaporated. You can prepare the sausage filling a day ahead and refrigerate it in an airtight container. Stuff the mushrooms just before baking for a delicious appetizer with a golden top and tender, juicy center.
12. Apple Cheddar Crostini
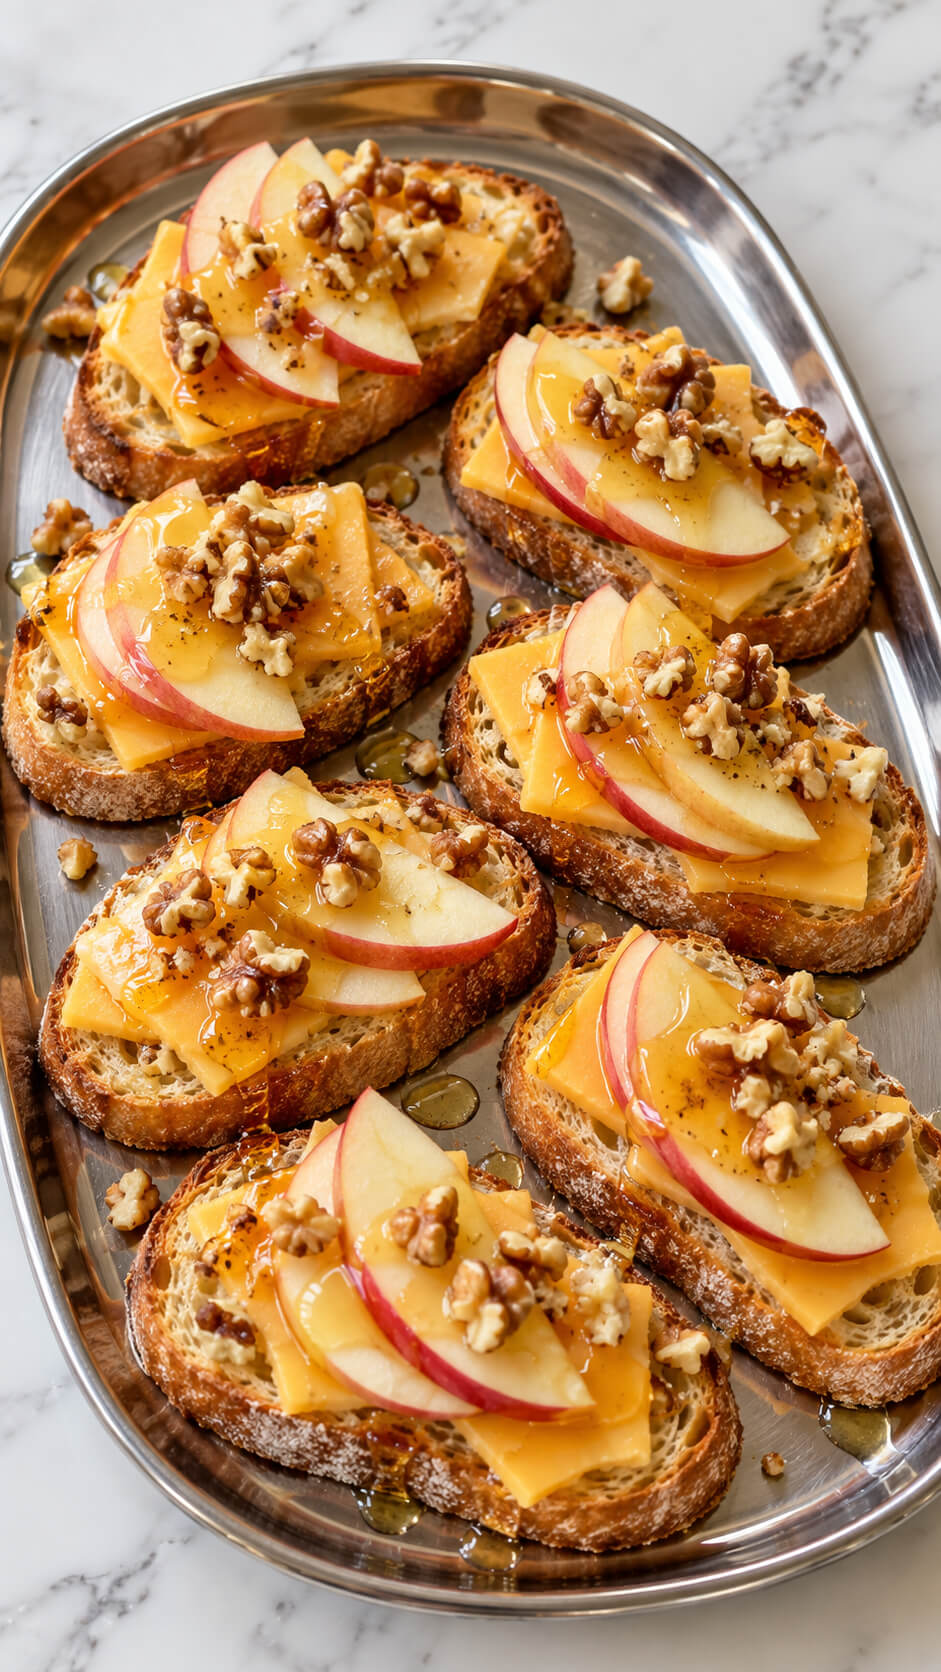
A little sweet, a little savory, and all kinds of delicious.
Toasted baguette slices topped with sharp cheddar, crisp apple slices, and a drizzle of honey make a quick, colorful appetizer.
Garnish on top with crushed walnuts.
It’s the ideal balance of flavors—and the perfect nod to fall.
13. Spinach and Artichoke Dip Cups
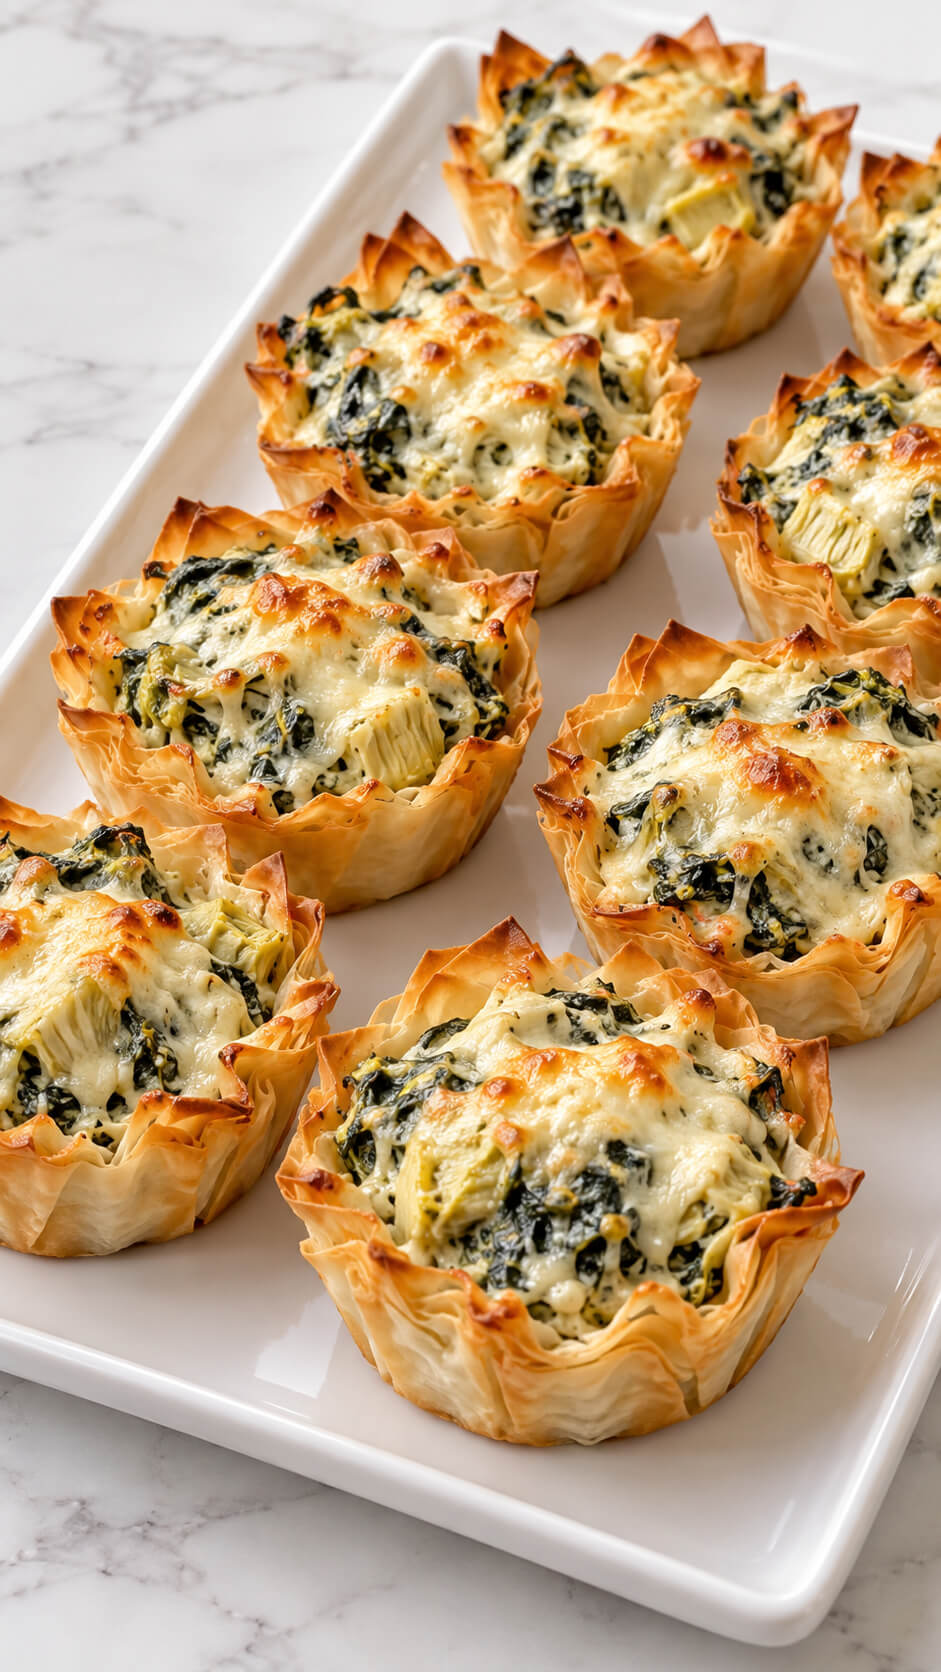
Your favorite creamy dip, but make it bite-sized!
Spoon spinach and artichoke dip into crispy phyllo shells and bake until bubbly.
They’re warm, cheesy, and perfectly portioned for guests to enjoy without spoons or double-dipping drama.
Serve hot and watch them vanish.
Ingredients
- 24 mini phyllo pastry shells
- 1 cup frozen chopped spinach, thawed and squeezed dry
- 1 cup canned or jarred artichoke hearts, drained and finely chopped
- 4 oz (115 g) cream cheese, softened
- ½ cup sour cream
- ½ cup shredded mozzarella cheese
- ¼ cup grated Parmesan cheese
- 2 cloves garlic, minced
- ¼ teaspoon salt, or to taste
- ¼ teaspoon black pepper
- ¼ teaspoon onion powder
- 1 tablespoon olive oil or melted butter, optional for brushing the pastry shells
Instructions
1. Preheat the oven
Preheat your oven to 375°F (190°C). Arrange the mini phyllo pastry shells on a baking tray or oven-safe rectangular serving tray, leaving a little space between each cup to allow for even heating.
2. Prepare the spinach and artichokes
Thaw the frozen spinach completely and squeeze out as much liquid as possible using a clean kitchen towel or paper towels. Drain and finely chop the artichoke hearts. Removing excess moisture helps keep the phyllo pastry crisp instead of soggy.
3. Mix the creamy filling
In a medium-sized bowl, combine the softened cream cheese, sour cream, minced garlic, salt, black pepper, and onion powder. Stir until smooth and creamy. Add the prepared spinach, chopped artichokes, mozzarella, and Parmesan cheese, then mix until all the ingredients are evenly distributed.
4. Fill the phyllo pastry cups
Spoon the spinach and artichoke mixture into each phyllo shell, filling the cups almost to the top. Spread the filling gently so that each cup contains a generous amount of the creamy mixture without overflowing over the delicate pastry edges.
5. Bake the filled pastry cups
Place the tray in the preheated oven and bake for 12–18 minutes, or until the filling is hot and bubbly, the mozzarella has melted, and the pastry edges are crisp and golden brown. If using larger or homemade phyllo cups, allow additional baking time as needed.
6. Check the cheese and pastry
Check that the filling is heated through and the pastry shells are crisp. The cheese should look melted, with a few lightly golden spots on the surface. If the tops need more color, bake for another 1–2 minutes while watching closely to prevent the delicate pastry from burning.
7. Cool and serve the phyllo cups
Remove the tray from the oven and allow the cups to rest for 3–5 minutes. This helps the filling settle slightly and makes the cups easier to handle. Serve warm on a clean white rectangular platter for an attractive presentation.
Tip
For the crispiest phyllo cups, squeeze the spinach completely dry before mixing the filling. You can also brush the pastry edges lightly with melted butter or olive oil before baking for extra golden color and a delicate, flaky texture. For a stronger cheesy flavor, sprinkle a little extra Parmesan over the filling before placing the tray in the oven.
14. Pecan-Crusted Goat Cheese Balls
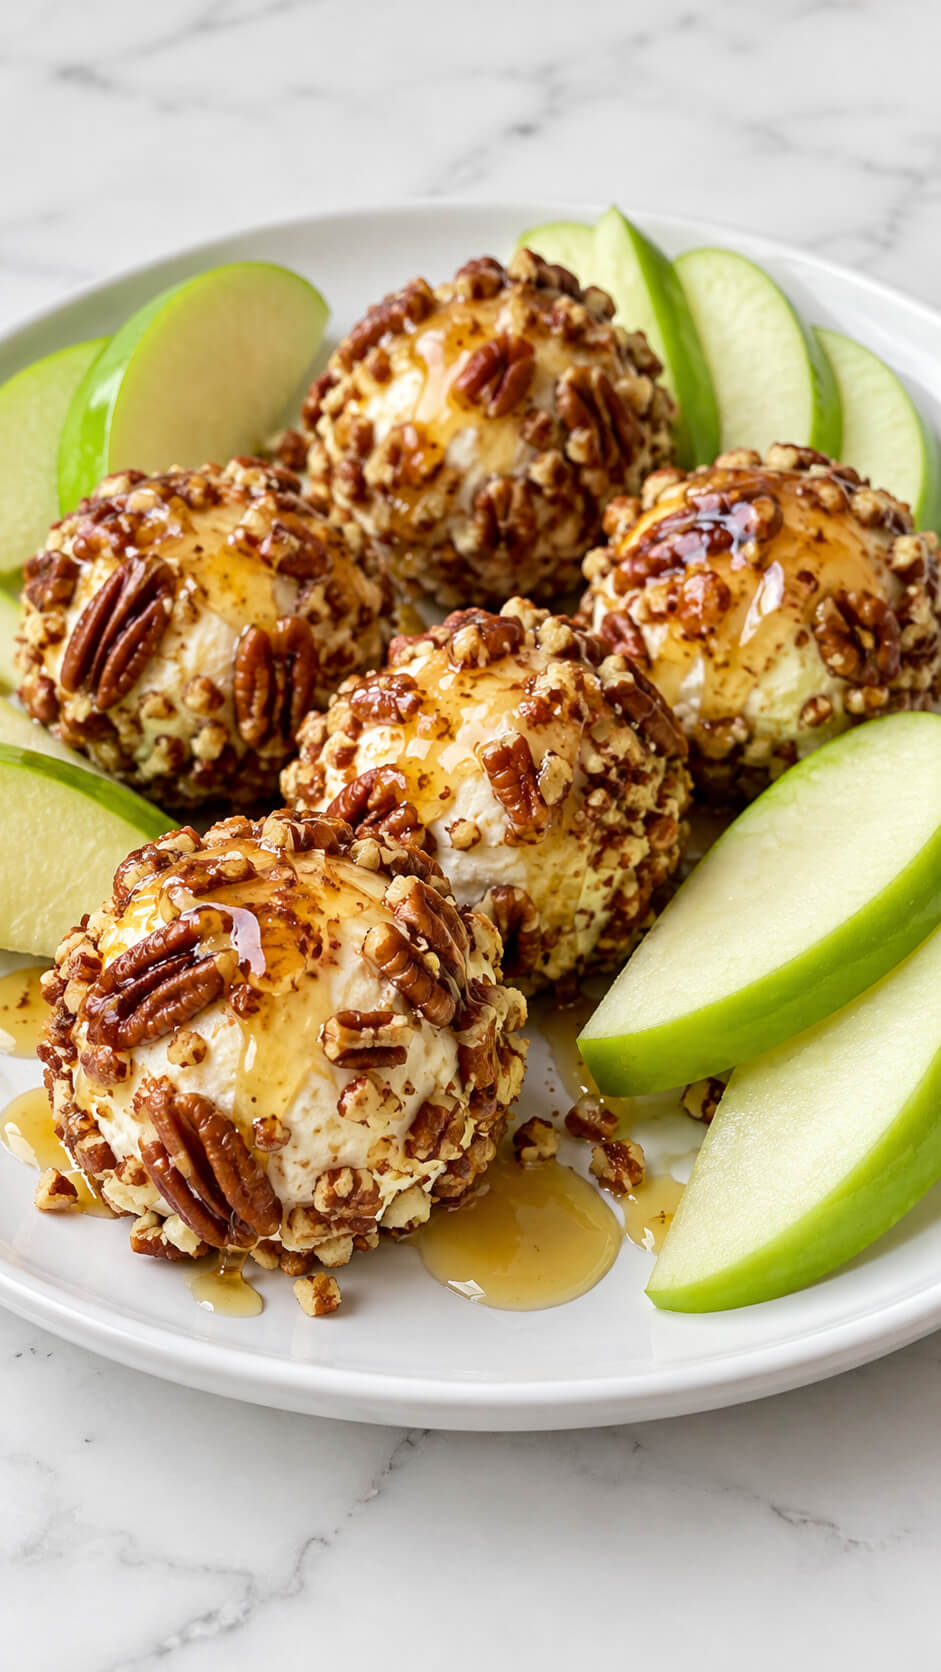
Fancy-looking but secretly effortless.
Roll soft goat cheese in toasted pecans, drizzle with honey, and serve with apple slices or crackers.
They’re creamy, nutty, and just a little tangy—the kind of appetizer that disappears while you’re still setting out napkins.
15. Roasted Grape and Ricotta Crostini
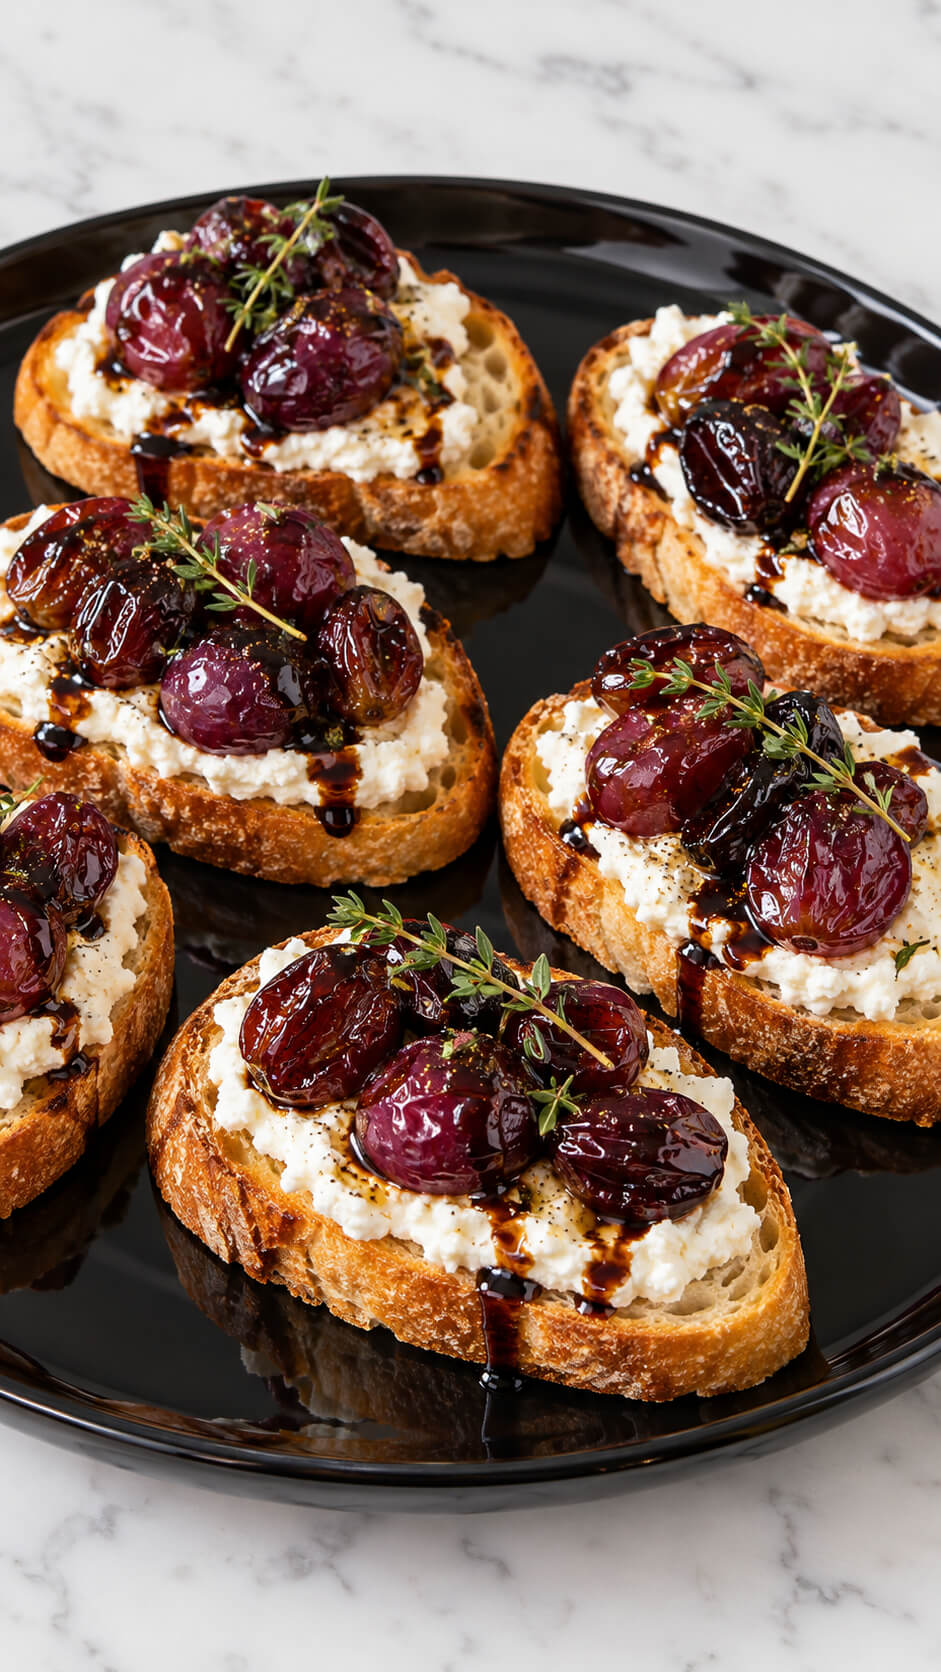
Unexpected and elegant, these crostini are pure autumn charm.
Roasted grapes become sweet and jammy, pairing beautifully with whipped ricotta on crunchy baguette slices.
Finish with a drizzle of balsamic glaze for a show-stopping appetizer that tastes as good as it looks.
Ingredients
- 1 French baguette, sliced into ½-inch rounds
- 1½ cups red or purple seedless grapes
- 1 cup whole-milk ricotta cheese
- 2 tablespoons olive oil, divided
- 2 tablespoons balsamic glaze
- 4–6 fresh thyme sprigs, plus extra leaves for garnish
- 1 tablespoon honey (optional)
- ¼ teaspoon salt, or to taste
- ⅛ teaspoon freshly ground black pepper
Instructions
1. Preheat the oven
Preheat your oven to 400°F (200°C). Line a baking sheet with parchment paper. This temperature allows the grapes to soften and caramelize while the baguette becomes golden and crispy.
2. Prepare the grapes
Wash and thoroughly dry the grapes, then place them in a bowl. Toss with 1 tablespoon of olive oil, salt, black pepper, and the thyme sprigs. Add the honey if you prefer a sweeter, more caramelized flavor.
3. Roast the grapes
Spread the seasoned grapes in a single layer on the prepared baking sheet. Roast for 15–20 minutes, stirring gently halfway through, until the grapes are softened, slightly wrinkled, and beginning to release their juices. Remove them from the oven and set aside.
4. Toast the baguette slices
Arrange the baguette slices on another baking sheet and brush both sides lightly with the remaining olive oil. Bake at 400°F (200°C) for 5–8 minutes, turning once, until the slices are golden brown and crisp around the edges.
5. Prepare the ricotta cheese
Place the ricotta in a small bowl and stir until smooth and creamy. If the cheese is very thick, mix in a small drizzle of olive oil. Taste and add a little salt and black pepper as needed to enhance its mild, milky flavor.
6. Spread the ricotta on the crostini
Allow the toasted baguette slices to cool slightly, then spread a generous layer of ricotta over each slice. Cover the surface evenly, leaving a little of the golden crust visible around the edges for an attractive presentation.
7. Add the roasted grapes
Arrange several warm roasted grapes on top of each ricotta-covered baguette slice. Spoon a small amount of the roasted grape juices over the toppings for extra sweetness and a rich, fruity flavor.
8. Drizzle with balsamic glaze
Drizzle the balsamic glaze lightly over each crostini. The sweet, tangy glaze complements the creamy ricotta and caramelized grapes without overpowering their delicate flavors.
9. Garnish and serve
Finish with fresh thyme leaves and, if desired, a small pinch of freshly ground black pepper. Arrange the crostini on a glossy black round platter and serve immediately while the bread is crisp and the grapes are still slightly warm.
Tip
For the best results, use whole-milk ricotta and roast the grapes until they are just wrinkled and juicy, not completely collapsed. Assemble the crostini just before serving to prevent the baguette from becoming soggy. For an extra touch of elegance, add a few flakes of sea salt and a little lemon zest to brighten the creamy, sweet, and tangy flavors.
16. Turkey Meatballs with Cranberry Glaze
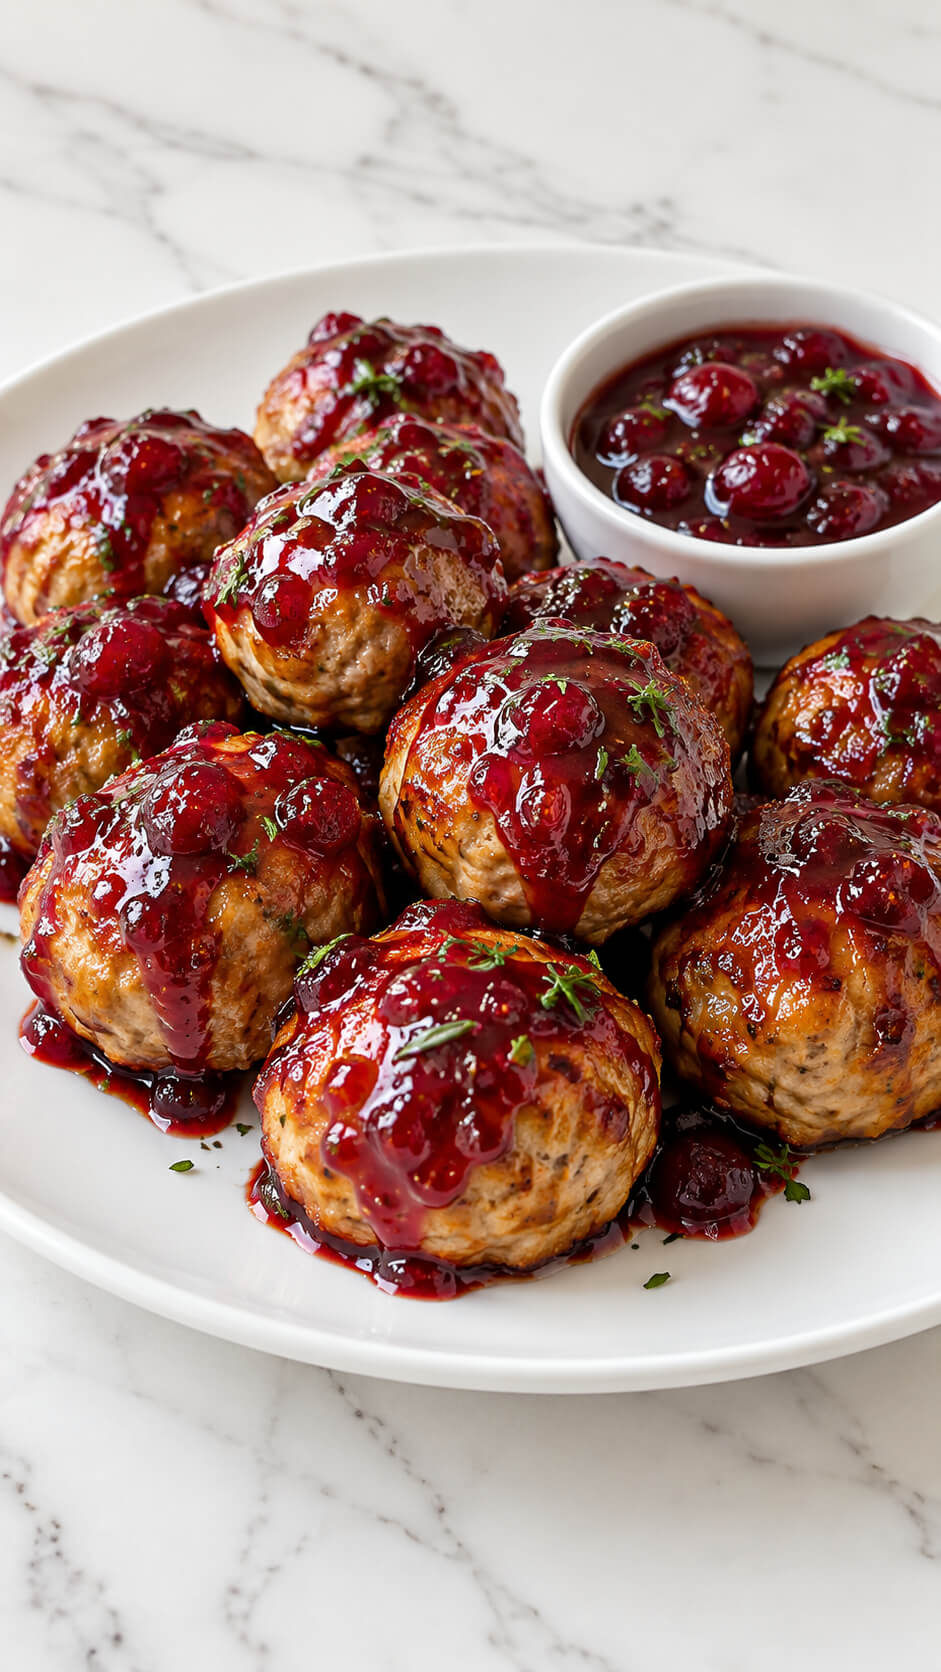
These bite-sized beauties bring all the Thanksgiving vibes in one mouthful.
Juicy turkey meatballs are simmered in a glossy cranberry glaze that’s equal parts tangy and sweet.
Serve them warm on toothpicks, and you’ve got a festive crowd-pleaser that feels cozy and celebratory at the same time.
Ingredients
- 1 pound (450 g) ground turkey
- ½ cup breadcrumbs
- 1 large egg
- 2 cloves garlic, minced
- ¼ cup finely chopped onion
- 2 tablespoons chopped fresh parsley
- ½ teaspoon dried thyme
- ½ teaspoon salt
- ¼ teaspoon black pepper
- 1 tablespoon olive oil
For the cranberry glaze
- 1 cup cranberry sauce, homemade or canned
- 2 tablespoons honey or maple syrup
- 1 tablespoon soy sauce
- 1 tablespoon Dijon mustard
- 1 tablespoon orange juice
- 1 teaspoon apple cider vinegar
- ½ teaspoon garlic powder
- 1 teaspoon finely chopped fresh rosemary or thyme
Instructions
1. Prepare the turkey mixture
In a large mixing bowl, combine the ground turkey, breadcrumbs, egg, minced garlic, chopped onion, parsley, dried thyme, salt, and black pepper. Mix gently until all the ingredients are evenly incorporated. Avoid overmixing, as this can make the meatballs dense rather than tender.
2. Shape the meatballs
Roll the turkey mixture between your palms to form evenly sized balls, approximately 1–1½ inches in diameter. Place them on a clean plate or lined baking tray, leaving a little space between each meatball so they cook evenly.
3. Bake the meatballs until golden
Preheat your oven to 400°F (200°C). Lightly brush or drizzle the meatballs with olive oil and arrange them on a lined baking sheet. Bake for 18–22 minutes, depending on their size, until golden brown and cooked through. The internal temperature should reach 165°F (74°C) for safe consumption.
4. Combine the cranberry glaze ingredients
While the meatballs bake, place the cranberry sauce, honey, soy sauce, Dijon mustard, orange juice, apple cider vinegar, garlic powder, and chopped rosemary or thyme in a small saucepan. Stir thoroughly to combine the sweet, tangy, and savory flavors.
5. Simmer the glaze until thick
Place the saucepan over medium-low heat and bring the mixture to a gentle simmer. Cook for 5–8 minutes, stirring frequently, until the sauce thickens slightly and becomes glossy. If the glaze becomes too thick, add a tablespoon of water or orange juice to loosen it.
6. Coat the meatballs with cranberry glaze
Transfer the cooked turkey meatballs into the saucepan with the cranberry glaze. Gently toss them until each meatball is evenly coated in the rich, shiny sauce. Allow them to simmer together for 2–3 minutes so the glaze clings to the meatballs and the flavors blend.
7. Arrange the meatballs for serving
Transfer the glazed meatballs to a clean white serving plate, arranging them in a neat mound. Spoon a little extra cranberry glaze over the top and sprinkle with finely chopped fresh parsley or thyme. Pour any remaining sauce into a small dipping bowl and place it beside the meatballs.
8. Serve while warm
Serve the cranberry-glazed turkey meatballs immediately while the glaze is glossy and the meatballs are tender. They pair beautifully with roasted vegetables, mashed potatoes, rice, or a fresh green salad. For parties, provide toothpicks so guests can easily enjoy them as appetizers.
Tip
For an extra glossy, restaurant-quality finish, reserve a few tablespoons of cranberry glaze before adding the meatballs to the saucepan. Brush the reserved glaze over the meatballs just before serving. Use whole-berry cranberry sauce for a richer texture, and add a little orange zest for a fresh citrus aroma that complements the cranberries beautifully.
17. Maple Roasted Nuts
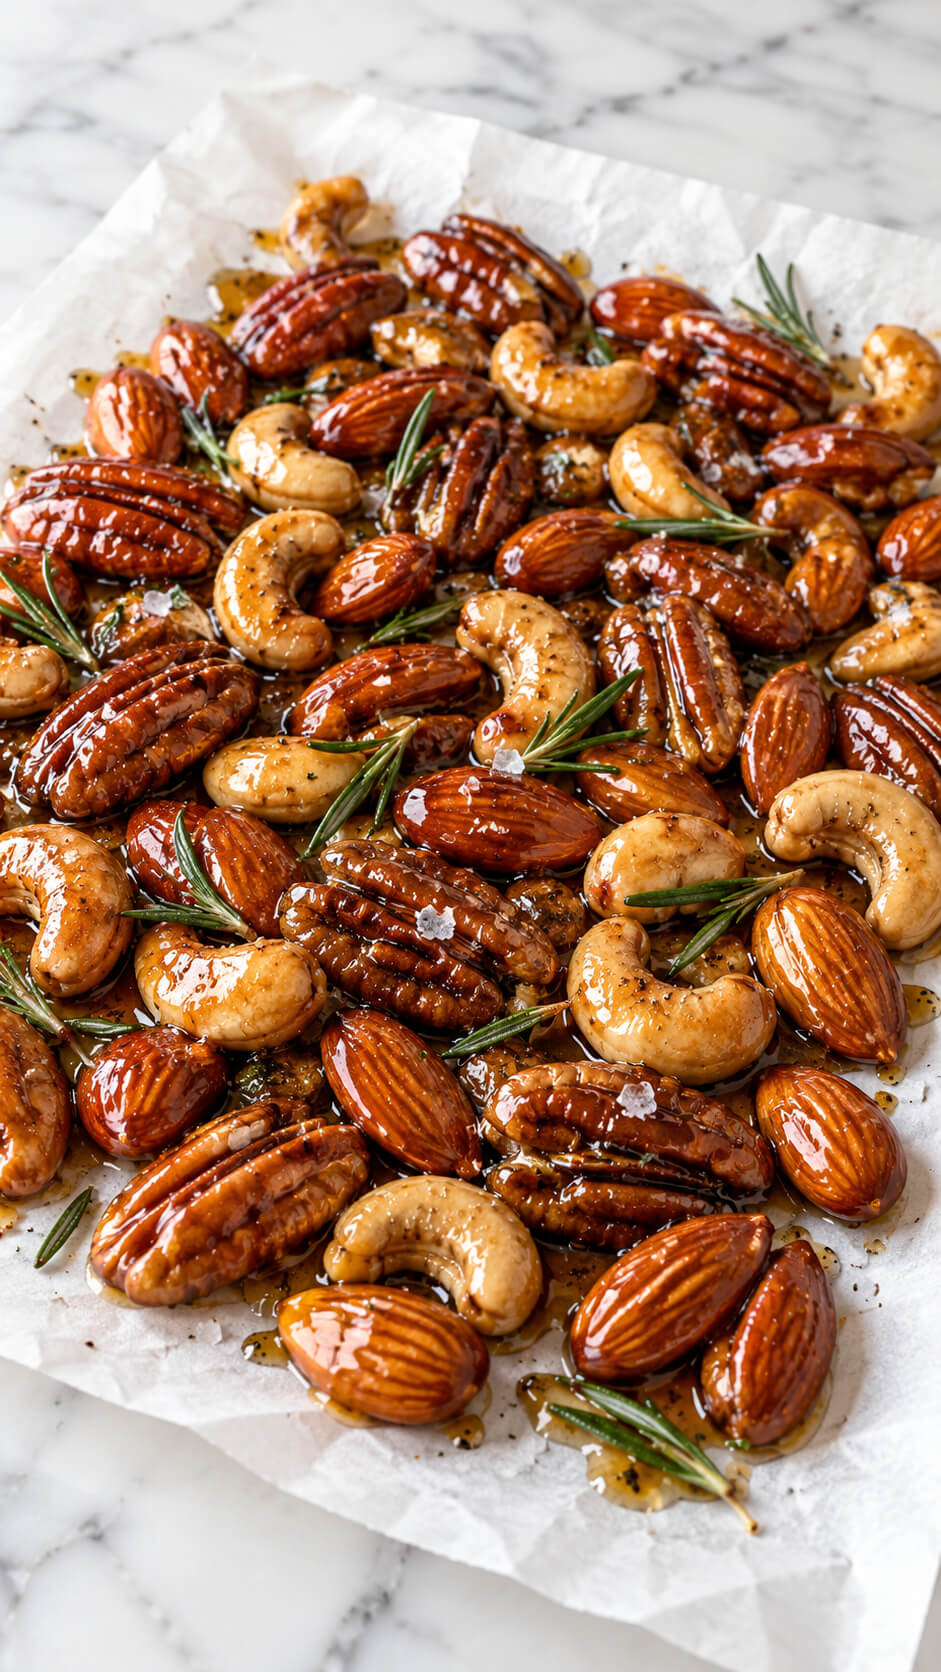
Your kitchen will smell heavenly while these roast.
A mix of pecans, almonds, and cashews tossed with maple syrup, rosemary, and a dash of cayenne turns into a crunchy, addictive snack.
They’re perfect for nibbling with cocktails while the turkey finishes roasting.
Ingredients
- 1 cup pecan halves
- 1 cup whole almonds
- 1 cup cashews
- 3 tablespoons pure maple syrup
- 1 tablespoon olive oil or melted butter
- 1 tablespoon fresh rosemary, finely chopped
- ½ teaspoon fine sea salt
- ¼ teaspoon ground cinnamon (optional)
- ⅛ teaspoon cayenne pepper (optional, for a gentle kick)
- Flaky sea salt, for sprinkling
Instructions
1. Preheat the oven
Preheat your oven to 325°F (165°C). Line a large baking sheet with parchment paper to prevent the maple glaze from sticking and to make cleanup easier. Arrange your oven rack in the center for even roasting.
2. Combine the nuts
Place the pecans, almonds, and cashews in a large mixing bowl. Stir them together so the different nuts are evenly distributed. Make sure the nuts are plain and unsalted so you can control the seasoning.
3. Prepare the maple glaze
In a small bowl, whisk together the maple syrup, olive oil or melted butter, chopped rosemary, fine sea salt, and optional cinnamon and cayenne pepper. Mix until everything is well combined and the glaze looks smooth.
4. Coat the nuts with the glaze
Pour the maple mixture over the nuts. Toss thoroughly with a spatula until every nut is lightly coated in the glossy mixture. Pay special attention to the pecans and cashews, making sure the glaze reaches their crevices.
5. Spread the nuts on the baking sheet
Transfer the coated nuts to the prepared baking sheet. Spread them into a single layer, leaving a little space between the pieces. This helps them roast evenly and develop a delicious caramelized coating rather than steaming.
6. Roast the nuts until golden
Bake for 18–22 minutes, stirring gently halfway through. Watch them closely during the final few minutes because maple syrup can burn quickly. Remove the nuts when they smell fragrant and look golden and glossy. They may still feel slightly sticky while hot, but they will crisp up as they cool.
7. Add the rosemary and sea salt
While the nuts are still warm, sprinkle them with a little extra chopped rosemary and flaky sea salt. Toss gently if needed to distribute the seasoning. The residual heat helps the rosemary release its aroma while the salt balances the sweetness of the maple glaze.
8. Cool the roasted nuts
Allow the nuts to cool completely on the parchment-lined baking sheet for about 20–30 minutes. Separate any clusters with a spatula once they have cooled enough to handle. The glaze will become firmer and crispier as the nuts cool.
9. Serve the maple rosemary nuts
Transfer the cooled nuts to a serving bowl or platter. Serve them as a snack, alongside a cheese board, or as a crunchy topping for salads and roasted vegetables. Store any leftovers in an airtight container once completely cool.
Tip
For the best glossy, crunchy finish, use pure maple syrup and avoid overcrowding the baking sheet. Stir the nuts halfway through roasting, and let them cool completely before storing. If you prefer a more savory flavor, add extra rosemary and flaky sea salt; for a sweeter finish, drizzle a little additional maple syrup over the nuts during the final few minutes of roasting, watching carefully to prevent burning.
18. Caprese Skewers with a Fall Twist
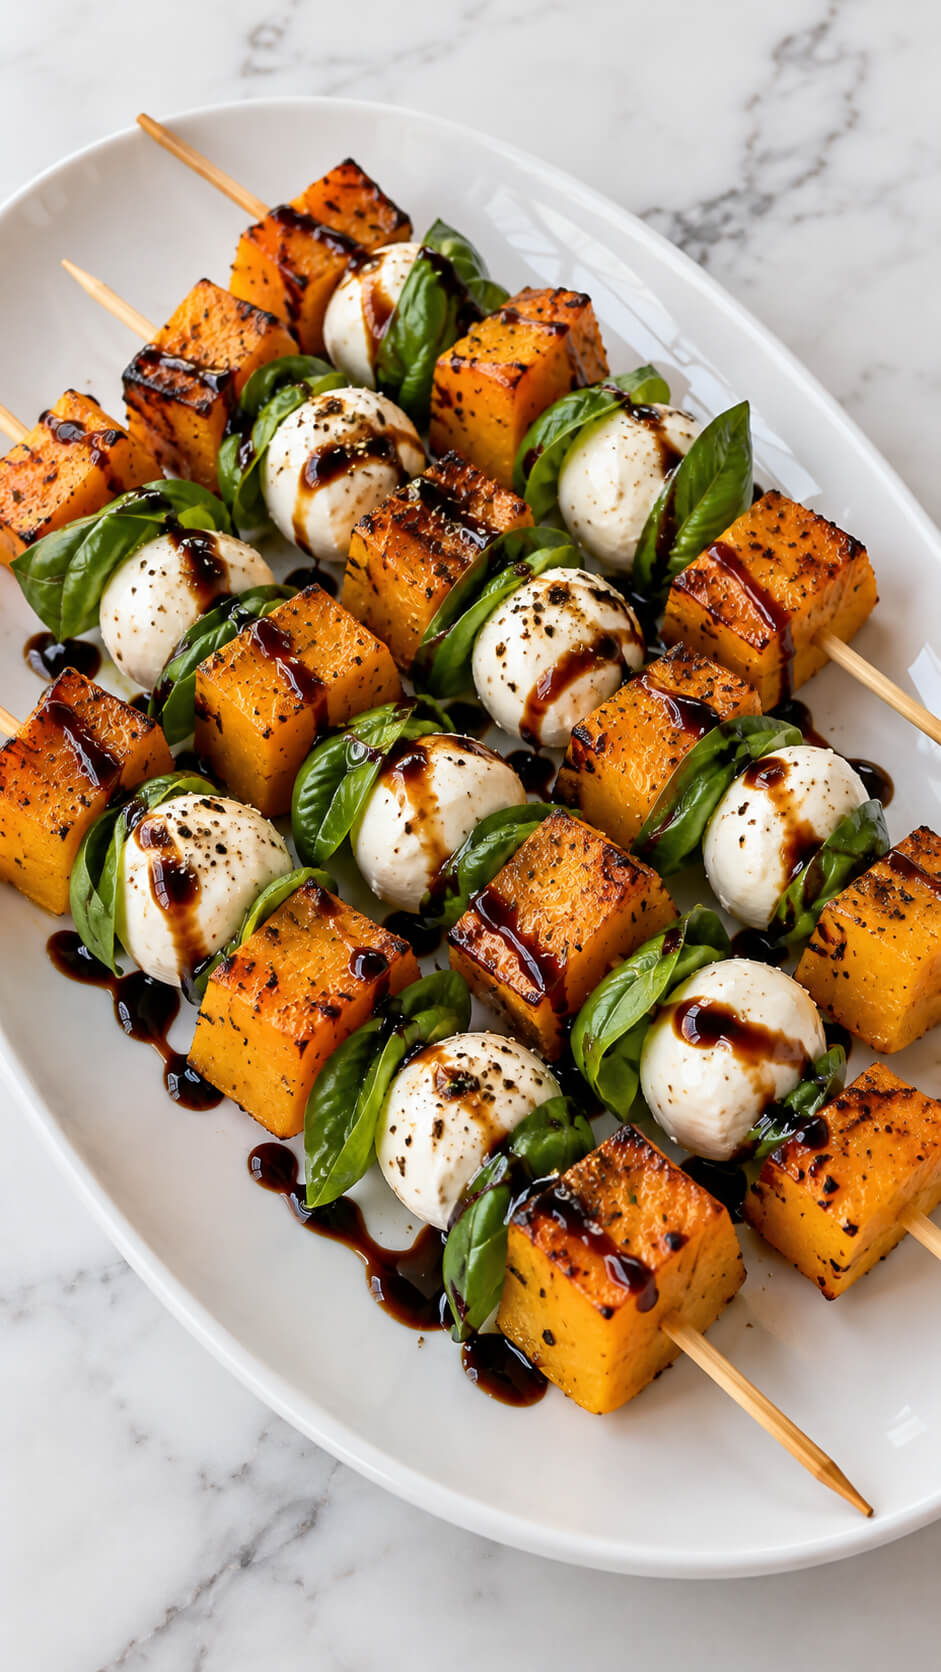
Give the classic Caprese skewer a Thanksgiving makeover!
Swap out summer tomatoes for roasted butternut squash cubes, then layer with mozzarella pearls and fresh sage.
A drizzle of balsamic glaze ties it all together. They’re colorful, classy, and perfectly seasonal.
Ingredients
- 2 cups butternut squash, peeled and cut into 1-inch cubes
- 8 oz (225 g) fresh mozzarella balls, preferably bocconcini
- 20–25 fresh basil leaves
- 2 tablespoons olive oil
- 2–3 tablespoons balsamic glaze
- ½ teaspoon salt
- ¼ teaspoon black pepper
- ½ teaspoon Italian seasoning (optional)
- 8–10 small wooden skewers
Instructions
1. Roast the butternut squash
Preheat the oven to 400°F (200°C). Place the butternut squash cubes on a baking sheet and toss with olive oil, salt, black pepper, and Italian seasoning if desired. Spread them in a single layer and roast for 20–25 minutes, turning halfway through, until golden brown, tender, and lightly caramelized. Allow the squash to cool before assembling the skewers.
2. Prepare the mozzarella and basil
Drain the fresh mozzarella balls and pat them dry with paper towels to remove excess moisture. Wash the basil leaves and gently pat them dry. Choose medium-sized leaves that are fresh and bright green so they look attractive on the skewers.
3. Assemble the skewers
Thread a roasted butternut squash cube, a fresh basil leaf, and a mozzarella ball onto each wooden skewer. Fold larger basil leaves in half if necessary. Repeat the pattern until each skewer contains several pieces of squash, mozzarella, and basil. Arrange the finished skewers neatly on a glossy white serving plate.
4. Drizzle with balsamic glaze
Drizzle the balsamic glaze over the assembled skewers in a thin, decorative stream. Let some of the glaze fall onto the plate for an elegant presentation. The dark, glossy glaze complements the sweet roasted squash, creamy mozzarella, and fragrant basil.
5. Garnish and serve the skewers
Finish with a light sprinkle of freshly cracked black pepper and a few additional basil leaves if desired. Serve immediately at room temperature as an appetizer, party snack, or colorful addition to a fall-inspired meal.
Tip
For the best presentation, let the roasted squash cool completely before threading it onto the skewers. This prevents the mozzarella from softening too much and keeps the basil leaves fresh and vibrant. Add the balsamic glaze just before serving to maintain its glossy finish.
19. Cranberry Jalapeño Dip
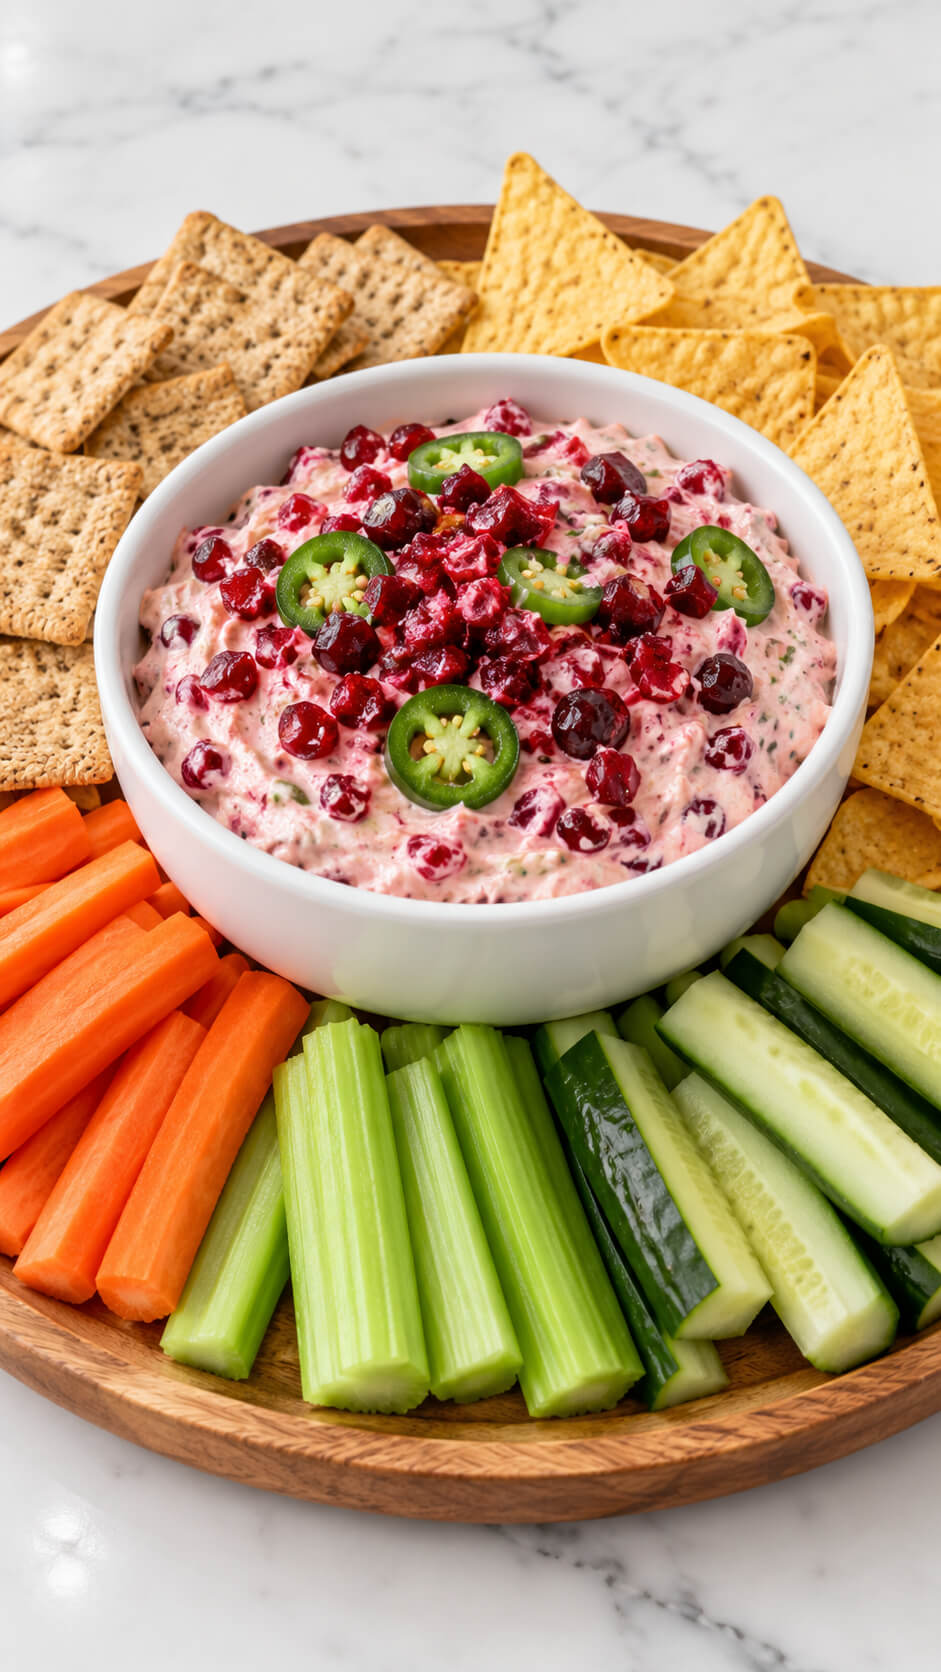
This dip brings the perfect mix of zing and creaminess to your spread.
Chopped cranberries, jalapeños, cilantro, and green onions are spooned over whipped cream cheese for a vibrant, festive look.
It’s tangy, a little spicy, and dangerously good with buttery crackers.
Ingredients
- 8 oz (225 g) cream cheese, softened
- ½ cup sour cream
- 1 cup fresh cranberries, finely chopped
- 1–2 fresh jalapeño peppers, finely chopped and seeded if desired
- 2 tablespoons fresh cilantro, finely chopped
- 2 tablespoons honey
- 1 tablespoon fresh lime juice
- ¼ teaspoon salt
- ¼ teaspoon black pepper
For serving
- Square-shaped wheat crackers
- Triangular tortilla chips
- 2 medium carrots, peeled and cut into sticks
- 2 celery stalks, cut into sticks
- 1 cucumber, cut into sticks
Instructions
1. Prepare the cranberries and jalapeños
Rinse the fresh cranberries thoroughly and pat them dry. Finely chop the cranberries into small pieces so their tart flavor is distributed throughout the dip. Wash the jalapeño peppers, remove the seeds and membranes for a milder taste, and chop them finely. Reserve a small amount of cranberries and thinly sliced jalapeños for the topping.
2. Mix the creamy dip base
Place the softened cream cheese and sour cream in a medium mixing bowl. Whisk or beat them together until the mixture becomes smooth, creamy, and free of lumps. Softened cream cheese blends more easily and gives the dip a rich, velvety texture.
3. Add the sweet and tangy flavors
Add the honey, fresh lime juice, salt, and black pepper to the cream cheese mixture. Stir thoroughly until everything is evenly combined. The honey balances the tart cranberries, while the lime juice adds a refreshing citrus flavor.
4. Fold in the cranberries and jalapeños
Add the chopped cranberries, finely chopped jalapeños, and fresh cilantro to the creamy mixture. Gently fold everything together with a spatula until the ingredients are evenly distributed. The dip should have a light pink appearance with visible red cranberry pieces and green pepper flecks.
5. Chill the dip to develop the flavor
Cover the bowl and refrigerate the dip for at least 30 minutes. Chilling allows the cranberry, jalapeño, and lime flavors to blend while helping the dip firm up slightly. If the dip becomes too thick after chilling, stir it gently before serving.
6. Prepare the crackers and vegetables
Peel the carrots and cut them into even sticks. Slice the celery and cucumber into similarly sized pieces. Arrange the wheat crackers, tortilla chips, carrot sticks, celery sticks, and cucumber sticks into separate sections on a round wooden serving tray for a neat and colorful presentation.
7. Garnish the cranberry jalapeño dip
Transfer the chilled dip into a small, round, glossy white serving bowl. Smooth the surface with the back of a spoon, then sprinkle the reserved chopped cranberries and thinly sliced jalapeños over the top. Distribute the garnish evenly to create an appealing contrast of red, green, and pale pink.
8. Arrange and serve the appetizer
Place the bowl of cranberry jalapeño dip in the center of the wooden tray. Arrange the crackers and tortilla chips around one side and group the carrot, celery, and cucumber sticks around the remaining edges. Serve immediately while the dip is chilled and the vegetables are crisp.
Tip
For the best flavor, prepare the dip a few hours ahead and refrigerate it until serving. If you prefer a milder dip, remove all the jalapeño seeds and membranes before chopping. For extra heat, leave a few seeds in the mixture. Always add the fresh cranberry and jalapeño garnish just before serving to keep the topping colorful and fresh.
20. Smoked Salmon Cucumber Rounds
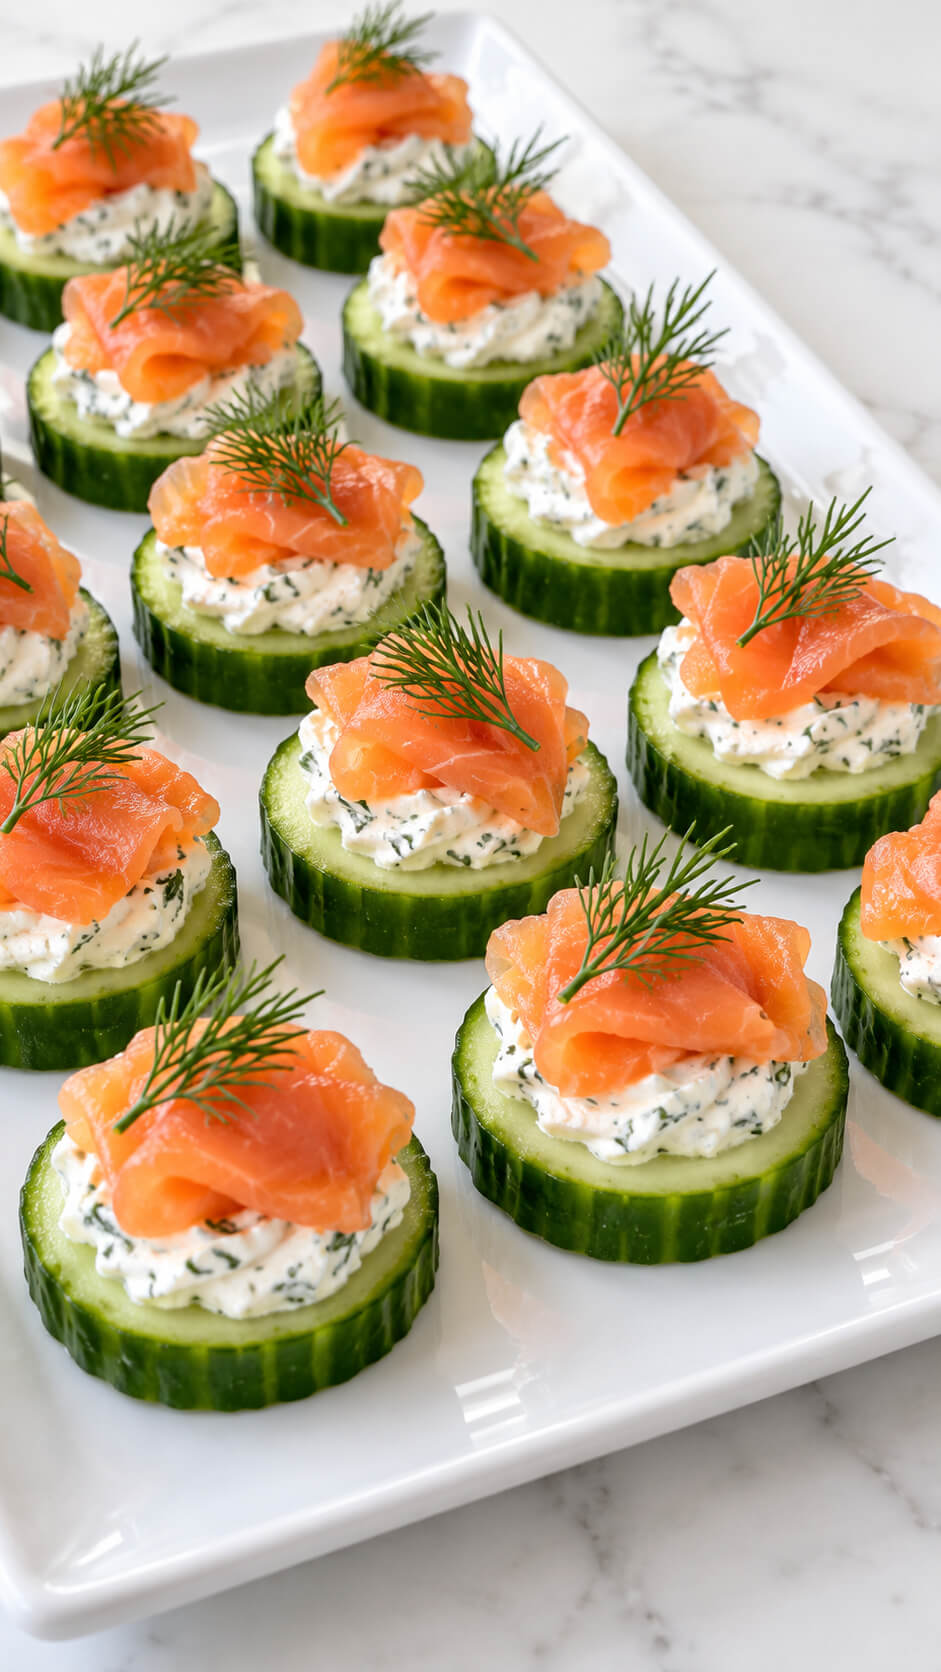
Light, crisp, and elegant—these are the calm before the feast.
Thick cucumber slices topped with herbed cream cheese, smoked salmon, and a sprinkle of dill make the perfect refreshing bite.
They add a touch of sophistication without being heavy.
21. Mini Potato Pancakes with Applesauce
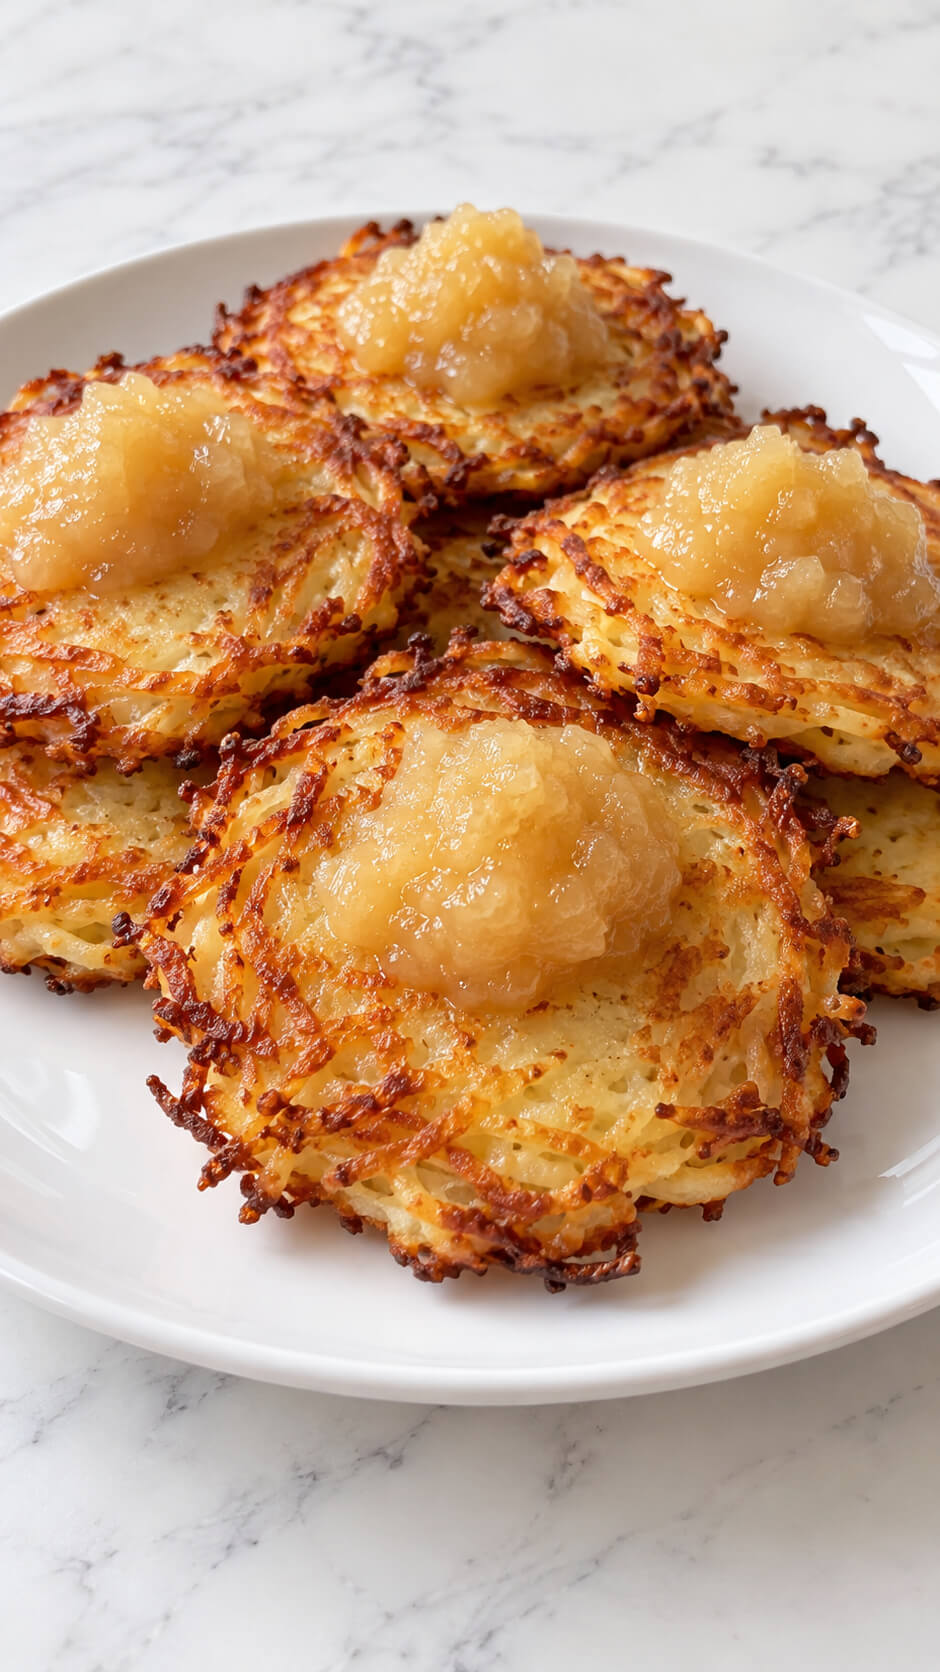
Crispy on the outside, tender inside—these mini latke-inspired bites are pure comfort.
Top each one with a dollop of sour cream and spiced applesauce for a sweet-savory balance.
They’re nostalgic, cozy, and perfect for passing around before the big meal.
Ingredients
- 4 medium potatoes, peeled
- 1 small onion, finely grated
- 2 large eggs
- 3 tablespoons all-purpose flour
- ½ teaspoon salt
- ¼ teaspoon ground black pepper
- ½ teaspoon garlic powder (optional)
- Vegetable oil, for frying
- 1 cup applesauce, for serving
Instructions
1. Grate the potatoes and onion
Peel the potatoes and grate them using the large holes of a box grater. Finely grate the onion and combine it with the potatoes in a large bowl. Transfer the mixture to a clean kitchen towel and squeeze firmly to remove as much excess liquid as possible. This helps the pancakes become crisp and golden rather than soggy.
2. Prepare the pancake mixture
Place the drained potatoes and onion in a clean bowl. Add the eggs, flour, salt, black pepper, and garlic powder if using. Mix thoroughly until the ingredients are evenly combined and the grated potatoes are lightly coated. The mixture should hold together when pressed into a small patty.
3. Shape the mini potato pancakes
Scoop approximately 1–2 tablespoons of the potato mixture for each pancake. Use your hands or a spoon to shape it into a small, flat round about 5–7 cm wide. Keep the pancakes relatively thin so they cook evenly and develop crispy edges.
4. Heat the oil in a frying pan
Pour enough vegetable oil into a large skillet to create a thin layer across the bottom. Heat over medium heat until the oil shimmers. Test it by adding a small strand of potato mixture; it should sizzle immediately without burning. Avoid overheating the oil, as the pancakes may brown too quickly before cooking through.
5. Fry the potato pancakes until golden
Carefully place the mini pancakes into the hot oil in a single layer, leaving space between them. Fry for approximately 3–4 minutes on the first side, until the edges are crisp and the underside is golden brown. Flip gently with a spatula and cook for another 2–4 minutes, until the second side is golden and the potatoes are tender inside. Work in batches to avoid overcrowding the pan.
6. Drain the cooked pancakes
Transfer the finished potato pancakes to a plate lined with paper towels to absorb excess oil. Let them rest for a minute or two while you cook the remaining batches. Keep the cooked pancakes warm in a low oven if needed, arranging them in a single layer to help preserve their crisp texture.
7. Prepare the applesauce topping
Spoon the applesauce into a small bowl and stir until smooth and creamy. If it is too thick, mix in a teaspoon of water. You can serve it chilled or at room temperature, depending on your preference. For a sweeter topping, add a small pinch of cinnamon.
8. Arrange and serve the potato pancakes
Arrange the warm potato pancakes in a neat, slightly overlapping stack on a clean white serving plate. Add a generous dollop of applesauce to each pancake or spoon it over the top of the stack. Serve immediately while the pancakes are hot and crispy and the applesauce is cool and creamy.
Tip
For the crispiest potato pancakes, remove as much moisture as possible from the grated potatoes before mixing the batter. Fry them in small batches and avoid stacking them while they are still hot. For an extra flavorful applesauce topping, stir in a pinch of ground cinnamon and a squeeze of lemon juice to balance the sweetness.
22. Brie-Stuffed Mushrooms
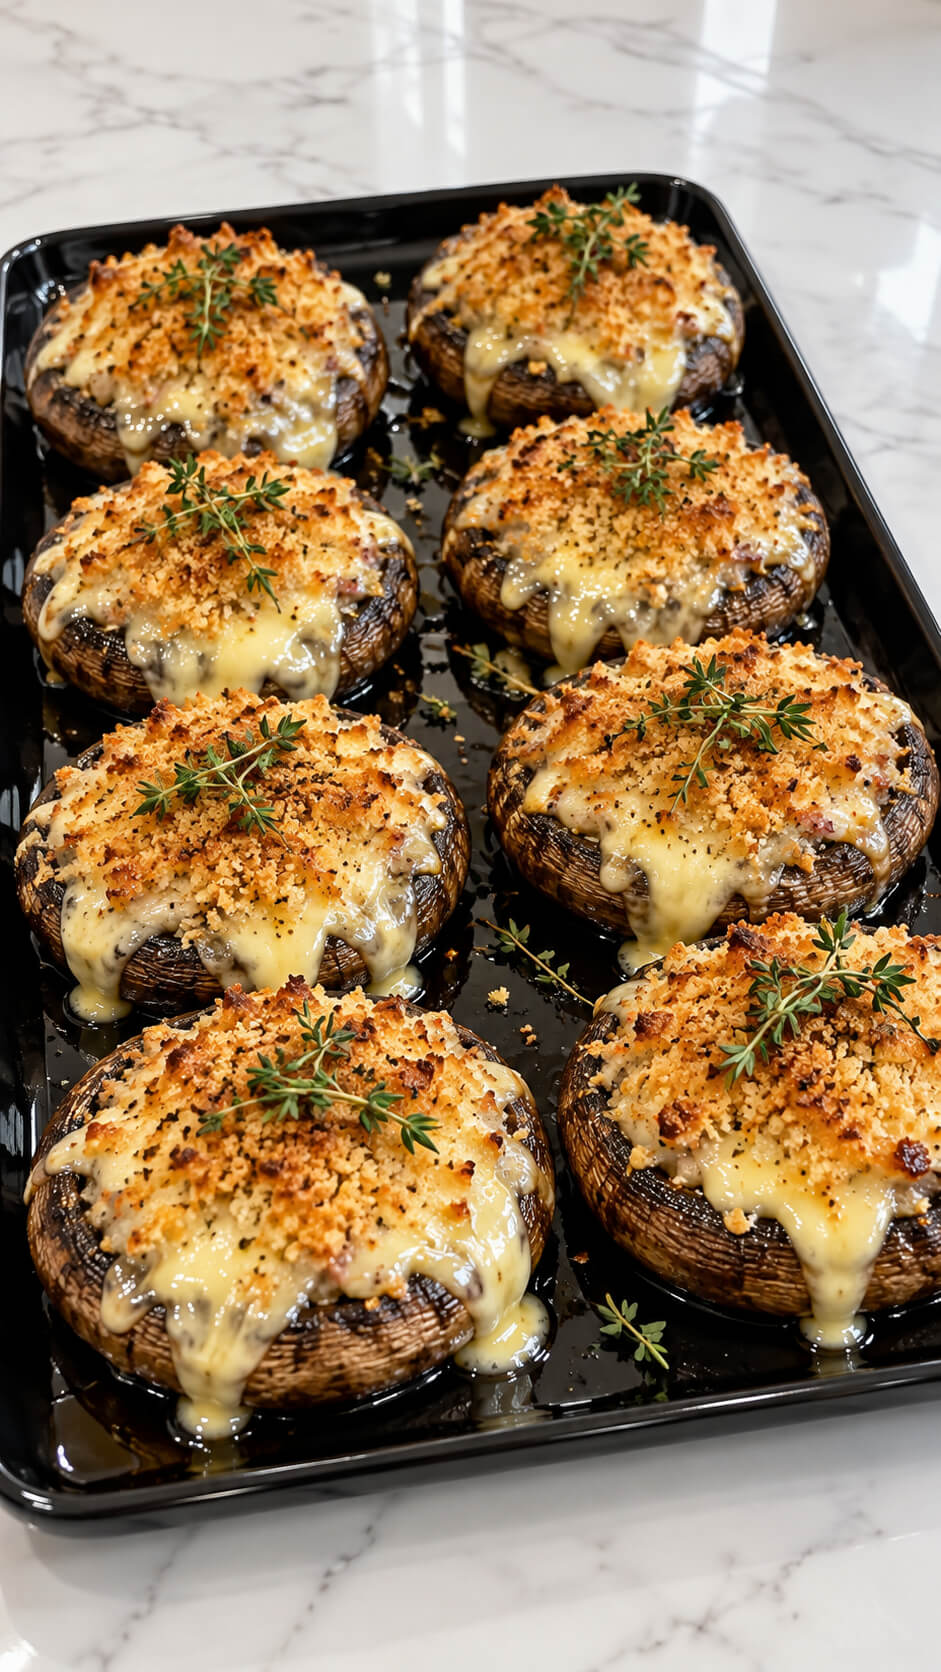
Take creamy brie, tuck it inside juicy mushroom caps, and bake until molten and bubbly.
A sprinkle of herbs and crushed walnuts on top adds crunch and elegance.
These are decadent, earthy, and just the right size for an indulgent one-bite treat.
Ingredients
- 8 medium Portobello mushrooms
- 250 g Brie cheese, rind removed if desired, cut into small pieces
- 1 cup breadcrumbs or panko breadcrumbs
- 3 tablespoons olive oil
- 2 tablespoons unsalted butter, melted
- 2 garlic cloves, finely minced
- 2 tablespoons fresh thyme leaves, plus extra sprigs for garnish
- ¼ cup grated Parmesan cheese
- ½ teaspoon salt, or to taste
- ¼ teaspoon freshly ground black pepper
- 1 teaspoon lemon juice (optional)
Instructions
1. Preheat the oven
Preheat your oven to 200°C (400°F). Line a baking tray with baking paper or lightly grease a baking dish. This temperature helps the mushrooms become tender while allowing the breadcrumb topping to turn beautifully golden and crisp.
2. Clean and prepare the mushrooms
Gently wipe the Portobello mushrooms with a damp paper towel to remove any dirt. Remove the stems and, if desired, scrape out the dark gills with a small spoon to create more room for the filling. Arrange the mushroom caps with the hollow sides facing upward.
3. Season the mushroom caps
Mix the olive oil with half of the minced garlic, salt, and black pepper. Brush the mixture over the mushroom caps, including the edges and undersides. Place them hollow-side up on the prepared tray so they are ready to hold the creamy Brie filling.
4. Prepare the golden breadcrumb topping
In a small bowl, combine the breadcrumbs, melted butter, grated Parmesan, remaining garlic, and fresh thyme leaves. Stir until the breadcrumbs are evenly coated and slightly moist. This mixture will create a crunchy, golden topping that contrasts beautifully with the soft mushrooms and melted cheese.
5. Fill the mushrooms with Brie
Cut the Brie into small pieces and divide it evenly among the eight mushroom caps. Arrange the cheese inside each cap, spreading it toward the edges so it melts throughout the mushroom. Avoid leaving large, solid blocks of cheese exposed on top; the aim is a creamy, melted filling that can ooze over the edges during baking.
6. Add the breadcrumb topping
Generously spoon the breadcrumb mixture over the Brie-filled mushrooms. Press it very gently so the topping stays in place without pushing all the cheese out of the caps. Make sure each mushroom has an even layer of breadcrumbs for a crisp, golden finish.
7. Bake until the cheese melts
Bake for 15–20 minutes, depending on the size of the mushrooms. The mushrooms should become tender, the Brie should melt into a creamy filling, and the breadcrumbs should turn golden brown. If the topping needs extra color, switch to the grill or broiler for 1–2 minutes, watching carefully to prevent burning.
8. Garnish with fresh thyme
Remove the tray from the oven and allow the mushrooms to rest for 2–3 minutes. Drizzle with a little lemon juice if desired, then garnish with fresh thyme sprigs. The residual heat keeps the Brie soft and luscious, allowing it to flow gently over the mushroom caps.
9. Serve the mushrooms warm
Arrange the eight stuffed mushrooms on a shiny black rectangular serving tray. Spoon any melted cheese and flavorful juices from the baking tray over the mushrooms. Serve immediately while the Brie is warm and gooey and the breadcrumb topping is still crisp.
Tip
For the creamiest, most appetizing result, remove the Brie rind if you prefer a smoother melt and cut the cheese into small pieces rather than leaving large chunks. If your mushrooms release a lot of liquid during baking, carefully drain the excess halfway through cooking. For an extra-crispy topping, lightly toast the breadcrumbs in a skillet with the butter before mixing them with the Parmesan and thyme.
23. Harvest Flatbread
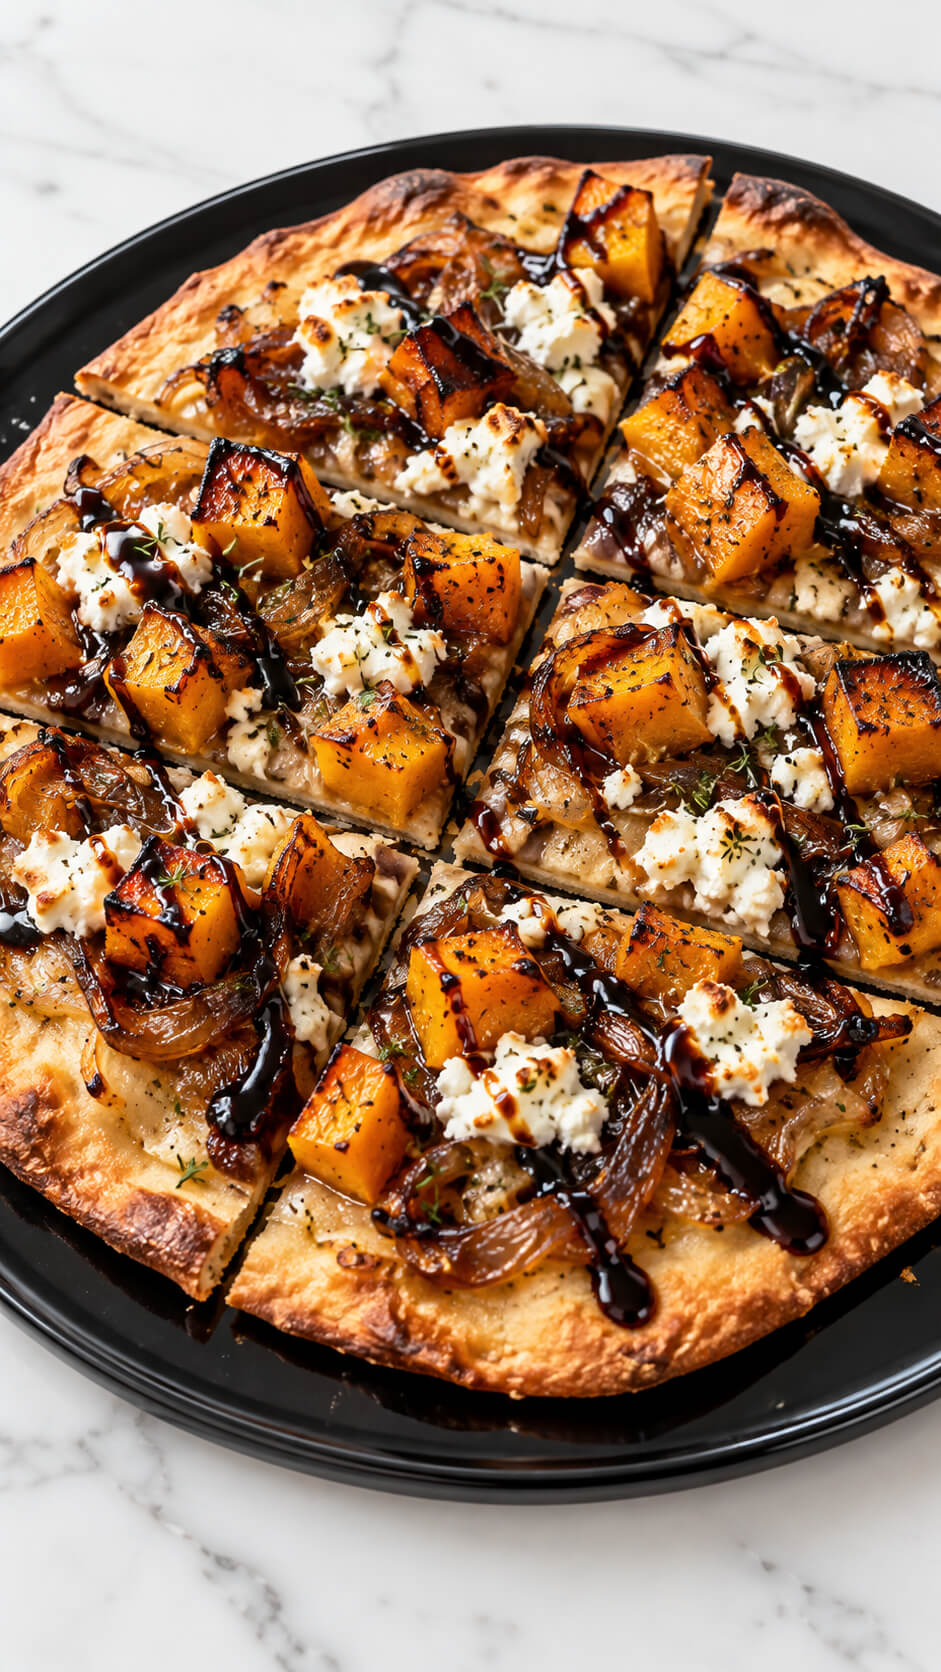
If autumn were a pizza, this would be it.
A crisp flatbread topped with caramelized onions, roasted squash, goat cheese, and a drizzle of balsamic reduction—it’s colorful, flavorful, and easy to cut into bite-sized squares.
Perfect for guests to grab between sips of cider.
Ingredients
- 1 large flatbread or 1 store-bought pizza crust (about 12 inches)
- 2 cups butternut squash, peeled and cut into small cubes
- 2 medium yellow onions, thinly sliced
- 120 g goat cheese, crumbled
- 2 tablespoons olive oil, divided
- 1 tablespoon butter
- 1 teaspoon fresh thyme leaves, or ½ teaspoon dried thyme
- ½ teaspoon salt, divided
- ¼ teaspoon black pepper
- 1 teaspoon honey or maple syrup (optional)
- 2 tablespoons balsamic glaze or balsamic reduction
- 1 tablespoon chopped fresh parsley or extra thyme, for garnish (optional)
For the balsamic reduction
- ½ cup balsamic vinegar
- 1 tablespoon honey or brown sugar (optional)
If using ready-made balsamic glaze, you can skip making the reduction.
Instructions
1. Roast the butternut squash
Preheat the oven to 200°C (400°F). Place the cubed butternut squash on a baking tray and toss with 1 tablespoon olive oil, half the salt, black pepper, and thyme. Spread the cubes in a single layer and roast for 20–25 minutes, turning halfway through, until tender, lightly caramelized, and golden around the edges. Remove from the oven and set aside.
2. Caramelize the onions
Heat the butter and remaining tablespoon of olive oil in a skillet over medium-low heat. Add the sliced onions and cook for 15–20 minutes, stirring occasionally, until soft, golden brown, and sweet. If the onions begin sticking, add a tablespoon of water. Stir in the honey or maple syrup if desired, then remove from the heat.
3. Prepare the balsamic reduction
Pour the balsamic vinegar into a small saucepan and bring it to a gentle simmer over medium-low heat. Add the honey or brown sugar if using. Simmer for 5–8 minutes, stirring occasionally, until the liquid reduces and becomes thick enough to coat the back of a spoon. Remove from the heat and allow it to cool slightly. Alternatively, use ready-made balsamic glaze.
4. Prepare the flatbread base
Place the flatbread on a baking tray lined with parchment paper. If you prefer an extra-crispy crust, bake the plain flatbread for 3–5 minutes in the preheated oven before adding the toppings. This helps prevent the base from becoming soggy under the vegetables and cheese.
5. Add the caramelized onions
Spread the caramelized onions evenly over the flatbread, leaving a small border around the edges. Distribute them in a thin layer so every bite has a balance of sweet onion flavor without making the crust too moist.
6. Arrange the roasted butternut squash
Scatter the roasted butternut squash cubes evenly over the onions. Try to distribute the pieces across the entire flatbread so each slice has a generous amount of tender squash and golden caramelized flavor.
7. Add the goat cheese
Sprinkle the crumbled goat cheese over the squash and onions. Distribute it evenly, allowing some pieces to remain larger for a creamy texture and others to crumble into the gaps. The tangy goat cheese balances the natural sweetness of the vegetables.
8. Bake the flatbread until golden
Return the topped flatbread to the oven and bake for 8–12 minutes at 200°C (400°F), or until the edges are crisp and golden and the goat cheese is warmed through. Keep an eye on the crust during the final minutes to prevent over-browning.
9. Drizzle with balsamic reduction
Remove the flatbread from the oven and let it rest for 2–3 minutes. Drizzle the balsamic reduction over the top in thin, decorative lines. Add fresh parsley or a little extra thyme if desired. The sweet-tart glaze enhances the roasted squash and caramelized onions while adding a glossy finish.
10. Slice and serve the flatbread
Transfer the flatbread to a cutting board and slice it into bite-sized squares or small rectangles using a sharp knife or pizza cutter. Arrange the pieces on a glossy black round serving tray for an elegant presentation. Serve warm while the crust remains crisp and the goat cheese is soft.
Tip
For the crispiest flatbread, roast the squash until its surface is lightly browned and allow excess moisture to evaporate before adding it to the crust. Drizzle the balsamic glaze only after baking to preserve its glossy appearance and prevent it from burning. For extra flavor and texture, sprinkle a few toasted chopped walnuts over the flatbread just before serving.
24. Mini Chicken Pot Pies

These are pure, flaky nostalgia in mini form.
Golden pastry shells hold creamy chicken, veggies, and herbs for the ultimate comfort appetizer.
Serve them warm from the oven, and watch guests’ eyes light up.
They’re hearty, homey, and always a hit.
Ingredients
- 2 sheets puff pastry, thawed
- 2 cups cooked chicken breast, shredded or diced
- 1 cup frozen peas and carrots
- 3 tablespoons butter
- ¼ cup finely chopped onion
- 2 tablespoons all-purpose flour
- ¾ cup chicken broth
- ½ cup whole milk or heavy cream
- ½ teaspoon garlic powder
- ½ teaspoon dried thyme
- ¼ teaspoon black pepper
- ½ teaspoon salt, or to taste
- 1 tablespoon chopped fresh parsley (optional)
- 1 egg, beaten, for the egg wash
Instructions
1. Preheat the oven and prepare the muffin tin
Preheat your oven to 200°C (400°F). Lightly grease a 12-cup muffin tin with butter or cooking spray. Allow the puff pastry to thaw until pliable but still cool, making it easier to cut and shape without tearing.
2. Cook the onions in butter
Melt the butter in a medium saucepan over medium heat. Add the chopped onion and cook for 3–4 minutes, stirring occasionally, until softened and translucent. This creates a flavorful base for the creamy chicken filling.
3. Prepare the creamy sauce
Sprinkle the flour over the softened onions and stir continuously for about 1 minute. Gradually pour in the chicken broth while whisking to prevent lumps, then add the milk or cream. Cook for 3–5 minutes until the sauce thickens into a smooth, creamy consistency.
4. Add the chicken and vegetables
Stir the cooked chicken, peas, carrots, garlic powder, thyme, salt, and black pepper into the sauce. Simmer gently for 2–3 minutes until everything is well combined and heated through. Stir in the fresh parsley if desired, then remove the saucepan from the heat and allow the filling to cool slightly.
5. Cut and shape the pastry shells
Roll out the puff pastry sheets on a lightly floured surface. Cut 12 squares large enough to line the muffin cups, allowing the pastry to extend slightly over the edges. Press each square gently into a muffin cup, ensuring the base and sides are covered without stretching the pastry too much.
6. Fill the pastry shells with chicken mixture
Spoon the creamy chicken filling evenly into each pastry shell, filling each about three-quarters full. Avoid overfilling the cups, as the sauce may bubble over during baking and prevent the pastry edges from crisping properly.
7. Add the pastry tops and egg wash
Cut smaller pastry squares or circles to cover the filled pies. Place each piece over the filling and gently press the edges against the bottom pastry to seal. Cut a small slit in each top to allow steam to escape, then brush the pastry lightly with beaten egg for a shiny, golden finish.
8. Bake until golden and flaky
Place the muffin tin in the preheated oven and bake for 20–25 minutes, or until the pastry is puffed, crisp, and deeply golden brown. If the tops brown too quickly, loosely cover them with foil for the remaining baking time. Let the mini pies rest in the tin for 5 minutes before removing them carefully.
9. Serve the mini chicken pot pies
Transfer the pies to a glossy white serving plate and garnish with a little fresh parsley or thyme. Serve warm while the pastry is crisp and the creamy filling is comforting and flavorful. These individual pies are ideal for appetizer platters, buffet tables, or casual family meals.
Tip
For the flakiest pastry, keep the puff pastry cold while assembling the pies and let the filling cool before adding it to the shells. Avoid using hot filling, as it can soften the butter in the pastry before baking and reduce the flaky texture. You can prepare the filling a day ahead and refrigerate it until you’re ready to assemble and bake.
25. Roasted Beet and Feta Bites
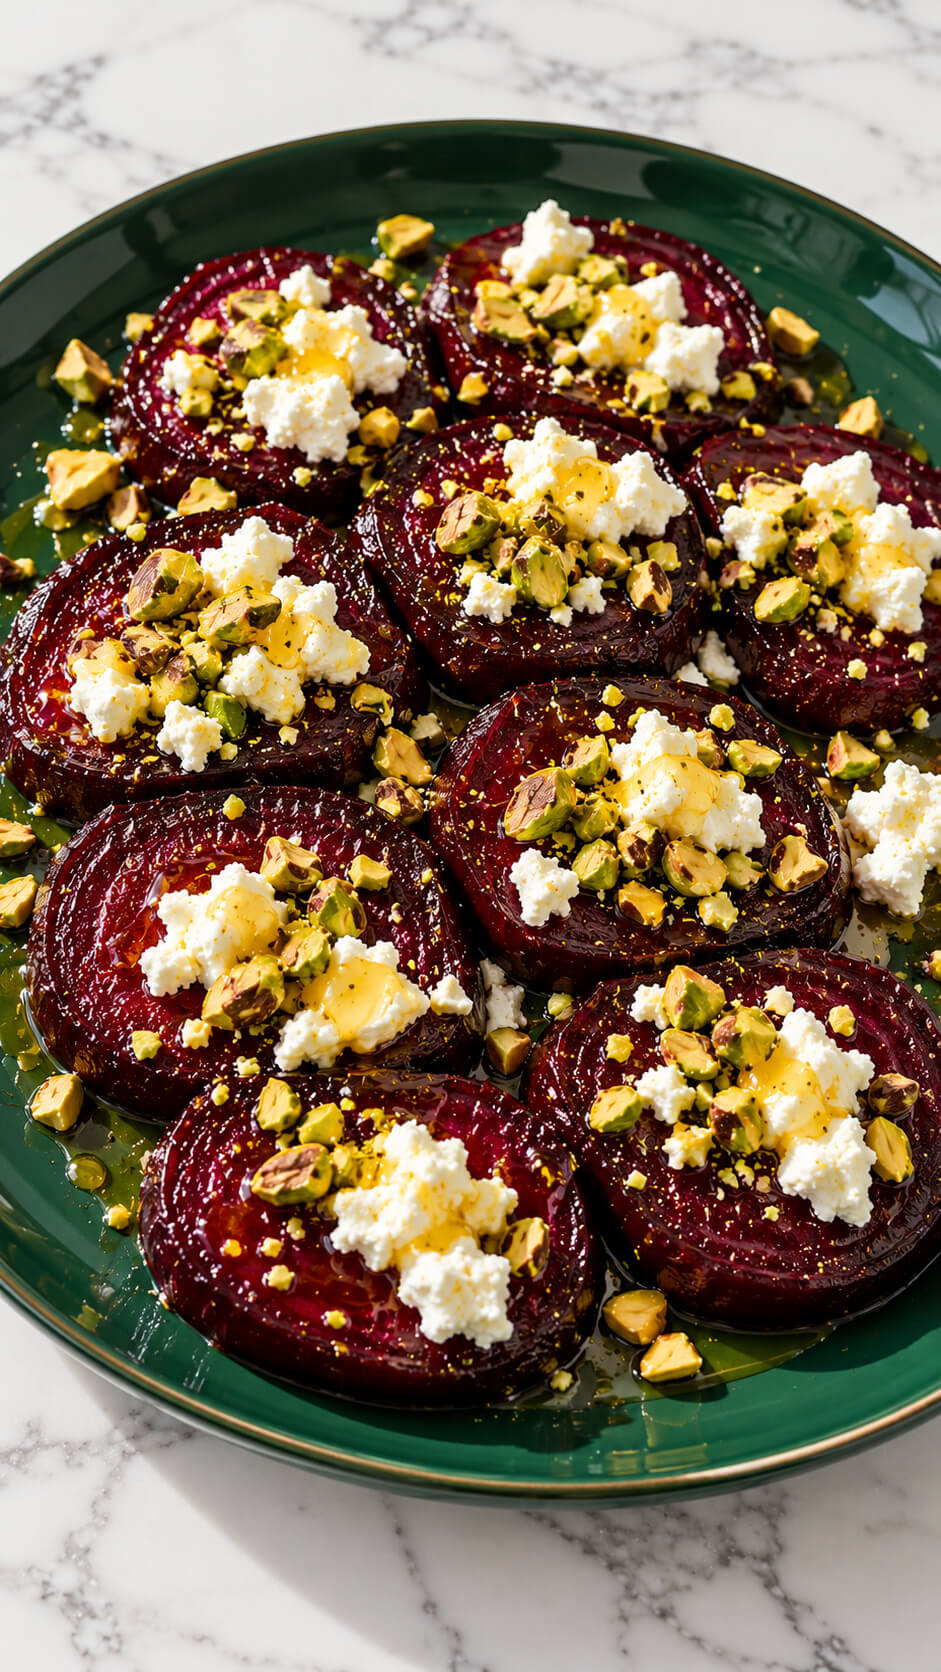
Bright, earthy, and oh-so-pretty.
Layer roasted beet slices with crumbled feta and a sprinkle of pistachios.
Add a drizzle of honey and a tiny mint leaf for color.
The flavors are fresh and tangy, making these bites a beautiful, refreshing contrast to rich holiday dishes.
Ingredients
- 3 medium-sized fresh beetroots
- 100 g feta cheese, crumbled
- ¼ cup shelled pistachios, roughly crushed
- 2 tablespoons olive oil
- 1–2 tablespoons honey
- ½ teaspoon salt, or to taste
- ¼ teaspoon freshly ground black pepper
- ½ teaspoon dried thyme (optional)
- 1 teaspoon fresh lemon juice (optional)
Instructions
1. Preheat the oven
Preheat your oven to 200°C (400°F). Prepare a baking tray by lining it with parchment paper or lightly greasing it with olive oil. This helps prevent the beetroot slices from sticking and allows them to roast evenly.
2. Wash and slice the beetroot
Wash and peel the beetroots, then cut them into evenly sized rounds approximately ½ cm thick. Keeping the slices uniform helps them cook at the same rate and makes it easier to arrange them neatly in rows on the serving plate.
3. Season the beetroot slices
Place the beetroot slices in a bowl and drizzle with olive oil. Add the salt, black pepper, and dried thyme if using. Toss gently until each slice is lightly coated with the seasoning, allowing the natural sweetness of the beetroot to develop during roasting.
4. Roast the beetroot until tender
Arrange the beetroot slices in a single layer on the prepared baking tray. Roast for 25–35 minutes, turning them halfway through cooking, until they are tender when pierced with a fork and slightly caramelized around the edges. Thicker slices may require additional cooking time.
5. Prepare the feta and pistachios
While the beetroot roasts, crumble the feta cheese into small pieces and roughly chop the pistachios. Keep the feta in a separate bowl and set the pistachios aside. This preparation makes it easy to distribute the toppings evenly over each beetroot slice.
6. Arrange the roasted beetroot on a plate
Remove the roasted beetroot from the oven and allow it to cool for about 5 minutes. Arrange the slices in neat, slightly overlapping rows on a glossy dark green serving plate. The rich red beetroot contrasts beautifully with the deep green plate.
7. Add the feta cheese and pistachios
Sprinkle the crumbled feta evenly over the beetroot slices, ensuring each piece receives a little of the creamy cheese. Scatter the crushed pistachios on top to add a delicate nutty flavor and a satisfying crunch to every bite.
8. Drizzle with honey
Drizzle the honey lightly over the arranged beetroot slices, allowing it to fall across the feta and pistachios. Add a little fresh lemon juice if desired to balance the sweetness and brighten the overall flavor without overpowering the earthy beetroot.
9. Serve the roasted beetroot
Serve immediately while the beetroot is slightly warm and the feta remains creamy. Place the plate on a clean white marble countertop for an attractive presentation. Enjoy this dish as an appetizer, a side for grilled vegetables or meat, or a light meal with fresh bread.
Tip
For the best flavor and presentation, roast the beetroot until tender but not overly soft so the slices hold their shape when arranged on the plate. Add the feta, pistachios, and honey just before serving to preserve their texture and freshness. For extra crunch and a deeper nutty flavor, lightly toast the pistachios in a dry pan for 2–3 minutes before crushing them.
26. Cornbread Mini Muffins with Honey Butter
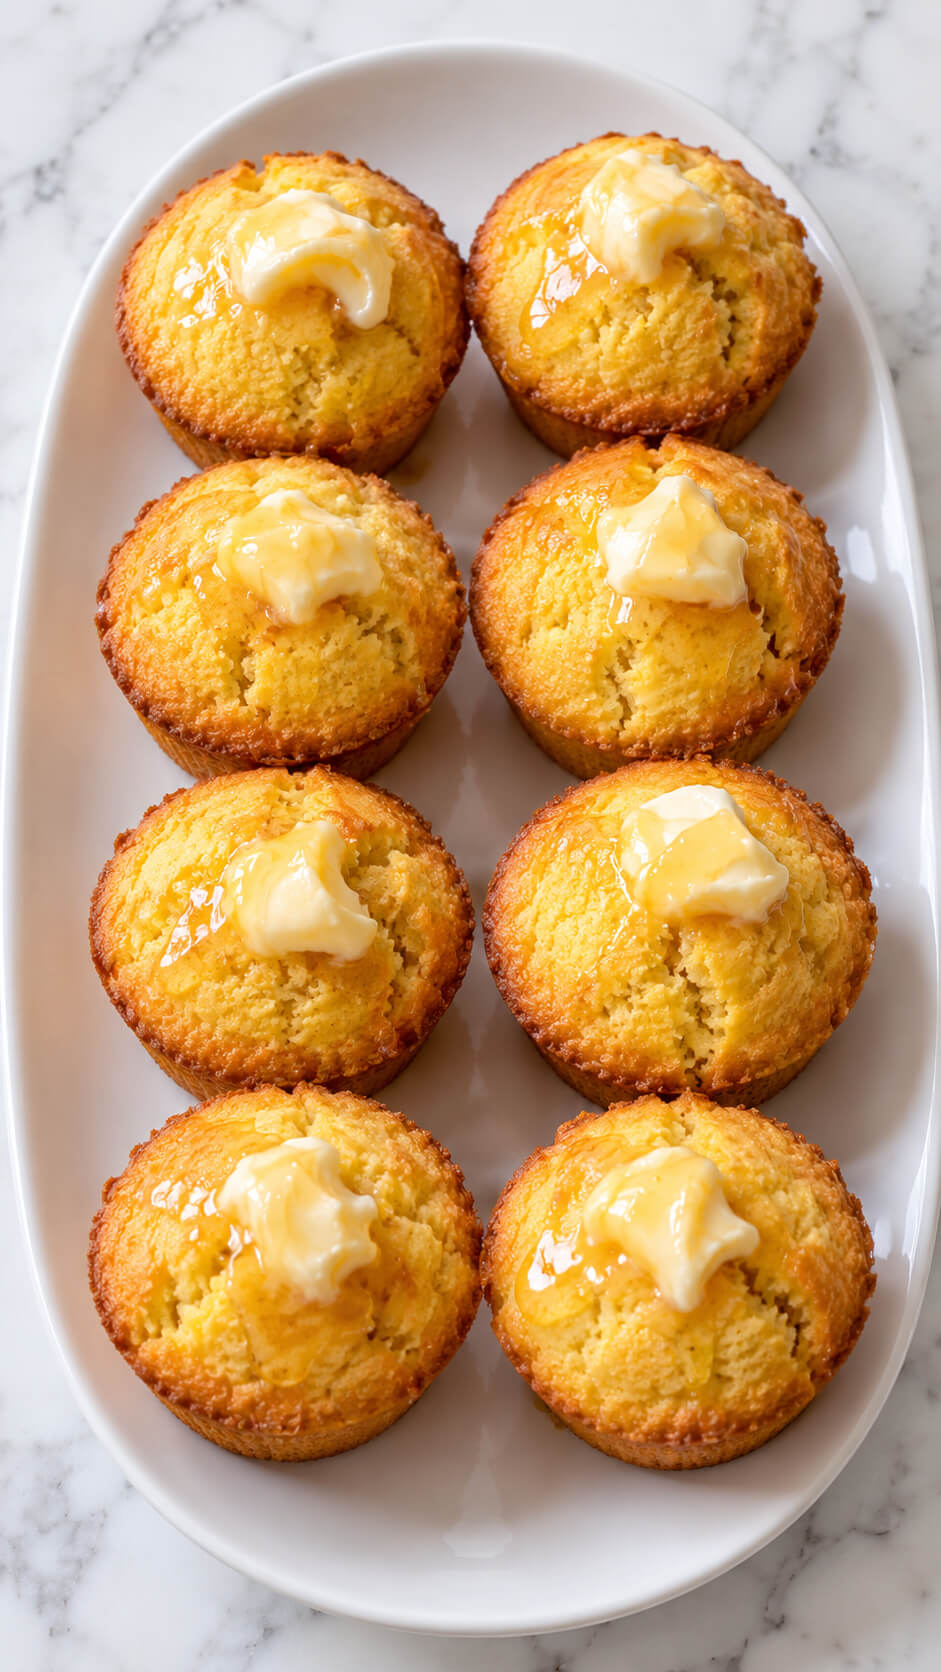
Soft, golden, and a little sweet—these mini muffins bring Southern charm to the table.
Whip up some honey butter for spreading, and you’ve got an irresistible pairing.
They’re simple, comforting, and perfect for balancing out the savory appetizers on your spread.
Ingredients
- 1 cup (125 g) all-purpose flour
- 1 cup (150 g) yellow cornmeal
- ¼ cup (50 g) granulated sugar
- 1 tablespoon baking powder
- ½ teaspoon salt
- 1 cup (240 ml) buttermilk
- 2 large eggs
- ⅓ cup (75 g) unsalted butter, melted
- 2 tablespoons honey
For the honey butter
- ¼ cup (55 g) unsalted butter, softened
- 2 tablespoons honey
- Pinch of salt, optional
Instructions
1. Preheat the oven and prepare the muffin pan
Preheat your oven to 375°F (190°C). Lightly grease a mini muffin pan with butter or nonstick cooking spray, making sure to coat the wells thoroughly to prevent sticking. You can also use mini paper liners if preferred.
2. Combine the dry ingredients
In a large mixing bowl, whisk together the all-purpose flour, yellow cornmeal, sugar, baking powder, and salt until evenly combined. Mixing these ingredients first helps distribute the baking powder throughout the batter, giving the muffins a light, fluffy texture.
3. Mix the wet ingredients
In a separate bowl, whisk the buttermilk, eggs, melted butter, and honey until smooth. Allow the melted butter to cool slightly before adding it so it does not cook the eggs. The buttermilk adds moisture and a gentle tang that balances the sweetness.
4. Combine the wet and dry mixtures
Pour the wet ingredients into the bowl of dry ingredients. Stir gently with a spatula until everything is just combined and no large pockets of dry flour remain. Avoid overmixing, as this can make the muffins dense rather than tender.
5. Fill the mini muffin pan
Spoon the batter into the prepared mini muffin wells, filling each approximately three-quarters full. Distribute the batter evenly so the muffins bake at the same rate and develop beautifully rounded, golden tops.
6. Bake until golden and fluffy
Place the muffin pan in the preheated oven and bake for 10–14 minutes, or until the tops are golden, lightly cracked, and a toothpick inserted into the center comes out clean. If using a regular-sized muffin pan instead, increase the baking time to approximately 15–20 minutes.
7. Prepare the honey butter
While the muffins bake, place the softened butter in a small bowl. Add the honey and a small pinch of salt, then stir until creamy and smooth. Taste and adjust the honey according to your preferred level of sweetness.
8. Brush the muffins with honey butter
Remove the muffins from the oven and let them rest in the pan for about 3–5 minutes. While they are still warm, spread or spoon a small dollop of honey butter onto each muffin. The heat will gently melt the butter, allowing its sweet, rich flavor to soak into the golden tops.
9. Serve the cornbread muffins warm
Carefully remove the muffins from the pan and arrange them on a clean white serving plate. Add a little extra honey butter if desired and serve while warm, when the centers are soft and the buttery topping is slightly melted.
Tip
For the fluffiest muffins, avoid overmixing the batter and use room-temperature eggs and buttermilk. For extra golden tops and a richer finish, brush the muffins with honey butter immediately after baking. Store leftovers in an airtight container for up to 2 days at room temperature, and reheat briefly before serving to soften the butter topping.
27. Caramel Apple Skewers
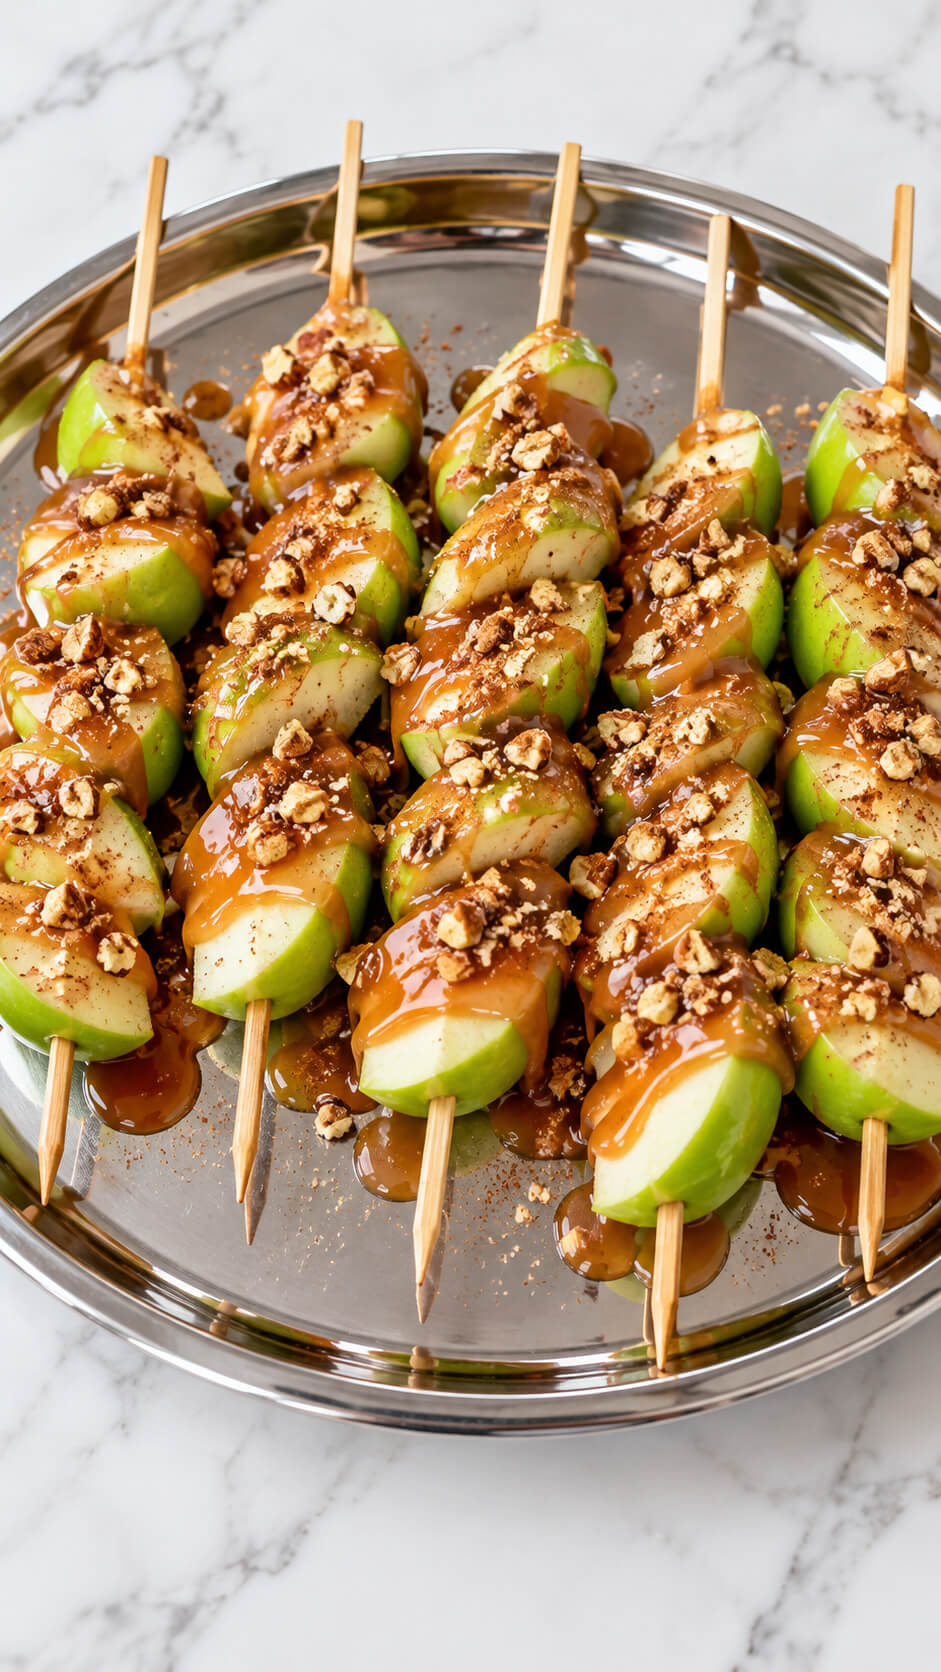
End on a playful note!
Thread apple slices onto skewers, drizzle with warm caramel, and sprinkle with crushed nuts or a dash of cinnamon.
They’re a fun, mess-free take on a classic fall treat—sweet, crisp, and guaranteed to make everyone smile.