17 Halloween Soup Ideas Perfect for a Spooky Gathering

I used to think Halloween food had to be all about candy, cookies, and spooky desserts.
Then I discovered soup.
A warm bowl of soup can be cozy, filling, and surprisingly fun for Halloween! With a few simple toppings, colors, and creative names, even an everyday soup can fit the spooky mood.
These Halloween soup ideas are perfect for parties, family dinners, or a chilly night at home.
So grab your favorite pot, get creative, and let’s get started!
1. Pumpkin Soup with Ghostly Cream

Nothing says Halloween quite like a bowl of pumpkin soup dressed up for the occasion.
Make a smooth, savory pumpkin soup with roasted pumpkin, onion, garlic, vegetable or chicken stock, and a touch of cream.
For the spooky finish, spoon sour cream into a piping bag and create little ghost shapes on the surface.
Add tiny black-pepper eyes, and suddenly an everyday soup looks ready for a haunted dinner table.
Serve it in dark bowls for extra drama. It is cozy, inexpensive, kid-friendly, and wonderfully easy to prepare ahead.
Ingredients
- 4 cups pumpkin purée, preferably roasted pumpkin for deeper flavor
- 1 medium yellow onion, finely chopped
- 3 garlic cloves, minced
- 2 tablespoons olive oil
- 4 cups vegetable or chicken stock
- 1 cup heavy cream
- 1 teaspoon salt, plus more to taste
- ½ teaspoon black pepper
- ½ teaspoon smoked paprika
- ¼ teaspoon ground nutmeg
- 2 tablespoons sour cream, for the ghost decorations
- 8–12 whole black peppercorns, for the ghost eyes
- Fresh parsley or pumpkin seeds, optional for serving
Instructions
1. Sauté the onion and garlic
Heat the olive oil in a large pot over medium heat. Add the chopped onion and cook for about 5–6 minutes, stirring occasionally, until soft and translucent. Add the minced garlic and cook for another 30–60 seconds, just until fragrant. Avoid browning the garlic, as it can become bitter and overpower the delicate pumpkin flavor.
2. Add the pumpkin and seasonings
Stir the pumpkin purée into the softened onion mixture. Add the smoked paprika, nutmeg, salt, and black pepper, stirring well so the seasonings are evenly distributed. Let everything cook together for about 2 minutes. This brief cooking time helps bring out the warmth of the spices before the stock is added.
3. Pour in the stock
Gradually add the vegetable or chicken stock, stirring as you pour. Bring the mixture to a gentle simmer over medium heat. Once bubbling lightly, reduce the heat and let the soup cook uncovered for approximately 15 minutes. Stir occasionally to prevent anything from settling on the bottom of the pot.
4. Blend the soup until smooth
Use an immersion blender to blend the soup directly in the pot until it becomes completely smooth and velvety. If using a countertop blender, work in small batches and carefully vent the lid because hot soup can create pressure. Blend until no noticeable chunks remain, then return the soup to the pot if necessary.
5. Stir in the cream
Lower the heat and slowly stir in the heavy cream. Allow the soup to warm gently for another 3–4 minutes, but do not let it boil vigorously after adding the cream. Taste and adjust the salt and pepper as needed. The finished soup should be thick enough to coat a spoon while remaining easy to ladle.
6. Prepare the ghost decorations
Transfer the sour cream into a small piping bag or a clean sandwich bag with the corner snipped off. Pipe small ghost-shaped blobs onto a plate or directly onto the soup once served. Carefully place two whole black peppercorns onto each ghost to create tiny eyes. Keep the shapes fairly small so they remain recognizable without taking over the bowl.
7. Ladle the soup into bowls
Pour the hot pumpkin soup into shallow serving bowls, leaving enough room at the top for the ghost decorations. Gently smooth the surface if necessary, then place two or three sour-cream ghosts on each bowl. The heat from the soup will soften the sour cream slightly, giving the ghosts a charming homemade appearance.
8. Add the final garnish
For an optional finishing touch, sprinkle a few roasted pumpkin seeds or finely chopped parsley around the ghosts. Keep the garnish light so the spooky decorations remain the star. Serve immediately while the soup is hot and creamy, preferably with warm crusty bread for dipping.
Tip
For the best Halloween presentation, make the sour-cream ghosts just before serving. If they sit too long on very hot soup, they can spread and lose their shape. You can also chill the sour cream briefly before piping it, which makes it thicker and easier to shape.
Serving Suggestion
Serve each bowl with a couple of crisp toasted bread slices or pumpkin-shaped croutons. For a Halloween party, prepare the soup in a large pot and let guests add their own ghost decorations—the kids will love creating their little haunted bowls.
2. Tomato Soup with a Spiderweb Design
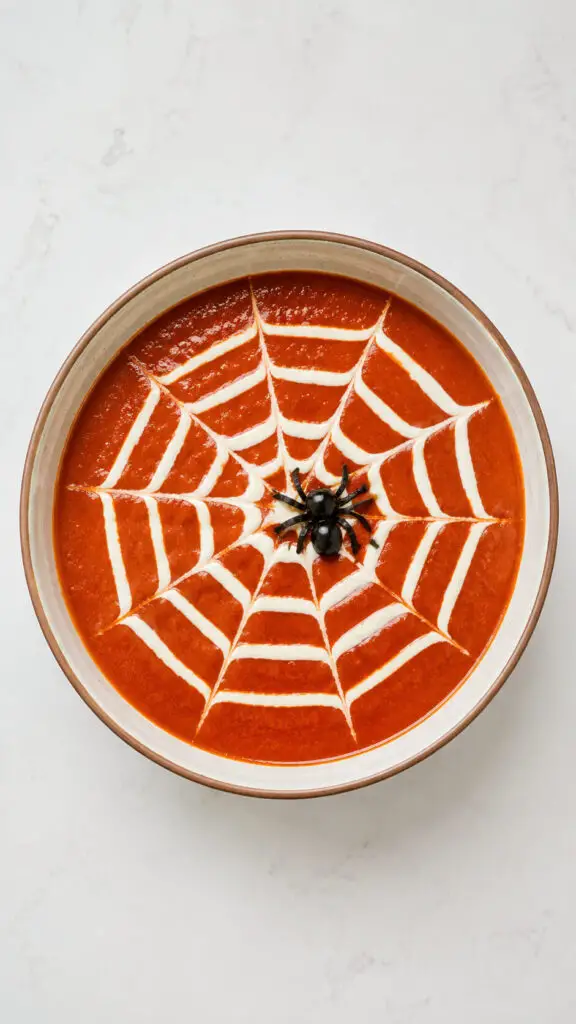
Classic tomato soup gets a Halloween makeover with one simple trick: the spiderweb.
Ladle hot tomato soup into shallow bowls, then pipe three or four concentric circles of cream across the surface.
Drag a toothpick from the center outward at several points to create a web effect.
Place a tiny olive “spider” in the middle if you are feeling ambitious.
The soup itself can stay wonderfully traditional, with roasted tomatoes, garlic, onion, herbs, and stock.
It is familiar enough for picky eaters while still looking impressively creepy on the table.
Ingredients
- 6 large ripe tomatoes, roughly chopped
- 1 medium yellow onion, chopped
- 4 garlic cloves, peeled
- 2 tablespoons olive oil
- 3 cups vegetable or chicken stock
- 1 teaspoon salt
- ½ teaspoon black pepper
- 1 teaspoon dried basil
- ½ teaspoon dried oregano
- 1 teaspoon sugar, optional, if the tomatoes are very acidic
- ½ cup heavy cream, plus extra for the spiderweb decoration
- Fresh basil leaves, optional for serving
Instructions
1. Roast the tomatoes and garlic
Preheat the oven to 400°F (200°C). Arrange the chopped tomatoes, onion, and garlic on a baking sheet and drizzle with olive oil. Sprinkle with a little salt and pepper, then roast for 25–30 minutes, until the tomatoes are soft, slightly caramelized, and fragrant. Roasting gives the soup a deeper, sweeter flavor than simply simmering the tomatoes.
2. Transfer the roasted vegetables to a pot
Carefully transfer the roasted tomatoes, onion, and garlic to a large saucepan or soup pot, making sure to scrape in any flavorful juices and browned bits from the baking sheet. These caramelized pieces add extra richness and savory flavor to the finished soup.
3. Add the stock and herbs
Pour the vegetable or chicken stock into the pot. Stir in the dried basil and oregano, then add the remaining salt and black pepper. Bring the mixture to a gentle boil over medium-high heat, then reduce the heat and simmer for about 10 minutes so the roasted vegetables and herbs can blend together.
4. Blend the soup until smooth
Use an immersion blender to purée the soup directly in the pot until it becomes completely smooth. Alternatively, carefully blend it in batches using a countertop blender. For an especially silky texture, strain the soup through a fine-mesh sieve after blending to remove tomato seeds and bits of skin.
5. Stir in the cream
Reduce the heat to low and stir in the heavy cream. If the tomatoes taste particularly sharp or acidic, add the optional teaspoon of sugar. Warm the soup gently for another 2–3 minutes without allowing it to boil rapidly. Taste and adjust the salt, pepper, or herbs as needed.
6. Create the spiderweb cream
Pour a small amount of cream into a piping bag or a clean sandwich bag with the corner snipped very finely. The opening should be small enough to produce thin, controlled lines. If the cream is very runny, chill it for a few minutes first so the spiderweb pattern holds its shape better on the soup.
7. Pipe the spiderweb onto the soup
Ladle the hot tomato soup into shallow bowls. Starting in the center, pipe a small circle, followed by two or three larger circles around it. Keep the circles evenly spaced. Then drag a toothpick from the center toward the outer edge at several points around the bowl to pull the cream into a classic spiderweb design.
8. Add the edible spider
For an optional creepy finishing touch, place a small black-olive piece near the center of the web to represent the spider’s body. Cut several very thin strips of olive for the legs and arrange them around the body. Keep the spider small so the delicate cream web remains the main decoration.
Tip
For the cleanest spiderweb, make the cream lines as thin as possible and work quickly after ladling the soup. A shallow, wide bowl gives you more room to create the web and makes the design much easier to see.
3. Black Bean Soup with Olive Eyeballs
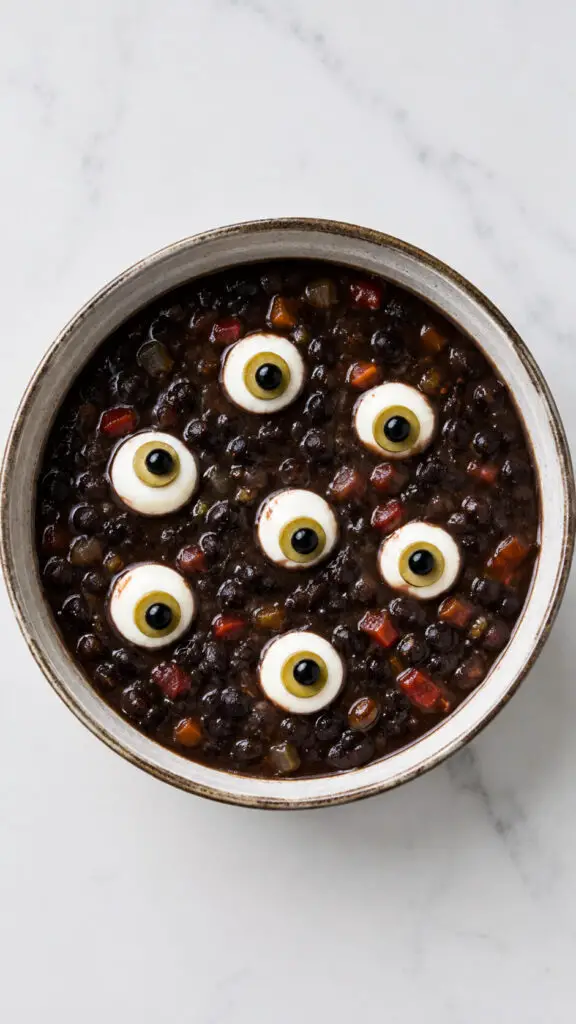
For a darker Halloween centerpiece, black bean soup is practically begging to be spooky.
Cook black beans with tomatoes, onion, garlic, cumin, peppers, and stock until thick and hearty.
Then create edible eyeballs using sliced hard-boiled eggs, green olives, and tiny pieces of black olive for pupils.
Float a few on each bowl just before serving.
The contrast between the deep, almost-black soup and the bright eyeballs is fantastic under Halloween decorations.
Add avocado or cilantro around the edges for color, and you have a filling soup that looks much more mischievous than it tastes.
Ingredients
- 2 tablespoons olive oil
- 1 medium yellow onion, finely chopped
- 3 garlic cloves, minced
- 1 medium red bell pepper, diced
- 2 teaspoons ground cumin
- 1 teaspoon smoked paprika
- ½ teaspoon dried oregano
- 4 cups cooked black beans, drained and rinsed, or about 2 cans
- 1 can (14.5 ounces) diced tomatoes
- 4 cups chicken or vegetable stock
- ½ teaspoon salt, plus more to taste
- ¼ teaspoon black pepper
- 1 tablespoon fresh lime juice
- 2 hard-boiled eggs
- 3–4 green olives
- 1 black olive, for the pupils
- Fresh cilantro, optional
Instructions
1. Sauté the vegetables
Heat the olive oil in a large soup pot over medium heat. Add the chopped onion and red bell pepper and cook for 5–7 minutes, stirring occasionally, until the vegetables soften. Add the minced garlic and cook for another 30 seconds, just until fragrant. This creates a flavorful base for the hearty black bean soup.
2. Toast the spices
Stir the cumin, smoked paprika, and dried oregano into the softened vegetables. Cook for about 30 seconds to 1 minute, stirring constantly. Warming the spices in the oil helps release their aroma and gives the soup a deeper, slightly smoky flavor that works beautifully with the black beans.
3. Add the beans and tomatoes
Add the drained black beans and diced tomatoes to the pot. Stir thoroughly to combine everything. Let the mixture cook for about 2 minutes so the beans can absorb some of the seasoned tomato juices. If you prefer a slightly thicker soup, gently mash a small portion of the beans against the side of the pot with the back of your spoon.
4. Pour in the stock
Pour the chicken or vegetable stock into the pot and stir well. Bring the soup to a gentle boil, then reduce the heat to low. Allow it to simmer uncovered for 20–25 minutes, stirring occasionally. The broth should become richer and slightly thicker while the beans and vegetables soften further.
5. Adjust the texture
For a soup with more body, use an immersion blender for just a few seconds in different areas of the pot, leaving plenty of whole beans intact. Alternatively, transfer about 1 cup of the soup to a blender, blend until smooth, and stir it back into the pot. This gives you a naturally creamy texture without needing cream.
6. Finish the soup with lime
Stir in the fresh lime juice and taste the soup. Add more salt, black pepper, or lime juice if needed. The lime should brighten the rich beans and smoky spices without making the soup taste distinctly sour. Keep the soup warm over low heat while you prepare the Halloween garnish.
7. Prepare the edible eyeballs
Slice the hard-boiled eggs into thick rounds. Cut green olives into small circular pieces and place one on each egg slice. Then cut tiny pieces from a black olive and position them in the centers of the green olive slices to create pupils. The combination of white egg, green olive, and black olive creates surprisingly convincing edible eyeballs.
8. Decorate each bowl
Ladle the hot black bean soup into shallow bowls, making sure several whole black beans remain visible on the surface. Carefully arrange two or three olive eyeballs on top of each serving. Add a few fresh cilantro leaves if desired, but keep the garnish restrained so the creepy eyes remain the main attraction.
Tip
Make the eyeballs shortly before serving so the egg stays fresh and the olive pieces remain neatly positioned. For an even spookier effect, make the pupils slightly off-center so every bowl looks as though its little edible eyes are staring in a different direction.
4. Broccoli Cheddar Soup with Cheese Ghosts

Broccoli cheddar soup is rich, creamy, and wonderfully comforting on a chilly Halloween evening.
The fun comes from the garnish.
Cut thin slices of mild white cheese into ghost shapes using a small cookie cutter, then gently place them on top of each bowl while the soup is hot enough to soften them slightly.
Give each ghost two tiny peppercorn eyes.
The cheese melts just enough to become deliciously gooey without completely disappearing.
Kids especially love discovering the little ghosts hiding in their soup, and parents appreciate having a vegetable-filled dinner that feels like a celebration.
Ingredients
- 4 cups fresh broccoli florets, chopped into small pieces
- 2 tablespoons butter
- 1 medium yellow onion, finely diced
- 2 garlic cloves, minced
- 4 cups vegetable or chicken stock
- 2 cups whole milk
- 1 cup heavy cream
- 2 cups sharp cheddar cheese, freshly grated
- ½ teaspoon salt, plus more to taste
- ½ teaspoon black pepper
- ¼ teaspoon smoked paprika
- ⅛ teaspoon ground nutmeg
- 8–10 small slices white cheese, such as mozzarella or provolone
- 16–20 whole black peppercorns, for the ghost eyes
Instructions
1. Sauté the onion and garlic
Melt the butter in a large soup pot over medium heat. Add the diced onion and cook for 5–6 minutes, stirring occasionally, until soft and translucent. Add the minced garlic and cook for about 30 seconds, just until fragrant. Keep the heat moderate so the garlic does not brown or become bitter.
2. Cook the broccoli
Add the chopped broccoli florets to the pot and pour in the vegetable or chicken stock. Stir in the salt, black pepper, smoked paprika, and nutmeg. Bring everything to a gentle boil, then reduce the heat and simmer for 10–12 minutes, or until the broccoli is very tender but still has a fresh green color.
3. Add the milk and cream
Pour the whole milk and heavy cream into the pot and stir well. Reduce the heat to low and warm the soup for another 4–5 minutes. Do not allow it to boil vigorously after adding the dairy, as gentle heating will help keep the soup smooth and creamy.
4. Blend the soup
Use an immersion blender to blend the soup until mostly smooth, leaving a little broccoli texture if you prefer a heartier consistency. Alternatively, carefully blend the soup in batches using a countertop blender. Return it to the pot and keep it over low heat.
5. Melt in the cheddar
Gradually add the freshly grated cheddar cheese, stirring constantly after each handful. Allow each addition to melt before adding more. Continue stirring until the cheese has completely melted and the soup is rich, creamy, and evenly combined. Taste and adjust the seasoning if necessary.
6. Cut the cheese ghosts
Use a small ghost-shaped cookie cutter to cut several ghost shapes from thin slices of white mozzarella or provolone. If you do not have a ghost cutter, use a small knife to create simple ghost silhouettes with rounded tops and wavy bottoms. Keep the shapes small enough to fit comfortably on the soup.
7. Add the ghost eyes
Place two whole black peppercorns on each cheese ghost to create tiny eyes. Press them gently into the cheese so they stay in position. For a milder garnish, you can use very small pieces of black olive instead of whole peppercorns, especially when serving children.
8. Serve the soup
Ladle the hot broccoli cheddar soup into shallow bowls, filling each bowl without covering the entire surface. Carefully place two or three cheese ghosts on top. The heat from the soup will gently soften the cheese, creating slightly melted edges while allowing the ghost shapes to remain visible. Serve immediately with crusty bread if desired.
Tip
Grate the cheddar yourself instead of using pre-shredded cheese. Freshly grated cheese melts much more smoothly and gives the soup a creamier texture. For the best ghost effect, chill the cheese slices for a few minutes before cutting them so the shapes are easier to handle.
5. Chicken Noodle Soup with “Witch Finger” Breadsticks
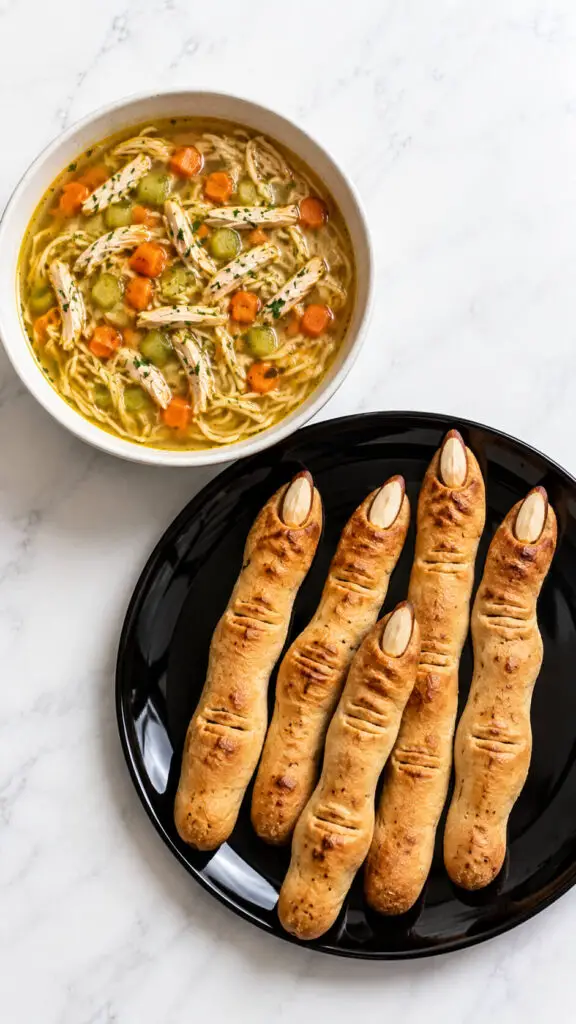
Turn comforting chicken noodle soup into a Halloween supper by pairing it with creepy breadstick “witch fingers.”
Prepare a classic broth-based soup with chicken, carrots, celery, onion, and noodles.
For the breadsticks, shape pizza or bread dough into long, slightly crooked fingers, score knuckle lines with a knife, and press a sliced almond onto the tip to resemble a fingernail.
Bake until golden and serve alongside the soup.
The fingers are especially fun for dipping, although someone at the table will inevitably announce that they are eating a witch one bite at a time.
Ingredients
- 6 cups chicken broth
- 2 cups cooked shredded chicken
- 2 medium carrots, peeled and diced
- 2 celery stalks, diced
- 1 small yellow onion, finely chopped
- 2 garlic cloves, minced
- 1½ cups egg noodles
- 1 tablespoon olive oil
- 1 teaspoon dried thyme
- ½ teaspoon dried parsley
- ½ teaspoon salt, plus more to taste
- ¼ teaspoon black pepper
- 1 bay leaf
- 2 tablespoons fresh parsley, chopped
For the witch-finger breadsticks:
- 1 pound prepared pizza or bread dough
- 1 egg, beaten
- 12–16 sliced almonds
- ½ teaspoon dried oregano
- 1 tablespoon grated Parmesan, optional
Instructions
1. Prepare the witch fingers
Divide the bread dough into 12–16 equal pieces and roll each piece into a thin, finger-length rope. Make the shapes slightly uneven and crooked so they look more like spooky witch fingers than perfectly straight breadsticks.
2. Add the creepy details
Use a small knife to make two or three shallow lines across each breadstick to resemble knuckles. Press one sliced almond firmly onto the end of each piece to create a fingernail. Avoid cutting too deeply because the dough will expand while baking.
3. Bake the breadsticks
Arrange the shaped fingers on a parchment-lined baking sheet, leaving a little space between each one. Brush them lightly with beaten egg and sprinkle with oregano and Parmesan if desired. Bake according to the dough’s package directions, generally at around 400°F (200°C) for 12–16 minutes, until puffed and golden brown.
4. Sauté the vegetables
While the breadsticks bake, heat the olive oil in a large soup pot over medium heat. Add the onion, carrots, and celery and cook for about 6–8 minutes, stirring occasionally, until the vegetables begin to soften. Add the garlic and cook for another 30 seconds.
5. Add the chicken broth
Pour the chicken broth into the pot and add the bay leaf, thyme, parsley, salt, and black pepper. Bring the mixture to a gentle boil, then reduce the heat and simmer for approximately 10 minutes so the vegetables become tender and the broth develops a savory flavor.
6. Add the noodles
Stir the egg noodles into the simmering broth and cook according to the package directions, usually about 6–8 minutes. Stir occasionally to prevent the noodles from sticking together. Keep an eye on them because overcooked noodles can become soft and absorb too much of the broth.
7. Stir in the chicken
Add the cooked shredded chicken and simmer for another 2–3 minutes, just until the chicken is thoroughly heated. Remove the bay leaf and taste the soup, adding more salt or pepper if needed. Stir in the fresh parsley just before serving for a little color and freshness.
8. Serve the spooky soup
Ladle the hot chicken noodle soup into bowls and arrange two or three witch-finger breadsticks alongside each serving. For extra Halloween fun, rest one breadstick partly across the edge of the bowl so it looks like a witch’s hand reaching into the soup.
Tip
Bake the witch fingers slightly darker than ordinary breadsticks. The deeper golden-brown color makes the almond “fingernails” and knuckle marks stand out much better, giving you a creepier Halloween presentation without adding artificial food coloring.
6. Potato Soup with Skull-Shaped Croutons

Creamy potato soup makes an excellent blank canvas for Halloween decorations.
Prepare it with potatoes, onion, garlic, stock, and milk or cream, then blend until velvety.
For the topping, cut sturdy bread into skull shapes using a small cookie cutter and toast the pieces until crisp.
Use a straw or tiny cutter to make eye sockets before baking, or simply draw the details with a little paprika and olive paste after toasting.
Scatter the skull croutons over the soup just before serving.
They add crunch, personality, and just enough spooky silliness to make dinner memorable.
Ingredients
- 4 large russet potatoes, peeled and cut into small cubes
- 1 medium yellow onion, finely chopped
- 3 garlic cloves, minced
- 2 tablespoons butter
- 4 cups chicken or vegetable stock
- 1 cup whole milk
- ½ cup heavy cream
- 1 teaspoon salt
- ½ teaspoon black pepper
- ½ teaspoon dried thyme
- ¼ teaspoon smoked paprika
- 4–6 slices sturdy white or sourdough bread
- 1 tablespoon olive oil
- Fresh chives, finely chopped, optional
- Extra black pepper, for the skull details
Instructions
1. Sauté the onion and garlic
Melt the butter in a large pot over medium heat. Add the chopped onion and cook for about 5 minutes, stirring occasionally, until soft and translucent. Add the minced garlic and cook for another 30 seconds, just until fragrant. This creates a flavorful base for the creamy potato soup without adding too much color.
2. Add the potatoes and stock
Add the cubed potatoes, chicken or vegetable stock, salt, black pepper, thyme, and smoked paprika to the pot. Stir everything together and bring the mixture to a gentle boil. Reduce the heat to medium-low, cover the pot partially, and simmer for approximately 15–20 minutes, or until the potatoes are completely tender when pierced with a fork.
3. Blend the soup until creamy
Use an immersion blender to purée the soup directly in the pot until smooth and creamy. If you prefer a little texture, blend only part of the soup and leave some small potato pieces intact. You can also use a countertop blender, working carefully in batches because hot soup can create pressure inside the blender.
4. Add the milk and cream
Stir the whole milk and heavy cream into the blended soup. Warm the soup gently over low heat for about 3–5 minutes, stirring occasionally. Avoid bringing it to a hard boil after adding the dairy. Taste the soup and adjust the salt, pepper, or smoked paprika according to your preference.
5. Cut the skull croutons
Use a small skull-shaped cookie cutter to cut skulls from slices of sturdy white or sourdough bread. For recognizable skull details, carefully cut or press small openings for the eyes and mouth using a small knife or the end of a clean straw. Keep the bread pieces thick enough that they will remain intact after toasting.
6. Toast the skull croutons
Brush both sides of the skull-shaped bread pieces lightly with olive oil. Arrange them on a baking sheet and toast in a preheated 400°F (200°C) oven for about 6–10 minutes, turning once, until crisp and golden around the edges. Watch them closely because the smaller shapes can brown quickly.
7. Finish the skull details
Once the croutons have cooled slightly, make the skull features more noticeable with a tiny sprinkle of black pepper or smoked paprika. If the eye and mouth openings became less defined during baking, gently reinforce them with the tip of a small knife. The goal is a cute spooky skull rather than anything overly elaborate.
8. Serve the Halloween soup
Ladle the hot potato soup into shallow bowls, making sure the surface is relatively smooth. Carefully place two or three skull-shaped croutons on top of each serving. Sprinkle a few chopped chives around the edges if desired, keeping the garnish minimal so the skulls remain the main attraction. Serve immediately while the soup is hot and the croutons are crisp.
Tip
For especially crisp skull croutons, toast them separately and add them immediately before serving. If they sit in the soup for too long, they will soften. You can also prepare the soup a day ahead—the flavor often becomes even better overnight. Just reheat it gently and make fresh croutons before serving.
7. Carrot Ginger Soup with Pumpkin Seed Bats

Bright orange carrot ginger soup already has the perfect Halloween color, so it only needs a clever garnish.
Roast carrots with onion and garlic, simmer them with stock and fresh ginger, then blend until smooth.
Sprinkle toasted pumpkin seeds across the top and arrange a few into simple bat silhouettes.
You can also cut small bat shapes from thin slices of roasted carrot for a more recognizable design.
The ginger keeps the soup lively rather than overly sweet, while the pumpkin seeds add welcome crunch. It is elegant enough for adults but still playful enough for children.
Ingredients
- 2 pounds carrots, peeled and roughly chopped
- 1 medium yellow onion, chopped
- 3 garlic cloves, minced
- 1 tablespoon fresh ginger, finely grated
- 2 tablespoons olive oil
- 5 cups vegetable or chicken stock
- ½ teaspoon ground cumin
- ½ teaspoon salt, plus more to taste
- ¼ teaspoon black pepper
- ½ cup heavy cream or coconut milk
- ¼ cup pumpkin seeds, for the bat garnish
- 1 tablespoon fresh parsley or chives, finely chopped, optional
Instructions
1. Roast the carrots
Preheat the oven to 400°F (200°C). Spread the chopped carrots on a baking sheet, drizzle with olive oil, and toss until evenly coated. Roast for 25–30 minutes, turning once halfway through, until the carrots are tender and lightly caramelized around the edges. Roasting gives the soup a deeper, naturally sweet flavor.
2. Sauté the onion and garlic
Heat a large pot over medium heat and add a small drizzle of olive oil. Add the chopped onion and cook for 5–6 minutes, stirring occasionally, until softened. Add the minced garlic and grated fresh ginger, then cook for another minute until fragrant. Keep the heat moderate so the garlic does not burn.
3. Add the roasted carrots
Transfer the roasted carrots to the pot with the onion, garlic, and ginger. Sprinkle in the cumin, salt, and black pepper, then stir thoroughly. Cook everything together for about 1–2 minutes so the spices coat the vegetables and become fragrant.
4. Simmer the soup
Pour the stock into the pot and stir to combine. Bring the mixture to a gentle boil, then reduce the heat and simmer for approximately 10–15 minutes. This allows the roasted carrots to become exceptionally tender while giving the ginger and spices time to flavor the broth.
5. Blend until silky smooth
Use an immersion blender to purée the soup directly in the pot until smooth and velvety. Alternatively, carefully transfer the soup to a blender in batches and blend until completely smooth. If the soup seems too thick, add a little extra stock until you reach a creamy, spoonable consistency.
6. Stir in the cream
Reduce the heat to low and stir in the heavy cream or coconut milk. Warm the soup gently for 2–3 minutes without allowing it to boil rapidly. Taste and adjust the salt, pepper, or ginger according to your preference. The finished soup should have a vibrant orange color and a smooth, creamy texture.
7. Shape the pumpkin seeds into bats
Toast the pumpkin seeds in a dry skillet over medium-low heat for a few minutes, stirring frequently, until fragrant and lightly crisp. To create bat decorations, arrange several seeds together on a plate or piece of parchment, using the larger seeds for the wings and smaller pieces for the body. You can also use a few finely chopped seeds to define the ears and wing edges.
8. Add the bat decorations
Ladle the hot carrot ginger soup into shallow bowls. Carefully arrange the pumpkin seeds into small bat silhouettes across the surface of each bowl. Keep the bats relatively simple because the natural shape and arrangement of the seeds will create the recognizable Halloween design. Add a tiny sprinkle of chopped parsley or chives if desired.
Tip
For the cleanest bat shapes, let the soup sit undisturbed for a minute or two before adding the pumpkin seeds. A smooth, settled surface makes it much easier to arrange the seeds without them sliding around. If you are serving children, make the bats larger and simpler so they are easy to recognize.
8. Cauliflower Soup with Creepy Cucumber Skulls
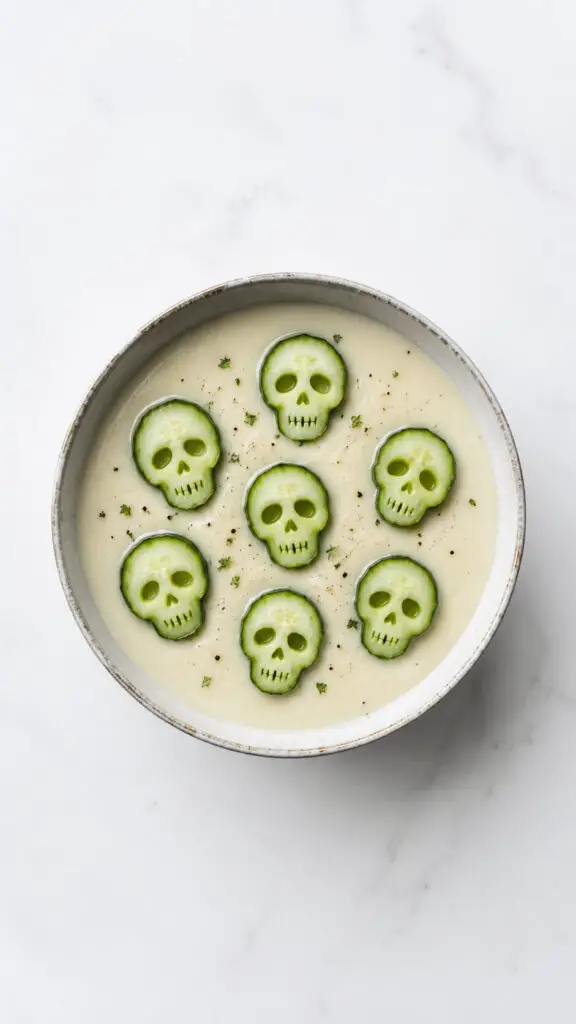
A pale cauliflower soup can become surprisingly eerie with a little vegetable artistry.
Make a silky cauliflower soup with onion, garlic, stock, and a splash of cream.
For the decoration, carve small skull faces from thick cucumber slices using a sharp paring knife or tiny cutters.
Cut simple eye sockets and a mouth, then gently place the cucumber skulls on top just before serving.
Their fresh crunch works beautifully against the creamy soup.
This idea is particularly handy when you want Halloween food that looks elaborate but does not require artificial food coloring or complicated ingredients.
Ingredients
- 1 large head cauliflower, cut into florets
- 1 medium yellow onion, chopped
- 3 garlic cloves, minced
- 2 tablespoons olive oil
- 4 cups vegetable or chicken stock
- ½ cup heavy cream
- ½ teaspoon salt, plus more to taste
- ¼ teaspoon black pepper
- ¼ teaspoon ground nutmeg
- ½ teaspoon dried thyme
- 1 large cucumber
- 2 tablespoons sour cream or plain Greek yogurt, optional
- Fresh chives or parsley, for garnish
- A few black sesame seeds or black olive pieces, for optional decoration
Instructions
1. Prepare the cauliflower and vegetables
Wash the cauliflower thoroughly and cut it into small, evenly sized florets so they cook at the same rate. Chop the onion and mince the garlic. Peel the cucumber only if desired, leaving some green skin around the edges will make the finished cucumber skulls more recognizable.
2. Sauté the onion and garlic
Heat the olive oil in a large soup pot over medium heat. Add the chopped onion and cook for about 5 minutes, stirring occasionally, until soft and translucent. Add the minced garlic, thyme, and nutmeg, then cook for another 30 seconds until fragrant. Keep the heat moderate so the garlic does not brown.
3. Cook the cauliflower
Add the cauliflower florets to the pot and pour in the vegetable or chicken stock. Bring everything to a gentle boil, then reduce the heat and simmer for approximately 15–20 minutes. The cauliflower should become very tender when pierced with a fork. This is important because softer cauliflower will produce a smoother, creamier soup.
4. Blend the soup until silky
Use an immersion blender to purée the soup directly in the pot until smooth and creamy. Alternatively, carefully transfer the soup to a countertop blender in batches. Blend until there are no large pieces of cauliflower remaining. If the soup seems too thick, add a little extra stock until it reaches your preferred consistency.
5. Add the cream and season
Return the soup to low heat and stir in the heavy cream. Add the salt and black pepper, then taste carefully and adjust the seasoning. Warm the soup for another 2–3 minutes without allowing it to boil vigorously. The finished soup should be creamy, mild, and smooth enough to provide a clean surface for the Halloween decoration.
6. Carve the cucumber skulls
Slice the cucumber into thick rounds, approximately ¼-inch thick. Using a small sharp paring knife, carefully carve two small eye sockets, a tiny nose opening, and a simple mouth into each slice. Leave enough cucumber flesh around the edges so the skull shape remains intact. Do not make the facial details too deep, or the slices may break apart.
7. Ladle the soup into bowls
Pour the hot cauliflower soup into shallow bowls, filling each bowl without reaching the rim. Smooth the surface gently with the back of a spoon if necessary. A relatively flat surface will make it easier to position the cucumber skulls and will give the finished presentation a cleaner, more dramatic Halloween appearance.
8. Arrange the cucumber skulls
Carefully place one or two cucumber skulls on top of each serving. Position them slightly off-center rather than lining them up perfectly, which gives the presentation a more natural homemade appearance. For additional facial detail, tiny black sesame seeds or very small pieces of black olive can be placed inside the carved eye sockets.
9. Finish and serve
Add a very small amount of chopped chives or parsley around the skulls for a touch of color. If you like, drizzle a thin swirl of sour cream or Greek yogurt across the soup before adding the cucumber decorations. Serve immediately while the soup is warm and the cucumber remains crisp.
Tip
Chill the cucumber before carving it. A cold, firm cucumber is easier to cut cleanly and is less likely to become soft while you work. For the most convincing skulls, use a small paring knife and make the eyes noticeably larger than the nose and mouth.
Serving Suggestion
Pair this creamy cauliflower soup with warm garlic bread, toasted baguette slices, or crisp crackers. For a Halloween dinner, place one cucumber skull in the center of every bowl just before serving so guests get the full spooky surprise.
9. French Onion Soup with Graveyard Toasts
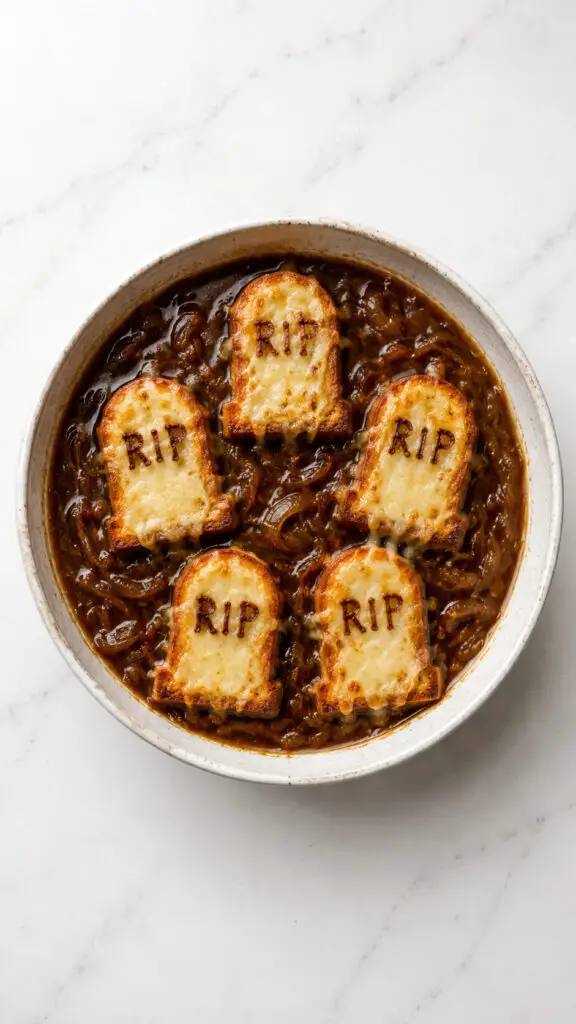
French onion soup naturally arrives dark, rich, and dramatic, making it perfect for a Halloween table.
Slowly caramelize onions until deeply golden, add beef stock and herbs, and finish with toasted bread and melted cheese.
Instead of ordinary toast, cut the bread into little tombstone shapes before broiling it with Gruyère or Swiss cheese.
Write tiny “RIP” letters using thin strips of cheese or a little balsamic glaze after baking.
Set the tombstones upright in each bowl for a miniature edible graveyard.
It looks wonderfully theatrical while remaining a completely classic comfort-food favorite.
Ingredients
- 4 large yellow onions, thinly sliced
- 3 tablespoons unsalted butter
- 1 tablespoon olive oil
- 2 garlic cloves, minced
- 1 teaspoon granulated sugar
- ½ teaspoon salt, plus more to taste
- ½ teaspoon black pepper
- ½ teaspoon dried thyme
- 6 cups beef stock
- ½ cup dry white wine, optional
- 1 tablespoon Worcestershire sauce
- 1 French baguette
- 1½ cups grated Gruyère or Swiss cheese
- 1 tablespoon fresh parsley, finely chopped, optional
Instructions
1. Slice the onions
Thinly slice the onions from root to stem, keeping the pieces as even as possible so they cook at the same rate. Thin slices will gradually soften and caramelize, creating the rich, sweet base that gives French onion soup its signature flavor.
2. Soften the onions
Heat the butter and olive oil in a large heavy-bottomed pot over medium heat. Add the onions and salt, then stir well to coat them in the fat. Cook for about 10 minutes, stirring occasionally, until the onions become soft and begin to turn translucent.
3. Caramelize the onions
Reduce the heat to medium-low and continue cooking the onions for 30–40 minutes, stirring every few minutes. Add the sugar during the cooking process to encourage deeper browning. The onions should eventually become deeply golden brown, soft, and jammy. Take your time here—the caramelization is where most of the soup’s flavor develops.
4. Add the garlic and thyme
Stir in the minced garlic, black pepper, and dried thyme. Cook for about 1 minute, stirring constantly, until the garlic becomes fragrant. Be careful not to let it burn, especially because the caramelized onions can make the bottom of the pot quite hot.
5. Deglaze the pot
Pour in the white wine, if using, and scrape the bottom of the pot with a wooden spoon to loosen the browned bits. Let the wine simmer for 2–3 minutes until slightly reduced. If you prefer not to use wine, simply add a small amount of beef stock and scrape up the flavorful browned pieces.
6. Simmer the soup
Pour in the beef stock and Worcestershire sauce, then stir everything together. Bring the soup to a gentle simmer and cook uncovered for about 25–30 minutes. Taste and adjust the seasoning with additional salt and pepper. The broth should be rich and savory, with the caramelized onions remaining soft and abundant.
7. Shape the graveyard toasts
While the soup simmers, slice the baguette into thick pieces and use a small knife to trim each piece into a simple tombstone shape. Arrange the bread on a baking sheet and toast until lightly golden. The pieces should be sturdy enough to stand upright in the soup without immediately falling apart.
8. Add the melted cheese
Cover each toasted tombstone with grated Gruyère or Swiss cheese. Place them under a broiler for 1–3 minutes, watching closely, until the cheese melts and develops golden-brown bubbling spots. For an extra Halloween touch, use a tiny amount of cheese or a dark balsamic glaze to create small “RIP” letters on the tombstones.
9. Serve the haunted bowls
Ladle the hot French onion soup into individual bowls, making sure each serving contains plenty of caramelized onions. Carefully place one or two cheesy tombstone toasts on top of each bowl so they resemble a miniature edible graveyard. Garnish with a little parsley if desired and serve immediately while the cheese is warm and gooey.
Tip
Do not rush the onion caramelization. If the onions seem to be browning too quickly, lower the heat and add a splash of water or stock while scraping the bottom of the pot. Slow caramelization produces much deeper flavor and prevents the onions from becoming bitter.
10. Creamy Corn Soup with Monster Eyes

Sweet corn soup becomes a cheerful Halloween monster when you decorate the surface with edible eyes.
Blend cooked corn with onion, garlic, stock, and a little cream until smooth, leaving some kernels whole for texture.
For the eyes, use small mozzarella balls topped with sliced black olives, or make miniature eyes from hard-boiled egg and olive pieces.
Arrange several pairs across the soup so every bowl seems to be staring back.
Add chopped chives as messy “monster hair” around the edges.
It is colorful, mild, and particularly good for a family Halloween lunch or dinner.
Ingredients
- 4 cups fresh or frozen corn kernels
- 1 medium yellow onion, finely chopped
- 2 garlic cloves, minced
- 1 medium potato, peeled and diced
- 2 tablespoons butter
- 4 cups vegetable or chicken stock
- ½ cup heavy cream
- ½ teaspoon salt, plus more to taste
- ¼ teaspoon black pepper
- ¼ teaspoon smoked paprika
- 8 small mozzarella balls or thick slices of hard-boiled egg white
- 4–6 green olive slices
- 1–2 black olives, cut into tiny pieces for pupils
- 1 tablespoon finely chopped chives, optional
Instructions
1. Sauté the onion and garlic
Melt the butter in a large pot over medium heat. Add the chopped onion and cook for about 5 minutes, stirring occasionally, until soft and translucent. Add the minced garlic and cook for another 30 seconds, just until fragrant. This creates a savory base that balances the natural sweetness of the corn.
2. Add the corn and potato
Stir the corn and diced potato into the pot, making sure they are coated with the butter and softened onions. Sprinkle in the smoked paprika, salt, and black pepper. Cook everything together for about 2 minutes so the corn develops a slightly deeper flavor before the stock is added.
3. Simmer the soup
Pour in the vegetable or chicken stock and stir well. Bring the mixture to a gentle boil, then reduce the heat to medium-low. Cover the pot partially and simmer for about 15–18 minutes, or until the potato pieces are completely tender and can easily be pierced with a fork.
4. Blend the soup until creamy
Use an immersion blender to blend the soup until smooth and creamy. For an especially silky texture, blend for a little longer and strain the soup through a fine-mesh sieve if desired. If using a countertop blender, blend in small batches and carefully vent the lid to allow steam to escape.
5. Add the cream
Return the blended soup to low heat and stir in the heavy cream. Warm it gently for 2–3 minutes without allowing it to boil rapidly. Taste the soup and adjust the salt and pepper. The finished soup should be creamy, smooth, and naturally golden yellow, with enough thickness to support the Halloween decorations.
6. Prepare the monster eyes
Create the edible eyes while the soup is warming. Use small mozzarella balls or round pieces of hard-boiled egg white as the white portion of each eye. Place a green olive slice on top of each one, then add a tiny piece of black olive in the center to form the pupil. Make several pairs so each bowl can have its own little monster face.
7. Arrange the eyes on the soup
Ladle the hot corn soup into shallow bowls and allow the surface to settle for a few seconds. Carefully place two or more pairs of prepared eyes on top. Position some eyes straight ahead and others slightly sideways to make the monsters look as though they are staring in different directions. Press them gently into the soup so they sit securely without sinking.
8. Finish and serve the monster soup
Add a light sprinkle of finely chopped chives around the eyes to create a playful “monster hair” effect if desired. Serve the soup immediately while it is warm and creamy. Keep the decoration simple so the bright yellow soup and expressive edible eyes remain the main attraction.
Tip
For the clearest monster eyes, chill the mozzarella or hard-boiled egg pieces before decorating the soup. They will hold their shape better when placed on the hot surface. If serving children, use finely chopped olives and make sure any larger pieces are cut appropriately for them.
11. Mushroom Soup with a Witch’s Cauldron Effect
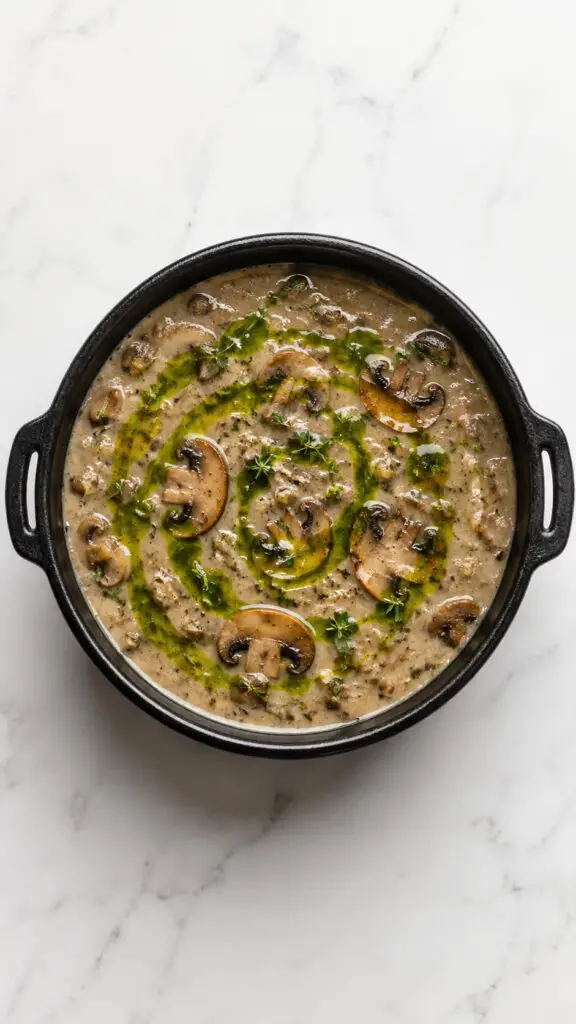
Serve mushroom soup as though it came straight from a witch’s bubbling cauldron.
Sauté mushrooms with onion, garlic, thyme, and butter, then simmer with stock and cream before blending part of the mixture for a chunky-creamy texture.
Present it in small black bowls or miniature heatproof cauldrons.
Swirl green herb oil over the top for a mysterious potion-like effect, then add a few sautéed mushroom slices resembling floating “ingredients.”
For extra fun, place a rosemary sprig across the rim like a witch’s broom.
It is earthy, sophisticated, and far more delicious than any suspicious-looking potion.
Ingredients
- 2 tablespoons butter or olive oil
- 1 medium yellow onion, finely chopped
- 3 garlic cloves, minced
- 1 pound (450 g) mushrooms, sliced
- 1 teaspoon fresh thyme leaves
- ½ teaspoon salt
- ¼ teaspoon black pepper
- 4 cups vegetable or chicken stock
- ½ cup heavy cream
- 1 tablespoon all-purpose flour, optional, for a thicker soup
- 1 tablespoon fresh parsley, finely chopped
- 1 tablespoon olive oil
- 1 teaspoon fresh parsley or chives, for the green “potion” effect
- Extra sautéed mushroom slices, for garnish
- Fresh rosemary sprigs, optional, for the witch’s-broom presentation
Instructions
1. Sauté the onion and garlic
Melt the butter in a large heavy-bottomed pot over medium heat. Add the chopped onion and cook for 4–5 minutes, stirring occasionally, until soft and translucent. Add the minced garlic and cook for another minute until fragrant. Keep the heat moderate so the garlic does not burn.
2. Cook the mushrooms
Add the sliced mushrooms and thyme to the pot. Season with salt and black pepper, then cook for 7–10 minutes, stirring occasionally. The mushrooms will release moisture and gradually become tender and golden around the edges. Reserve a few nicely browned mushroom slices if you want extra pieces for the final garnish.
3. Thicken the soup if desired
For a slightly thicker, more luxurious soup, sprinkle the flour over the cooked mushrooms and stir continuously for about 1 minute. Make sure the flour coats the mushrooms evenly and does not remain in dry pockets. You can skip this step if you prefer a lighter soup or want to keep the recipe gluten-free.
4. Add the stock
Slowly pour the stock into the pot while stirring continuously. Scrape the bottom of the pot with a wooden spoon to loosen any flavorful browned bits. Bring the mixture to a gentle boil, then reduce the heat and simmer for approximately 15 minutes, allowing the mushrooms, onion, garlic, and thyme to infuse the broth.
5. Blend the soup
Use an immersion blender to blend the soup until mostly smooth, leaving a little texture from the mushrooms for a rustic finish. For an especially silky soup, blend until completely smooth. If using a countertop blender, blend in small batches and carefully vent the lid because hot liquid can build pressure.
6. Add the cream
Reduce the heat to low and slowly stir in the heavy cream. Warm the soup for another 3–4 minutes without allowing it to boil vigorously. Taste and adjust the salt and black pepper. The finished soup should be creamy, earthy, and rich without becoming overly heavy.
7. Create the green potion oil
Combine the olive oil with finely chopped fresh parsley or chives. For a brighter green color, blend the herbs and oil briefly, then strain the mixture if you want a smoother finish. The resulting green herb oil will create the eerie “potion” effect on the surface of the soup.
8. Create the cauldron presentation
Ladle the hot mushroom soup into dark bowls that resemble miniature witch’s cauldrons. Drizzle a small amount of the green herb oil over the surface, then gently drag a toothpick through the oil to create swirling lines. Add a few reserved mushroom slices so they appear to be mysterious ingredients floating in the potion.
9. Finish with a spooky garnish
Place a small rosemary sprig across the edge of each bowl to suggest a tiny witch’s broom. Keep the garnish restrained so the soup remains the star. Serve immediately while the soup is hot, creamy, and fragrant.
Tip
For the best “witch’s cauldron” effect, use a dark bowl and keep the green herb oil concentrated rather than covering the entire surface. The contrast between the earthy mushroom soup and bright green swirls makes the presentation much more dramatic.
12. Sweet Potato Soup with Ghost Cheese Melts

Sweet potato soup brings gorgeous autumn color and a naturally creamy texture to the Halloween table.
Simmer roasted sweet potatoes with onion, garlic, stock, and warming spices such as cinnamon, ginger, or smoked paprika.
Cut slices of mozzarella or provolone into ghost shapes and place them on small toasted baguette rounds.
Float the cheesy ghosts on the soup just before serving so they become soft and melty.
Add two tiny black sesame seeds for eyes.
The result feels festive without being fussy, and the combination of sweet potato, savory cheese, and smoky seasoning is especially satisfying.
Ingredients
- 2 tablespoons olive oil
- 1 medium yellow onion, chopped
- 2 garlic cloves, minced
- 4 cups peeled and cubed sweet potatoes
- 4 cups vegetable or chicken stock
- ½ teaspoon ground ginger
- ½ teaspoon ground cinnamon
- ½ teaspoon smoked paprika
- 1 teaspoon salt
- ¼ teaspoon black pepper
- ½ cup heavy cream
- 8 small slices of baguette
- 4–8 slices mozzarella or provolone cheese
- 16 black sesame seeds or tiny pieces of black olive, for the ghost eyes
- Fresh chives, optional for garnish
Instructions
1. Sauté the onion and garlic
Heat the olive oil in a large pot over medium heat. Add the chopped onion and cook for 5–7 minutes, stirring occasionally, until softened and translucent. Add the minced garlic and cook for another minute until fragrant, taking care not to let it burn.
2. Cook the sweet potatoes with the seasonings
Add the cubed sweet potatoes, ground ginger, cinnamon, smoked paprika, salt, and black pepper to the pot. Stir thoroughly to coat the sweet potatoes in the aromatics and spices. Cook everything together for about 2 minutes to bring out the flavor of the seasonings.
3. Add the stock and simmer
Pour the vegetable or chicken stock into the pot and stir well. Bring the mixture to a gentle boil, then reduce the heat to medium-low. Cover partially and simmer for about 18–22 minutes, or until the sweet potatoes are completely tender and easily pierced with a fork.
4. Blend the soup until creamy
Use an immersion blender to purée the soup directly in the pot until smooth and velvety. If using a countertop blender, blend the soup in small batches and carefully vent the lid to allow steam to escape. Continue blending until there are no noticeable chunks of sweet potato remaining.
5. Stir in the cream
Return the blended soup to low heat if necessary and slowly stir in the heavy cream. Warm it gently for 3–4 minutes without allowing the soup to boil rapidly. Taste the soup and adjust the salt, pepper, or spices according to your preference. The finished soup should be thick, creamy, and beautifully orange.
6. Prepare the ghost cheese
Use a small ghost-shaped cookie cutter to cut the mozzarella or provolone slices into ghost shapes. If you do not have a cutter, use a small sharp knife to create simple ghost silhouettes. Make two tiny eyes in each cheese ghost using black sesame seeds or very small pieces of black olive.
7. Toast the baguette rounds
Place the baguette slices on a baking sheet and toast them in a preheated 400°F (200°C) oven for approximately 5–7 minutes, until the edges are crisp and lightly golden. Remove them from the oven and immediately place one cheese ghost on each toast. The residual heat will begin softening the cheese without completely melting away the ghost shape.
8. Serve the Halloween soup
Ladle the hot sweet potato soup into shallow bowls, then carefully place the ghost cheese toasts on top or slightly along the edge of each bowl. The white melted cheese should contrast beautifully with the deep orange soup. Add a few finely chopped chives if desired, then serve immediately while everything is warm.
Tip
For sharper ghost shapes, chill the cheese slices for 10–15 minutes before cutting them. The firmer cheese is easier to shape and will hold its ghost silhouette better when placed over the hot soup.
13. Tortilla Soup with Avocado Spider Art

Give Mexican-inspired tortilla soup a Halloween twist with an edible avocado spider.
Make the soup with tomatoes, chicken stock, corn, beans, spices, and shredded chicken, then top it with crispy tortilla strips.
For the spider, cut an avocado half into a rounded body and use thin strips of tortilla or chives for legs.
A small olive can become the head. Place the spider carefully on the surface just before serving.
The bright toppings stand out against the tomato-red broth, and everyone can customize their bowl with lime, cilantro, cheese, and jalapeños.
Ingredients
- 2 tablespoons olive oil
- 1 medium yellow onion, finely chopped
- 3 garlic cloves, minced
- 1 jalapeño, finely chopped, with seeds removed for a milder soup
- 1 can (14.5 ounces) diced tomatoes
- 6 cups chicken broth
- 2 cups cooked shredded chicken
- 1 cup black beans, drained and rinsed
- 1 cup corn kernels, fresh or frozen
- 1 teaspoon ground cumin
- 1 teaspoon chili powder
- ½ teaspoon smoked paprika
- ½ teaspoon salt, plus more to taste
- ¼ teaspoon black pepper
- Juice of 1 lime
- 2 cups crispy tortilla strips
- 1 ripe avocado
- 1 small black olive
- Fresh cilantro, for garnish
Instructions
1. Sauté the aromatics
Heat the olive oil in a large soup pot over medium heat. Add the chopped onion and jalapeño and cook for 4–5 minutes, stirring occasionally, until the onion becomes soft and translucent. Add the minced garlic and cook for another 30 seconds, just until fragrant.
2. Add the tomatoes and spices
Stir in the diced tomatoes, cumin, chili powder, smoked paprika, salt, and black pepper. Cook the mixture for about 2 minutes, stirring frequently. This helps the spices bloom and gives the tomato base a deeper, more rounded flavor.
3. Pour in the broth
Add the chicken broth and stir well, scraping the bottom of the pot to loosen any flavorful bits. Bring the mixture to a gentle boil, then reduce the heat to medium-low. Let the soup simmer uncovered for about 15 minutes so the tomato and spices have time to develop.
4. Add the chicken and vegetables
Stir in the shredded chicken, black beans, and corn. Continue simmering for 8–10 minutes, or until everything is heated through and the corn is tender. Taste the broth and adjust the salt or chili powder if needed. The soup should be savory, lightly smoky, and pleasantly spicy without overwhelming the other flavors.
5. Finish with fresh lime
Remove the pot from the heat and stir in the fresh lime juice. The acidity brightens the rich tomato broth and balances the smoky spices. Taste once more and add a little additional lime or salt if necessary.
6. Prepare the avocado spider
Cut the avocado in half and remove the pit. Slice or shape one half into a small rounded body for the spider. Use a small piece of black olive for the head, then cut very thin strips of tortilla or chives to create eight spider legs. Keep the legs narrow and slightly curved so the finished spider looks recognizable but still edible and natural.
7. Assemble the Halloween bowls
Ladle the hot tortilla soup into shallow bowls. Arrange crispy tortilla strips across the surface, leaving a relatively open area in the center for the avocado spider. Carefully place the avocado body and olive head together, then position the thin legs around it. Add a few cilantro leaves for a fresh green accent.
8. Serve the spooky soup
Serve the soup immediately while the broth is hot and the tortilla strips are still crisp. For extra flavor, place a lime wedge into each bowl and let everyone squeeze it over their serving. The avocado spider should be added right before serving so it stays fresh and holds its shape.
Tip
Make the spider shortly before serving. Avocado can brown quickly, so brush the cut avocado lightly with lime juice to keep it looking fresh. If you’re serving children, leave out the jalapeño or use only a small amount for a gentler, family-friendly soup.
14. White Bean Soup with Parmesan Spiderwebs
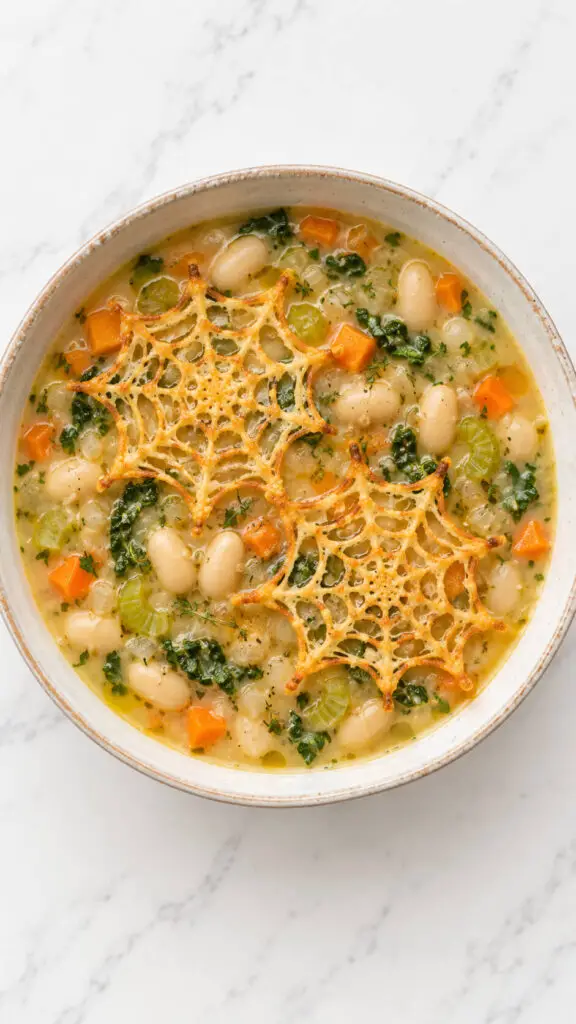
White bean soup is hearty enough for a Halloween dinner but mild enough to please a crowd.
Simmer cannellini beans with carrots, celery, onion, garlic, herbs, and stock, adding greens near the end.
For the Halloween presentation, create delicate parmesan spiderwebs by sprinkling finely grated Parmesan into web-like patterns on parchment and baking until crisp and golden.
Cool them completely before carefully placing one over each bowl.
The webs become crunchy edible decorations that also add salty richness.
They look sophisticated rather than cartoonish, making this a great choice for an adults-only Halloween gathering.
Ingredients
- 2 tablespoons olive oil
- 1 medium yellow onion, finely diced
- 2 carrots, peeled and finely diced
- 2 celery stalks, finely diced
- 3 garlic cloves, minced
- 4 cups cooked cannellini beans, drained and rinsed
- 4 cups vegetable or chicken stock
- 1 teaspoon dried thyme
- ½ teaspoon dried rosemary
- ½ teaspoon black pepper
- ¾ teaspoon salt, plus more to taste
- 2 cups chopped kale or baby spinach
- 1 tablespoon lemon juice
- ½ cup finely grated Parmesan cheese, plus extra for the spiderwebs
- 1 tablespoon fresh parsley, finely chopped, optional
Instructions
1. Sauté the vegetables
Warm the olive oil in a large soup pot over medium heat. Add the diced onion, carrots, and celery and cook for 6–8 minutes, stirring occasionally, until the vegetables soften and the onion becomes translucent. Add the minced garlic and cook for another minute, stirring constantly so it becomes fragrant without browning.
2. Add the beans and seasonings
Stir the cannellini beans into the softened vegetables. Add the thyme, rosemary, black pepper, and salt, mixing thoroughly so the beans are coated with the herbs and seasonings. Cook everything together for about 1–2 minutes to allow the herbs to become fragrant.
3. Pour in the stock
Add the vegetable or chicken stock and stir well, scraping the bottom of the pot to release any flavorful bits. Increase the heat and bring the soup to a gentle boil, then reduce the heat to medium-low. Allow it to simmer uncovered for about 15 minutes so the beans absorb the savory flavors.
4. Blend part of the soup
Scoop about 1½ cups of the soup into a blender and carefully blend until smooth. Return the purée to the pot and stir it through the remaining soup. This gives the broth a naturally creamy texture while keeping plenty of whole cannellini beans and vegetables visible.
5. Add the greens
Stir the chopped kale or baby spinach into the simmering soup. Cook for 3–5 minutes, depending on the greens you use, until they are tender and evenly incorporated. Add the lemon juice and grated Parmesan, then stir until the cheese melts into the broth. Taste and adjust the seasoning if needed.
6. Make the Parmesan spiderwebs
Heat the oven to 375°F (190°C). Line a baking sheet with parchment paper and sprinkle finely grated Parmesan into small spiderweb shapes, leaving space between each one. Bake for approximately 5–7 minutes, watching closely, until the cheese has melted and the edges are lightly golden. Let the webs cool completely so they become crisp.
7. Serve the soup
Ladle the hot white bean soup into shallow bowls, making sure each serving contains a good mixture of beans, vegetables, and greens. Carefully place a cooled Parmesan spiderweb over the top of each bowl. The crisp cheese should sit visibly above the pale soup, creating the spooky Halloween effect.
8. Finish with fresh herbs
For a final touch, sprinkle a small amount of finely chopped parsley around the soup without covering the spiderweb design. Serve immediately while the soup is hot and the Parmesan web remains crisp. A piece of crusty bread on the side makes this hearty soup feel like a complete meal.
Tip
For especially delicate spiderwebs, grate the Parmesan very finely and keep the web shapes relatively small. Let them cool completely before transferring them to the soup. If you place them on piping-hot soup too early, they can soften quickly and lose their intricate web shape.
15. Beet Soup with Creepy Egg Eyes
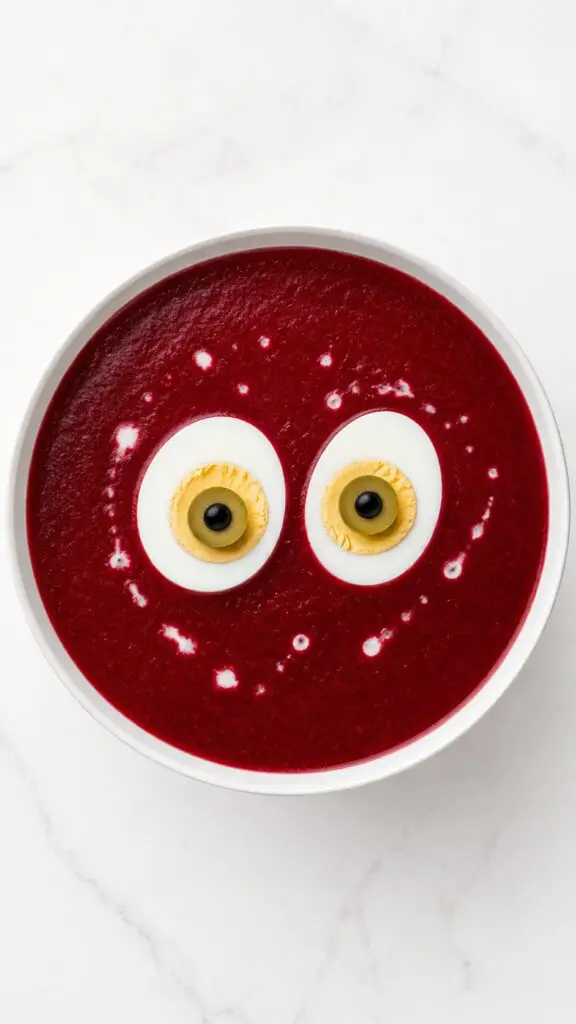
For a Halloween soup with dramatic color, beet soup is hard to beat.
Roast or simmer beets with onion, garlic, stock, and a little vinegar, then blend until smooth.
The deep ruby color instantly gives the impression that something mysterious is happening in the bowl.
Top each serving with two halved hard-boiled eggs, placing sliced black olives in the centers to create oversized eyes.
A drizzle of plain yogurt adds contrast and tang. It is visually striking, nutritious, and just creepy enough without relying on artificial red coloring.
Ingredients
- 4 medium cooked beets, peeled and chopped
- 1 small yellow onion, chopped
- 2 garlic cloves, minced
- 1 tablespoon olive oil
- 4 cups vegetable stock
- 1 medium potato, peeled and diced
- 1 tablespoon apple cider vinegar
- ½ teaspoon salt, plus more to taste
- ¼ teaspoon black pepper
- ½ cup heavy cream or plain Greek yogurt
- 4 large eggs
- 2 green olives, sliced into rounds
- 1 black olive, cut into tiny pieces for pupils
- Fresh dill or chives, optional for garnish
Instructions
1. Cook the eggs
Place the eggs in a saucepan and cover them with cold water. Bring the water to a boil, then reduce the heat and gently boil for about 10–11 minutes. Transfer the eggs to an ice-water bath and let them cool completely. Peel them carefully, then slice each egg in half lengthwise to create the spooky edible eyes.
2. Sauté the onion and garlic
Warm the olive oil in a large pot over medium heat. Add the chopped onion and cook for 5–6 minutes, stirring occasionally, until softened. Add the minced garlic and cook for about 30 seconds, just until fragrant. This creates a savory base that balances the natural sweetness of the beets.
3. Add the beet and potato
Add the chopped cooked beets and diced potato to the pot. Stir everything together for about 1 minute so the vegetables become coated with the flavorful onion and garlic mixture. The potato helps give the soup body and creates a smooth, creamy texture without requiring a large amount of cream.
4. Pour in the stock
Pour the vegetable stock into the pot and bring everything to a gentle boil. Reduce the heat to low, cover partially, and simmer for about 15–20 minutes, or until the potato pieces are completely tender. Stir occasionally and make sure the soup maintains a gentle simmer rather than a rapid boil.
5. Blend the soup until silky
Remove the pot from the heat and blend the soup with an immersion blender until completely smooth. If using a countertop blender, blend in batches and carefully vent the lid because hot liquid can build up pressure. Continue blending until the soup has a glossy, velvety consistency with no noticeable vegetable pieces remaining.
6. Balance the flavor
Stir the apple cider vinegar, salt, and black pepper into the blended soup. Taste and adjust the seasoning as needed. The vinegar is especially useful here because its gentle acidity cuts through the sweetness of the beets and makes the overall flavor brighter and more balanced.
7. Finish with cream
Return the pot to low heat and stir in the heavy cream, or use plain Greek yogurt for a slightly tangier finish. Warm the soup gently for 2–3 minutes without allowing it to boil vigorously. If using yogurt, stir it in gradually to prevent it from curdling.
8. Create the creepy eyes
Arrange the halved hard-boiled eggs with the cut sides facing upward. Place one green-olive slice in the center of each egg white, then add a tiny piece of black olive in the middle of each green olive to create the pupils. The finished eggs should resemble oversized, slightly creepy eyeballs.
9. Assemble the spooky bowls
Ladle the hot beet soup into shallow bowls, filling them carefully so the surface remains smooth and visually striking. Place two prepared egg eyes on top of each serving. Add a few very small drops or swirls of cream or yogurt around the eyes for contrast, keeping the design simple enough that the spooky eyeballs remain the main attraction.
10. Add the finishing garnish
For a final touch, sprinkle a small amount of finely chopped dill or chives around the soup. Keep the garnish restrained so it does not hide the dramatic ruby-red color or interfere with the eye design. Serve immediately while the soup is warm and the egg eyes are fresh.
Tip
For the creepiest—and cleanest—presentation, chill the hard-boiled eggs thoroughly before slicing them. Cold eggs are much easier to cut neatly, giving you smooth white circles for the eyeballs. If you want the soup to look especially dramatic, serve it in white bowls so the deep beet-red color really pops.
16. Green Pea Soup with Frankenstein Faces
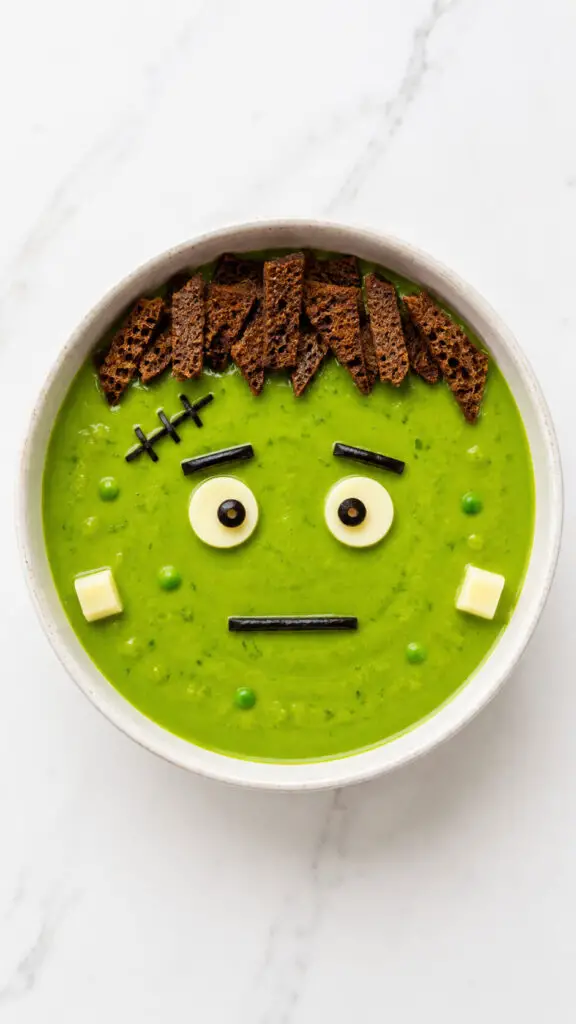
Green pea soup has the perfect color for a Frankenstein-inspired Halloween presentation.
Blend peas with onion, garlic, stock, and a little cream or yogurt until smooth and vibrant.
For each bowl, create a face using strips of toasted bread for Frankenstein’s hair, small cheese pieces for eyes, and thin olive strips for eyebrows and a mouth.
Add tiny cheese cubes at the sides as “bolts.” The trick is to keep the face simple so it remains recognizable.
This is an especially fun project for kids, who can decorate their own bowls before sitting down to eat.
Ingredients
- 4 cups fresh or frozen green peas
- 1 medium yellow onion, finely chopped
- 2 garlic cloves, minced
- 2 tablespoons olive oil or butter
- 4 cups vegetable or chicken stock
- ½ cup heavy cream
- ½ teaspoon salt, plus more to taste
- ¼ teaspoon black pepper
- ¼ teaspoon dried thyme
- ¼ cup toasted bread, cut into small pieces for Frankenstein’s hair
- 2 tablespoons white cheese, cut into small pieces for the eyes
- 1 black olive, thinly sliced for pupils, eyebrows, and mouth
- 4 small cheese cubes for the Frankenstein “bolts”
- 1 tablespoon finely chopped fresh parsley or chives, optional
Instructions
1. Sauté the onion and garlic
Heat the olive oil or butter in a large saucepan over medium heat. Add the chopped onion and cook for 4–5 minutes, stirring occasionally, until softened and translucent. Add the minced garlic and thyme, then cook for another 30–45 seconds until fragrant. Keep the heat moderate so the garlic does not brown or become bitter.
2. Add the peas and stock
Stir the green peas into the onion mixture, then pour in the vegetable or chicken stock. Bring everything to a gentle boil, then reduce the heat and simmer for about 8–10 minutes, or until the peas are tender. Frozen peas usually cook quickly, while fresh peas may need a few additional minutes.
3. Blend the soup until creamy
Remove the pot from the heat and blend the soup using an immersion blender until smooth and vibrant green. If using a countertop blender, blend in batches and carefully vent the lid because hot liquid can create pressure. For an especially silky soup, strain it through a fine-mesh sieve after blending.
4. Stir in the cream
Return the blended soup to low heat and stir in the heavy cream. Warm it gently for 2–3 minutes without allowing it to boil vigorously. Taste the soup and adjust the salt and black pepper. The finished soup should be creamy, smooth, and bright green, making the perfect base for the Frankenstein face.
5. Prepare Frankenstein’s hair
Cut toasted bread into small, irregular pieces that can be arranged along the upper edge of the soup. The pieces should resemble messy black hair once placed against the green surface. For darker-looking hair, toast the bread until deeply golden, but avoid burning it. You can also use very dark rye bread for a more dramatic Halloween appearance.
6. Create the Frankenstein eyes
Cut the white cheese into four small pieces, using two pieces for each eye. Place the cheese pieces near the upper center of the soup, leaving enough space between them for a recognizable face. Add tiny slices of black olive in the center of each piece to create the pupils. Slightly uneven eyes make the character look more playful and homemade.
7. Add the facial details
Use thin strips of black olive to create Frankenstein’s eyebrows and a simple horizontal mouth. Keep the features relatively bold so they remain visible against the green soup. Place two small cheese cubes on opposite sides of the bowl to represent Frankenstein’s famous neck bolts. Arrange the toasted bread pieces along the top edge to complete his messy hair.
8. Serve the Frankenstein soup
Serve the soup immediately while it is warm, taking care not to shake or tilt the bowls after decorating them. Add a small sprinkle of chopped parsley or chives around the edges if desired, but keep the garnish restrained so Frankenstein’s face remains the main attraction. Serve with warm crusty bread for dipping.
Tip
Decorate the soup immediately before serving. The heat and moisture will gradually soften the bread hair and cheese features. For the clearest Frankenstein faces, make the soup ahead of time, reheat it gently, and add all the decorations only after the soup has been poured into individual bowls.
17. Butternut Squash Soup with Pumpkin Patch Garnish
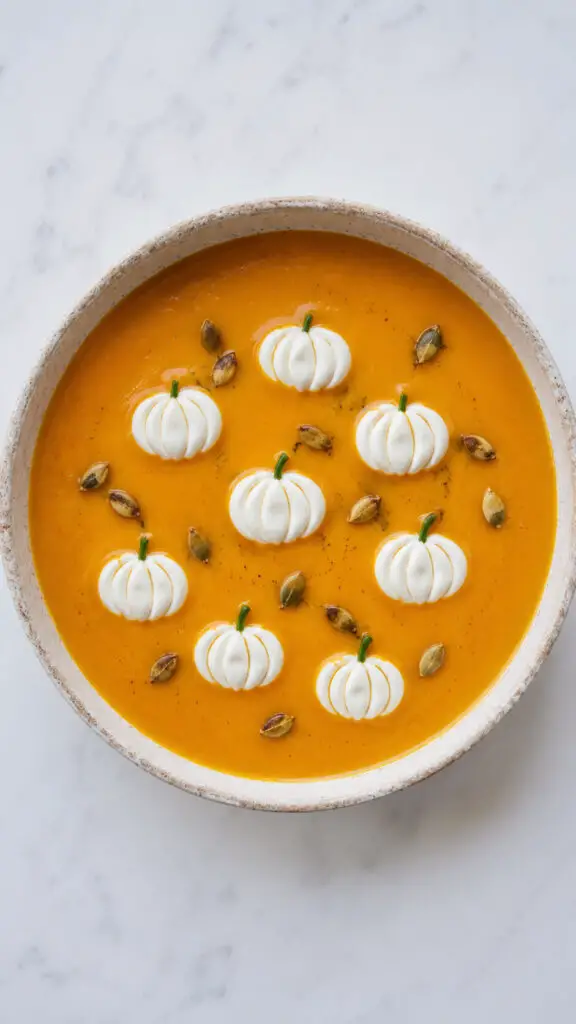
Finish your Halloween soup lineup with a gorgeous butternut squash soup decorated like a miniature pumpkin patch.
Roast squash with onion, garlic, and herbs, then blend it with stock until smooth and silky.
Spoon small rounds of sour cream or crème fraîche onto the surface and drag a toothpick through them to suggest tiny pumpkins.
Add chopped chives for stems and arrange roasted pumpkin seeds around them like scattered leaves.
Serve the soup with warm crusty bread and let everyone admire the little autumn scene before digging in. It is festive, cozy, and wonderfully comforting.
Ingredients
- 1 medium butternut squash, about 2½–3 pounds, peeled, seeded, and cut into cubes
- 1 medium yellow onion, chopped
- 3 garlic cloves, minced
- 2 tablespoons olive oil
- 4 cups vegetable or chicken stock
- ½ cup heavy cream
- 1 teaspoon salt
- ½ teaspoon black pepper
- ½ teaspoon ground cinnamon
- ¼ teaspoon ground nutmeg
- ¼ teaspoon smoked paprika
- 2 tablespoons sour cream or crème fraîche
- 1 tablespoon roasted pumpkin seeds
- 1 tablespoon finely chopped fresh chives
- 1 tablespoon butter, optional
Instructions
1. Roast the butternut squash
Preheat the oven to 400°F (200°C). Spread the cubed butternut squash on a baking sheet and toss it with the olive oil. Roast for 25–35 minutes, turning once, until the squash is completely tender and lightly caramelized around the edges. Roasting gives the soup a deeper, sweeter flavor than simply boiling the squash.
2. Cook the onion and garlic
While the squash roasts, heat a large pot over medium heat. Add the chopped onion and cook for 5–7 minutes, stirring occasionally, until soft and translucent. Add the minced garlic and cook for about 30 seconds, just until fragrant. If using butter, stir it in now for an extra rich, silky flavor.
3. Add the roasted squash and spices
Transfer the roasted squash to the pot with the onion and garlic. Add the cinnamon, nutmeg, smoked paprika, salt, and black pepper. Stir everything together and cook for about 1–2 minutes. This allows the spices to warm and coat the roasted squash before the liquid is added.
4. Pour in the stock
Add the vegetable or chicken stock and stir well, scraping up any flavorful bits from the bottom of the pot. Bring the mixture to a gentle simmer, then reduce the heat and cook for approximately 10 minutes. The squash is already roasted and tender, so this short simmer is mainly to bring the flavors together.
5. Blend the soup until smooth
Use an immersion blender to puree the soup directly in the pot until completely smooth and creamy. Alternatively, carefully transfer the soup to a countertop blender in batches. Blend until there are no visible chunks and the texture is silky. If the soup seems too thick, add a little more stock until it reaches your preferred consistency.
6. Stir in the cream
Reduce the heat to low and stir in the heavy cream. Warm the soup gently for 3–4 minutes without allowing it to boil rapidly. Taste and adjust the seasoning with additional salt, pepper, or a small pinch of nutmeg if needed. The finished soup should be creamy, savory, gently sweet, and warmly spiced.
7. Create the miniature pumpkin garnish
Spoon the sour cream or crème fraîche into a small piping bag or resealable plastic bag with a tiny corner snipped off. Pipe several small round portions onto the surface of each bowl of soup. Using a toothpick, gently drag through each circle to create curved grooves that resemble miniature pumpkins.
8. Add the pumpkin stems
Finely chop the fresh chives and carefully place a tiny piece in the center or top edge of each cream pumpkin to create a little green stem. Do not add too much chive, because the goal is for the small pumpkin shapes to remain clearly visible against the orange soup.
9. Scatter the pumpkin seeds
Sprinkle a small number of roasted pumpkin seeds around the miniature cream pumpkins. Arrange some naturally and leave others slightly separated to create the impression of autumn leaves scattered around a tiny pumpkin patch. Keep the seeds inside the bowl so they complement rather than overwhelm the decorative design.
10. Serve the Halloween soup
Ladle the hot butternut squash soup into shallow bowls and finish each one with the pumpkin-patch garnish. Serve immediately while the soup is warm and the cream decorations are clearly defined. Warm crusty bread makes an excellent accompaniment and is perfect for soaking up the last spoonfuls.
Tip
For the sharpest pumpkin designs, make the sour-cream garnish slightly thicker than you normally would. If your sour cream is runny, stir it with a little crème fraîche or chill it for 15–20 minutes before piping. Use a toothpick with a light touch when creating the grooves so the miniature pumpkins keep their shape.