23 Christmas Crafts for Kids That Will Keep Them Entertained

Some of the links in this post are affiliate links, meaning, at no additional cost to you, We will earn a commission if you click through and make a purchase.
Looking for fun Christmas crafts for kids?
This article is full of creative and simple ideas that will keep your little ones busy during the holidays.
From ornaments to holiday cards, there’s something for everyone to enjoy making.
Let’s get started!
1. Paper Plate Snowmen
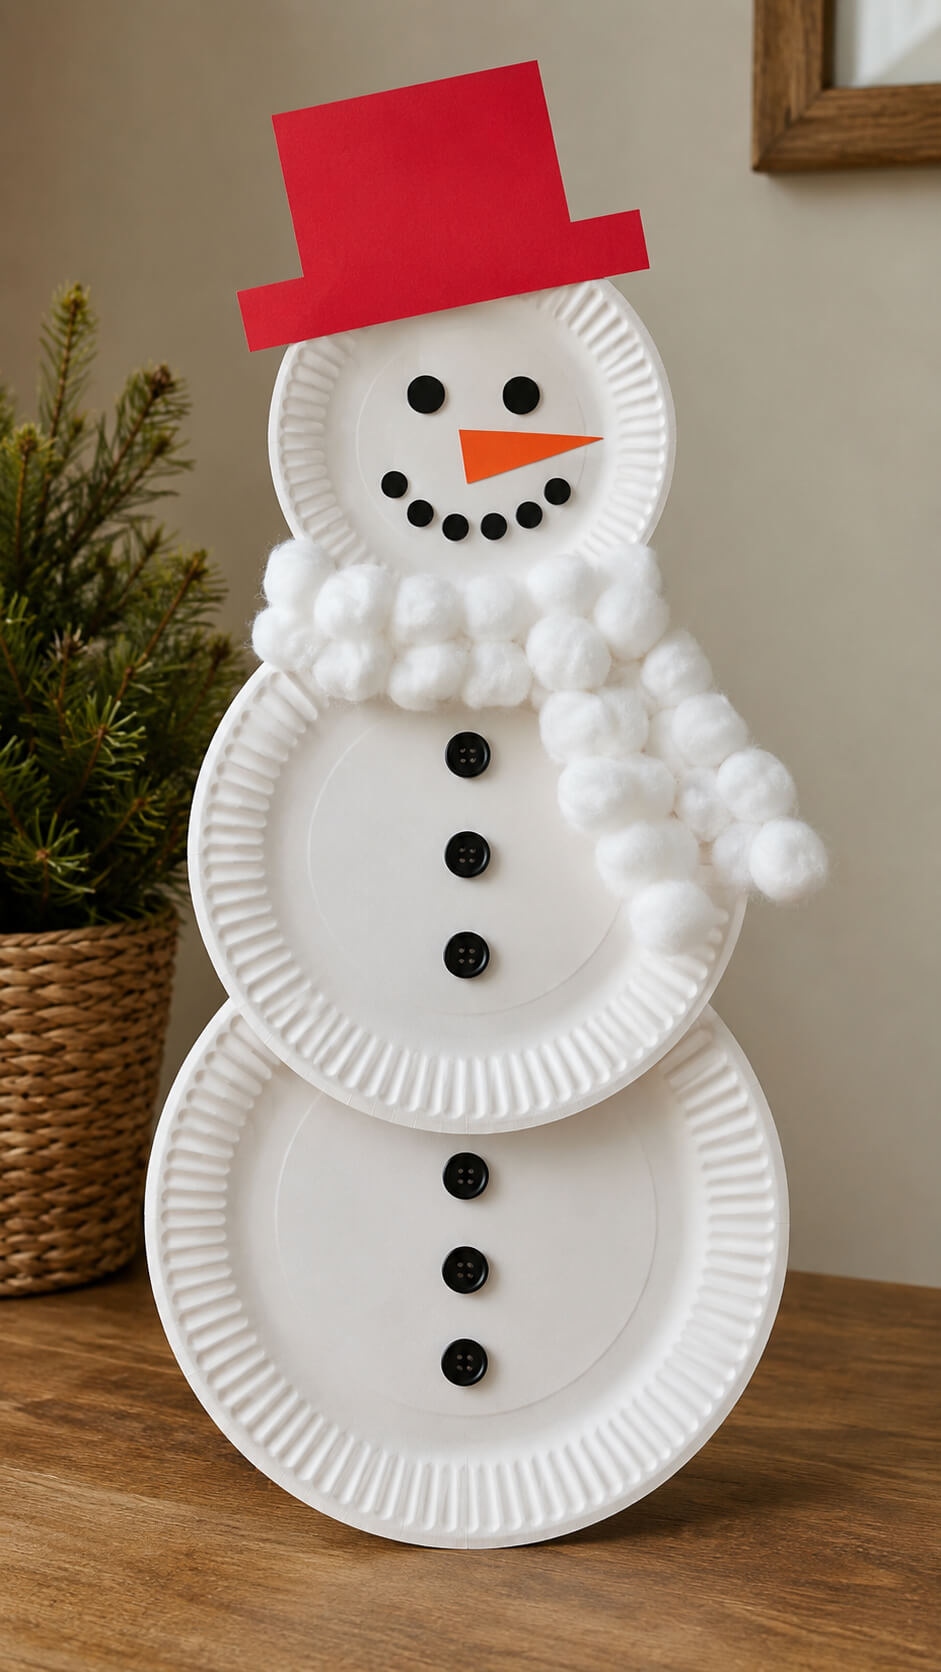
Transform simple paper plates into adorable snowmen!
With a few buttons, cotton balls for texture, and a construction paper hat, this craft is easy for young hands and fun to display.
Kids will love creating their own frosty friend to hang up at home.
Materials
- 3 white paper plates in three different sizes
- White cotton balls
- Black buttons
- Orange construction paper
- Red construction paper
- Glue
- Scissors
- Wooden surface or table for crafting
Instructions
1. Gather the paper plates
Choose three white paper plates in decreasing sizes. The largest plate will form the snowman’s bottom section, the medium plate will be the middle, and the smallest plate will become the head.
2. Stack the paper plates
Arrange the three plates vertically, placing the largest plate at the bottom, the medium plate in the center, and the smallest plate at the top. Slightly overlap the plates so they resemble a snowman’s body.
3. Create the snowman’s face
Glue two small black buttons onto the smallest plate for the eyes. Arrange several additional black buttons in a curved line to create a cheerful smiling mouth.
4. Add the carrot nose
Cut a small triangle from orange construction paper to create the snowman’s carrot nose. Glue it horizontally beneath the eyes, with the pointed end facing outward.
5. Make the red paper hat
Cut a simple top-hat shape from red construction paper, including a tall rectangular crown and a wider brim. Glue the hat onto the top of the snowman’s head at a slight angle for a playful appearance.
6. Create the cotton-ball scarf
Glue fluffy white cotton balls around the area where the head and middle plate meet. Continue the cotton balls down one side to make the scarf look wrapped naturally around the snowman’s neck.
7. Decorate the snowman’s body
Glue three black buttons vertically onto the middle plate and another three onto the largest plate. Keep the buttons evenly spaced to create the classic look of a snowman’s coat.
8. Let the snowman dry
Leave the finished craft on a flat surface until all the glue has completely dried. Once everything is secure, gently move the snowman to its display area.
Tip
For a fuller and more textured scarf, use plenty of cotton balls and overlap them slightly instead of leaving gaps between them.
2. Handprint Reindeer
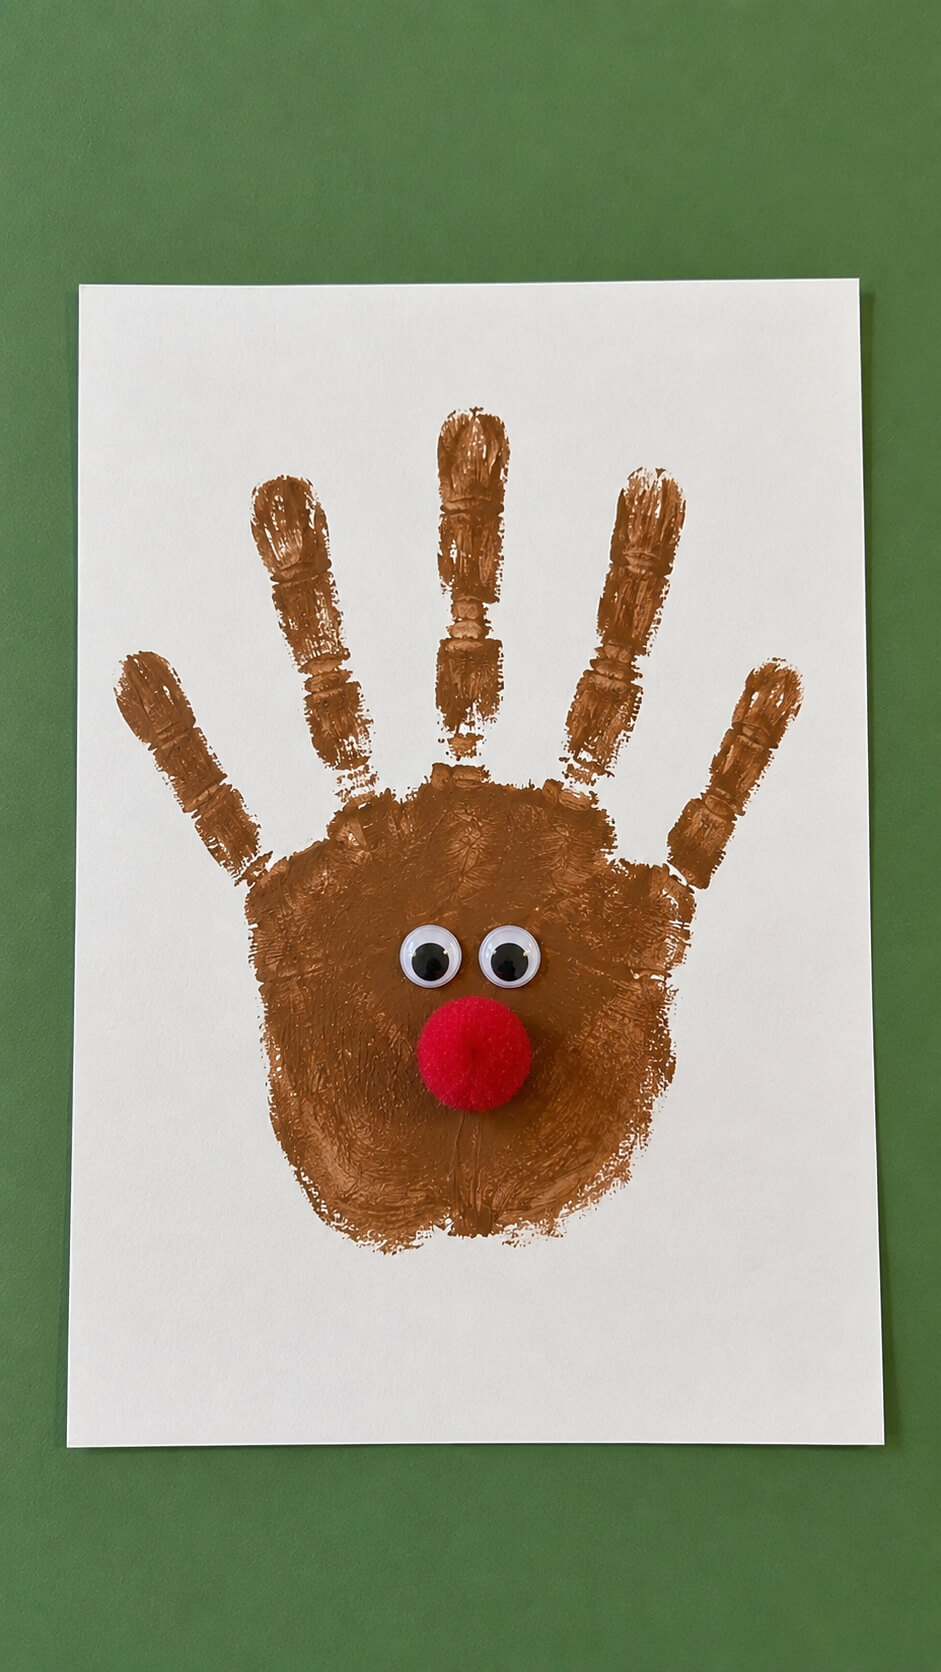
Handprint crafts are timeless, and turning your little one’s handprint into a reindeer makes a wonderful keepsake.
With brown paint, googly eyes, and a red pom-pom for the nose, this is a fun activity that helps capture a moment in time while letting kids get messy with paint.
Materials You’ll Need
- White construction paper or cardstock
- Brown washable paint
- 2 googly eyes
- 1 red pom-pom
- Paintbrush or sponge
- Glue
Instructions
1. Paint the child’s hand brown
Apply an even layer of brown washable paint to the child’s palm and all four fingers. Make sure the paint is well covered but not excessively thick so the handprint keeps its shape while still showing charming brush and finger marks.
2. Press the hand onto the paper
Place the painted hand carefully onto the center of the white paper and press down gently. Lift the hand straight up to reveal the handprint, keeping the four fingers pointing upward to create the reindeer’s antlers.
3. Let the handprint dry
Allow the brown paint to dry completely before adding the facial features. This helps prevent the googly eyes and pom-pom from becoming messy or sliding around on the wet paint.
4. Glue the googly eyes onto the center
Place two googly eyes close together in the center of the brown handprint, positioned slightly above the middle of the palm. Press them gently into place with glue and allow the adhesive to set.
5. Add the red pom-pom nose
Glue a bright red pom-pom directly below the googly eyes in the center of the palm. The pom-pom becomes the reindeer’s large, cheerful Rudolph-style nose.
6. Let the finished reindeer dry
Leave the completed craft flat until the glue has fully dried. Once everything is secure, the handprint reindeer is ready to display, gift, or use as a festive Christmas keepsake.
Tip
For the most adorable handmade look, don’t worry about making the paint perfectly smooth. Slightly uneven coverage, visible brush marks, and tiny paint smudges make the reindeer look authentically child-made.
3. Pinecone Christmas Trees
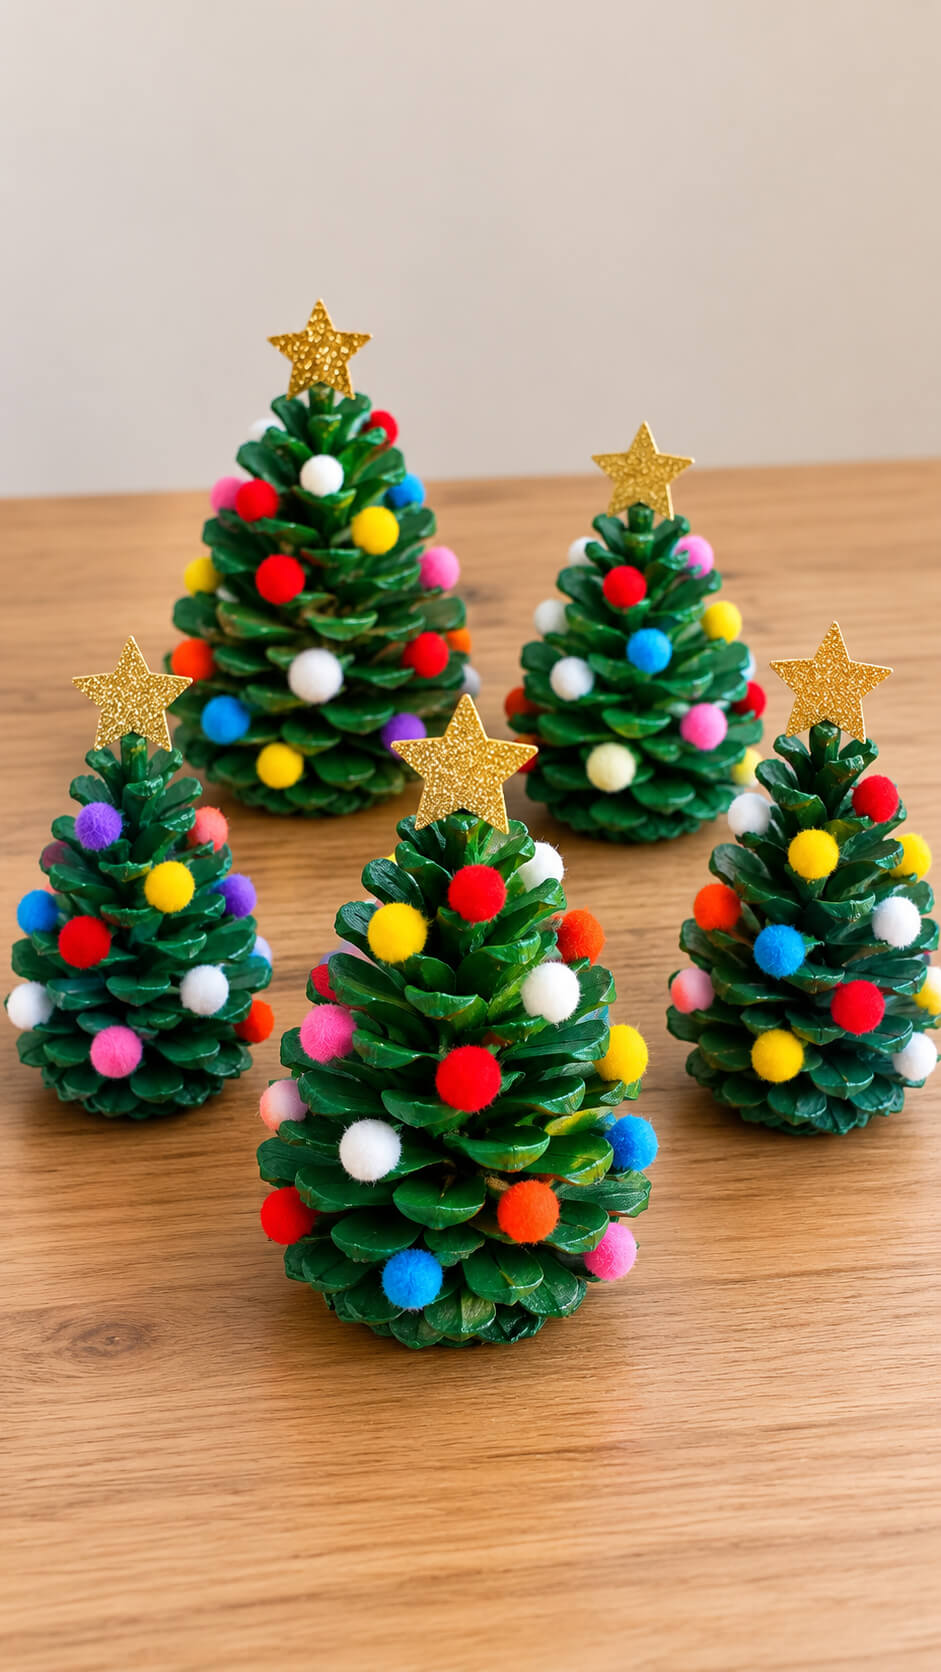
Collect some pinecones from the yard, and turn them into mini Christmas trees!
Paint them green, add tiny pom-poms or beads as ornaments, and place a small star on top.
This is a perfect nature-based craft that lets children bring a little piece of the outdoors inside for the holidays.
Materials
- Pinecones
- Green acrylic paint
- Paintbrush
- Colorful pom-poms
- Craft glue or a hot glue gun
- Small wooden slices or cardboard pieces for the bases
- Newspaper or a protective sheet for the work surface
Instructions
1. Prepare the pinecones
Choose clean, dry pinecones that have a naturally tree-like shape. Remove any loose dirt, leaves, or broken pieces, then place them on your protected work surface.
2. Paint the pinecones green
Use a paintbrush to cover the pinecones with green acrylic paint, working the paint into the spaces between the scales. Apply a second coat if needed and allow the pinecones to dry completely.
3. Prepare the tree bases
Place each painted pinecone on a small wooden slice or another sturdy flat base. Make sure the pinecone sits upright and is stable before attaching it.
4. Attach the pinecones to the bases
Apply a small amount of craft glue or hot glue to the bottom of each pinecone and carefully press it onto its wooden base. Hold it in place until the glue sets.
5. Decorate the trees with pom-poms
Arrange colorful pom-poms around the pinecone scales to create miniature Christmas ornaments. Use different colors and sizes to give each tree a playful, festive appearance.
6. Secure the pom-poms
Once you are happy with the arrangement, glue each pom-pom securely to the pinecone. Avoid using too much glue so the finished trees maintain a neat handmade appearance.
7. Let the decorations dry
Leave the finished pinecone trees undisturbed until all the glue and paint are completely dry. This helps prevent the ornaments from shifting when the trees are moved.
8. Arrange the finished Christmas trees
Place the completed miniature trees together on a clean craft table or display surface. Arrange taller trees toward the back and smaller ones toward the front to create an attractive layered display.
Tip
For a more colorful Christmas display, use a mix of red, yellow, pink, blue, orange, purple, and white pom-poms. Keep the decorations limited to the pinecone trees so the finished craft remains the main focus.
4. Popsicle Stick Ornaments
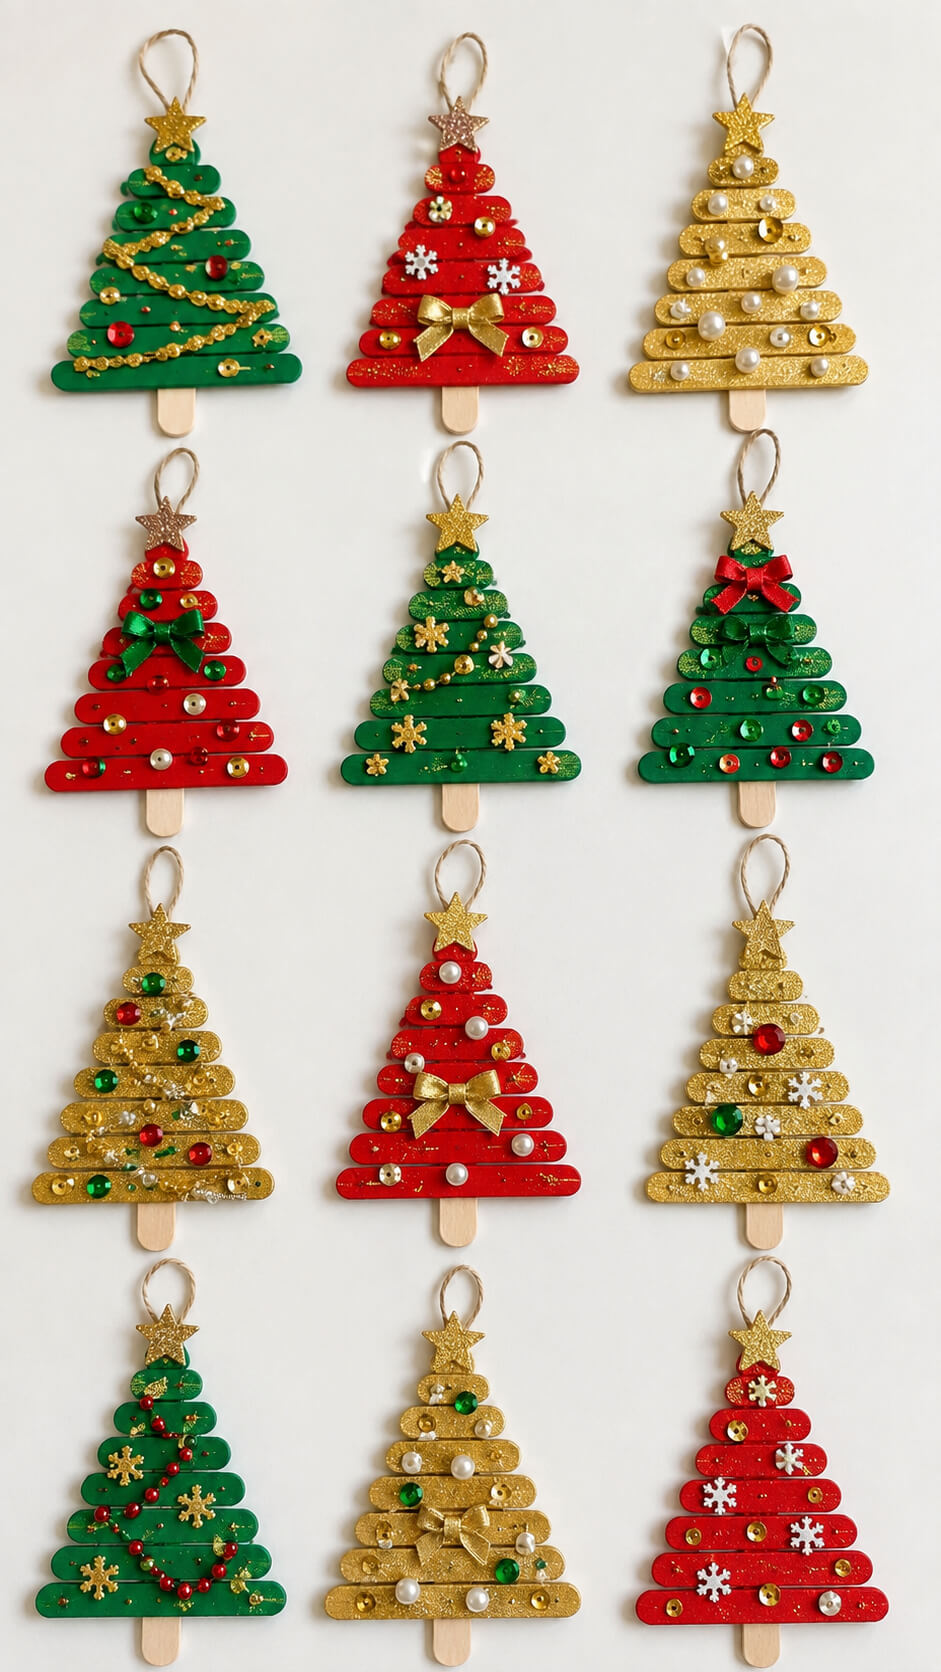
Popsicle sticks are a versatile material, and when paired with some glue and decorations, they can be transformed into adorable ornaments!
From stars to mini Christmas trees or even reindeer, let the kids’ imaginations run wild as they design their unique ornaments to hang on the tree.
Materials
- Popsicle sticks
- Acrylic paint in emerald green, ruby red, and gold
- Paintbrushes
- Craft glue
- Glitter
- Sequins
- Small beads or faux pearls
- Miniature bows
- Gold star embellishments
- Twine or thin ribbon
- Scissors
- Newspaper or a protective surface for painting
Instructions
1. Paint the popsicle sticks
Paint the popsicle sticks in festive colors such as emerald green, ruby red, and golden yellow. Apply an even coat over each stick and allow them to dry completely before adding decorations.
2. Arrange the sticks into a Christmas tree
Place the painted sticks horizontally, arranging them from shortest at the top to longest at the bottom so they form a triangular Christmas tree shape. Leave a small space between the sticks if you want the white background to show through slightly.
3. Glue the tree together
Apply a small amount of craft glue to the back of the horizontal sticks and attach them to one vertical popsicle stick running down the center. The vertical stick will act as the support and trunk for the ornament. Let the glue dry firmly.
4. Add glitter to the tree
Brush a thin layer of glue over selected areas of the painted sticks and sprinkle glitter over the glue. Use gold glitter on green or red trees and fine silver or gold glitter on lighter designs for a sparkling Christmas finish.
5. Decorate with sequins and beads
Glue small sequins, beads, faux pearls, and other tiny embellishments across the tree. Arrange them like Christmas ornaments or garlands, using different combinations on each tree to create a variety of designs.
6. Add a decorative bow
Attach a miniature red, green, or gold bow near the center or upper portion of the tree. A small bow gives the ornament a finished handmade appearance and adds another festive detail.
7. Attach the star topper
Glue a small glittery star to the top of each Christmas tree. Position it in the center so it sits neatly above the shortest popsicle stick.
8. Add the hanging loop
Cut a short piece of twine or ribbon and form it into a loop. Glue the ends securely to the back of the ornament, directly behind the star or top stick, creating a hanger for displaying the finished Christmas tree.
9. Let the ornaments dry completely
Place the finished ornaments on a clean, flat surface and allow all of the glue and paint to dry thoroughly. Avoid moving them while the embellishments are setting so the decorations remain securely attached.
10. Arrange the finished ornaments
Once completely dry, arrange the ornaments in neat rows on a clean white surface. Mix the green, red, and gold designs together to create an attractive collection of handmade Christmas decorations.
Tip
For a more polished collection, give each ornament a slightly different decorating style. Try one with a glitter garland, another with pearl ornaments, and another with bows and colorful sequins. This creates visual variety while keeping the entire collection coordinated.
5. Santa Beard Countdown
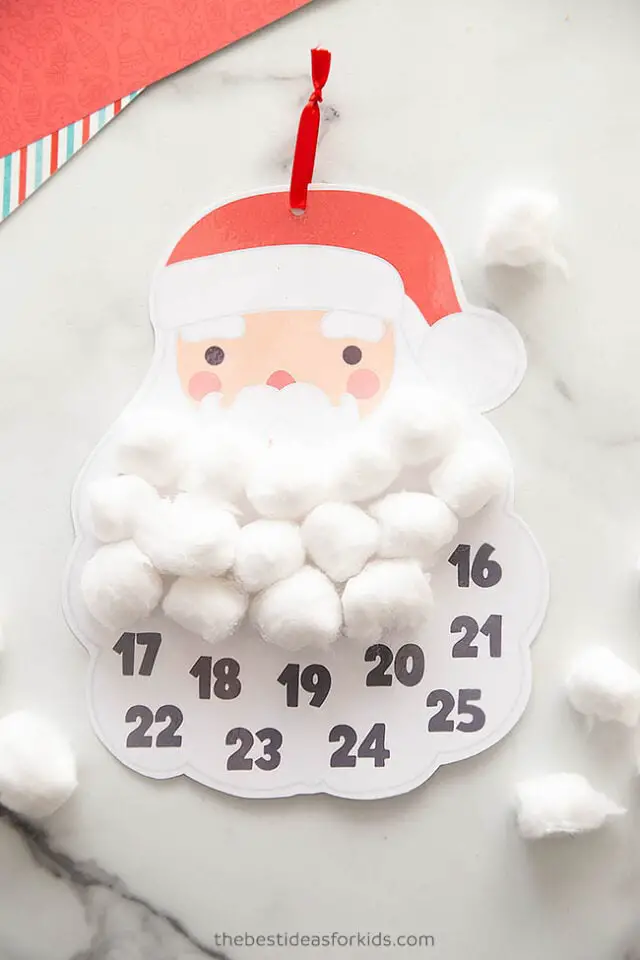
Help kids count down the days to Christmas with a fun Santa beard craft!
Cut out a picture of Santa’s face and add a long, numbered paper beard.
Each day, the kids can glue on a cotton ball, slowly building Santa’s fluffy beard as the big day gets closer.
6. Candy Cane Reindeer
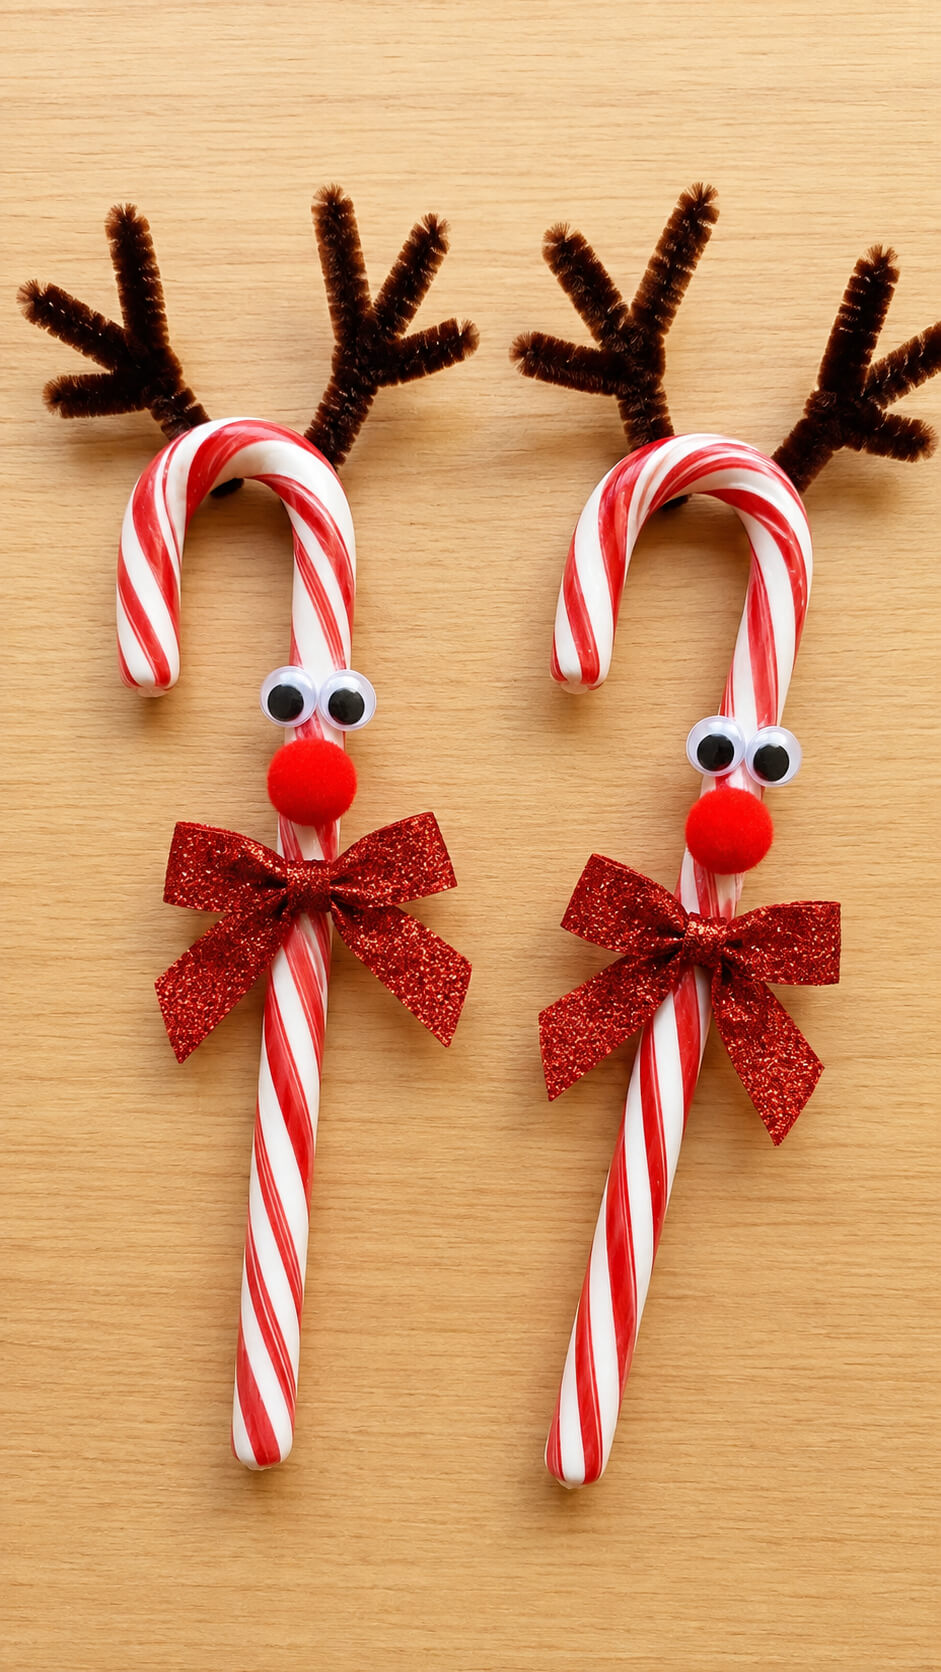
Turn candy canes into adorable reindeer with this super simple craft.
Using googly eyes, small red pom-poms, and brown pipe cleaners for antlers, kids can create cute candy cane characters to hand out as gifts or hang on the tree.
It’s sweet and crafty all in one!
Materials You’ll Need
- 2 red-and-white candy canes
- Brown pipe cleaners
- 4 googly eyes
- 2 red pom-poms
- 2 glittery red bows
- Craft glue
Instructions
1. Prepare the candy canes
Place the two candy canes on a clean, flat work surface with the curved ends facing upward. Keep the candy canes unwrapped while crafting, or leave the individual wrappers on if you want the finished crafts to remain suitable for gifting.
2. Make the reindeer antlers
Cut brown pipe cleaners into smaller pieces and bend them into simple antler shapes with a few branches. Position one antler on each side of the curved top of each candy cane and secure them firmly with craft glue.
3. Attach the googly eyes
Glue two googly eyes onto the straight section of each candy cane, just below the curved top. Position them close together to give each reindeer a cute, playful expression.
4. Add Rudolph’s red nose
Place a bright red pom-pom beneath the googly eyes on each candy cane. Glue it securely in place to create the classic Rudolph-inspired red nose.
5. Tie on the festive bows
Attach a glittery red bow around the candy cane below the face, creating the appearance of a little bow tied around the reindeer’s neck. Make sure the bow is centered and secure.
6. Let the crafts dry
Allow all of the glued pieces to dry completely before moving or handling the candy cane reindeer. Once dry, check that the antlers, eyes, noses, and bows are firmly attached.
Tip
For the neatest result, use small amounts of glue and hold each decoration in place for a few seconds before letting it dry. These adorable reindeer candy canes make simple Christmas decorations, party favors, or festive handmade gifts.
7. Salt Dough Ornaments

Making salt dough ornaments is a fun and sensory experience for kids.
They can roll out the dough, use cookie cutters to create festive shapes, and then decorate the ornaments with paint and glitter once they’ve baked.
These make perfect gifts or keepsakes to remember the holiday season.
What You’ll Need
- 2 cups all-purpose flour
- 1 cup salt
- ¾ to 1 cup warm water
- Rolling pin
- Christmas cookie cutters
- Baking sheet
- Parchment paper
- Straw or small skewer for making hanging holes
- Acrylic or craft paint
- Paintbrushes
- Gold or silver glitter
- Clear craft sealer or Mod Podge
- Ribbon or twine
Instructions
1. Mix the flour and salt
Combine 2 cups of flour and 1 cup of salt in a large mixing bowl. Stir thoroughly so the salt is evenly distributed throughout the flour.
2. Add the water gradually
Slowly pour warm water into the dry mixture while stirring. Continue adding water a little at a time until the mixture comes together into a soft, workable dough that isn’t sticky.
3. Knead the dough until smooth
Transfer the dough to a lightly floured surface and knead it for about 5 minutes. Work it until it becomes smooth and evenly textured, adding a tiny amount of flour if it feels too sticky.
4. Roll out the dough
Use a rolling pin to roll the dough to approximately ¼ inch thick. Keeping the thickness consistent will help the ornaments bake evenly and remain sturdy.
5. Cut out the ornaments
Press star, Christmas tree, and heart-shaped cookie cutters firmly into the dough. Carefully remove the excess dough around each shape and transfer the ornaments to a parchment-lined baking sheet.
6. Make the hanging holes
Use a straw or small skewer to create a hole near the top of every ornament. Make sure the hole goes completely through the dough so ribbon or twine can be added later.
7. Bake the ornaments
Bake the ornaments at 200°F (95°C) for approximately 2–3 hours, turning them once if needed. They should become completely dry and firm rather than soft in the center. Allow them to cool completely before decorating.
8. Paint the ornaments
Paint the dried ornaments in festive shades such as crimson red, forest green, creamy white, and golden yellow. Apply thin coats and allow each coat to dry before adding additional details.
9. Add festive decorations
Use a fine paintbrush to add dots, stripes, snowflakes, garlands, stars, and other Christmas-inspired patterns. Add small amounts of glitter while the paint or adhesive is still slightly tacky for a sparkling finish.
10. Seal the finished ornaments
Once all the paint and glitter are completely dry, brush on a thin layer of clear craft sealer or Mod Podge. Let the ornaments dry completely to protect the decorations and give them a longer-lasting finish.
11. Add ribbon for hanging
Thread a small piece of ribbon or twine through the hole at the top of each ornament and tie it securely. Choose coordinating colors to give the finished collection a cohesive Christmas look.
Tip
For the cleanest results, don’t make the dough too thick. About ¼ inch gives you ornaments that are sturdy enough to handle while still drying relatively quickly. For especially smooth ornaments, lightly sand the edges with fine-grit sandpaper after they have completely dried.
8. Paper Chain Garland
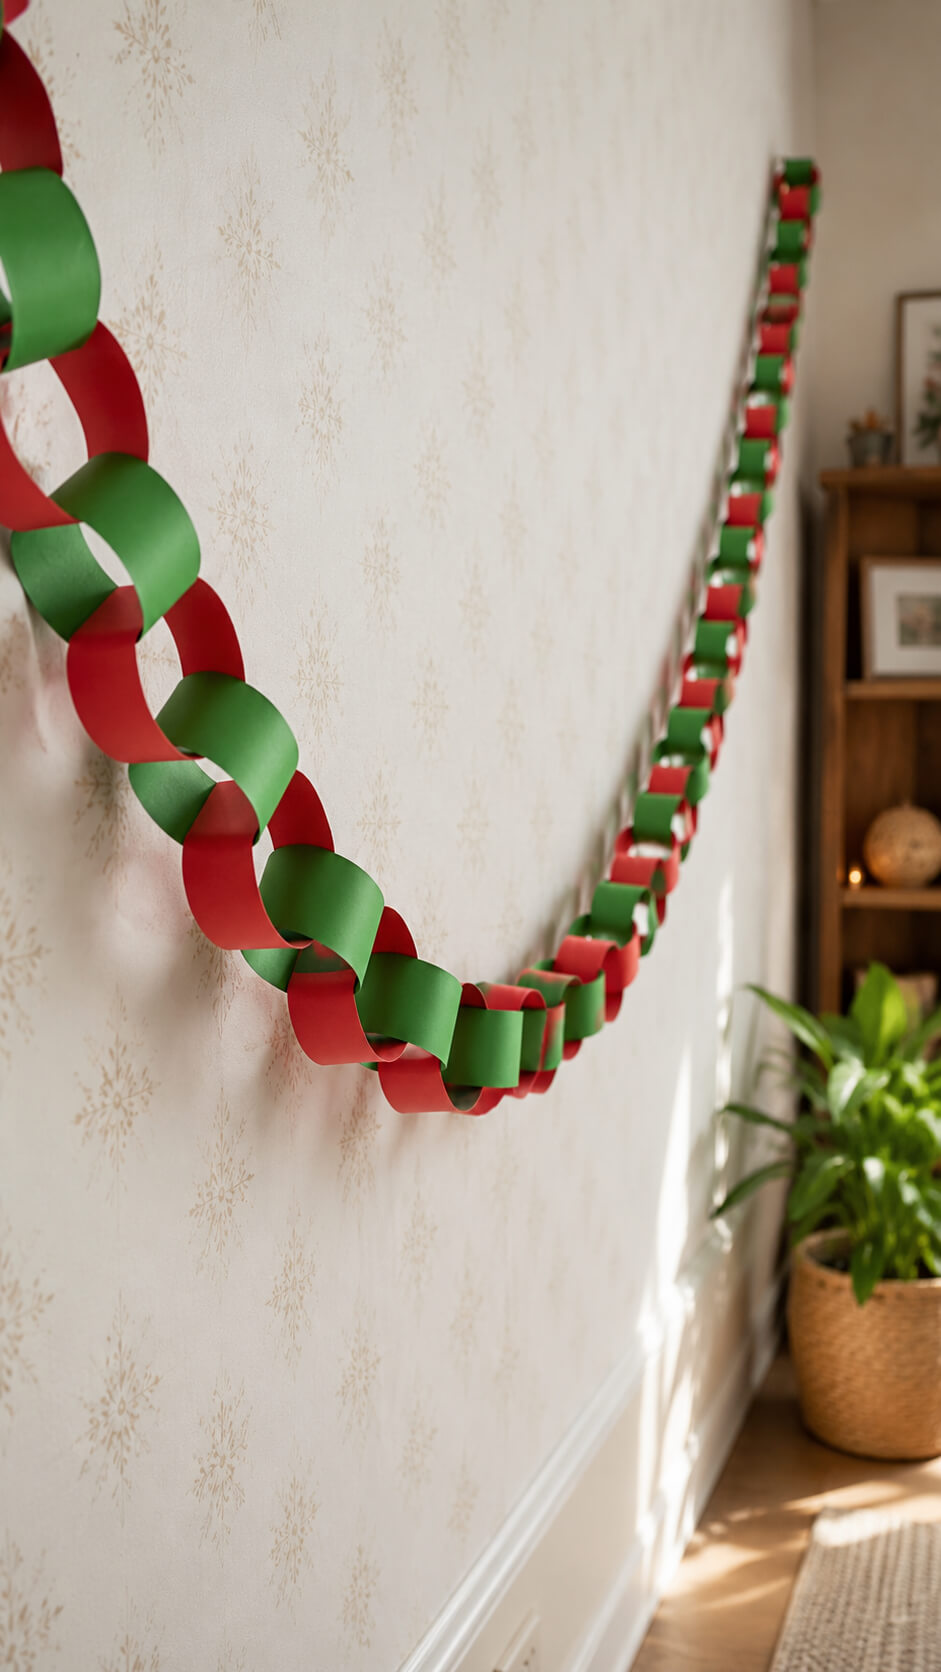
This classic Christmas craft is always a hit!
Have the kids cut out strips of festive-colored paper and loop them together to create a long garland to decorate the tree or room.
It’s a simple activity that helps develop fine motor skills while adding a handmade touch to your holiday decor.
Materials You’ll Need
- Red construction paper or cardstock
- Green construction paper or cardstock
- Scissors
- Ruler
- Pencil
- Glue stick or stapler
- Double-sided tape or removable wall hooks
- Optional: decorative scissors for a different edge
Instructions
1. Cut the red and green paper into strips
Measure and cut the paper into strips of approximately 2 × 8 inches. Try to keep every strip the same size so the finished garland looks neat and consistent.
2. Start the first paper loop
Take one red strip and gently bend it into a circle, overlapping the two short ends. Secure the ends together with glue or a small staple to create your first loop.
3. Add the green loop
Thread a green strip through the red loop before joining its ends. Secure the green strip into a circle, making sure the two loops remain linked together.
4. Continue alternating the colors
Add another red strip through the green loop and secure it, followed by another green strip through the red loop. Continue alternating red and green strips until the chain reaches your desired length.
5. Shape the completed chain
Gently adjust each loop so the circles are evenly spaced and face different directions naturally. Avoid pulling too tightly because the paper can crease or tear.
6. Choose where to hang the garland
Decide whether you want the garland to hang in a gentle curve, a deep swoop, or across the top of a wall. A relaxed curve gives the decoration a fuller and more natural appearance.
7. Attach the garland to the wall
Use small pieces of removable double-sided tape or wall-safe hooks at the ends and a few points along the garland. Make sure the attachment points can support the lightweight paper without damaging the wall.
8. Add a few finishing decorations
Complete the display with nearby Christmas décor such as a wooden shelf, small ornaments, greenery, candles, or a potted plant. Keep the surrounding decorations simple so the red-and-green chain remains the focal point.
Tip
For a fuller-looking garland, use slightly wider paper strips and make the loops larger. For a delicate, minimalist decoration, use narrower strips and smaller loops. Mixing matte red and green paper can also give the finished garland a more textured, handmade appearance.
9. Christmas Tree Suncatchers
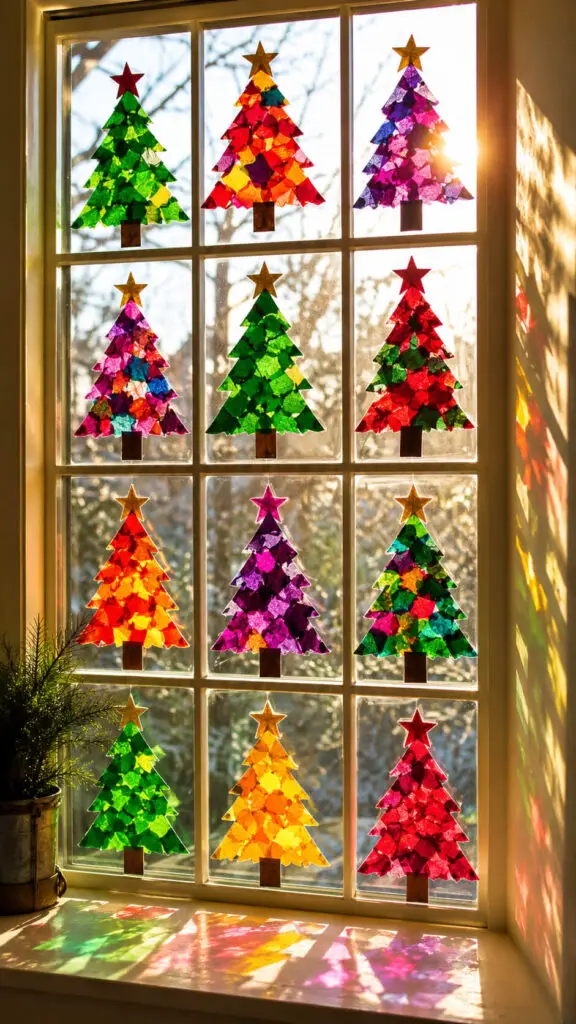
Using tissue paper and clear contact paper, kids can create beautiful suncatchers in the shape of Christmas trees.
Hang them in the window, and watch the light filter through the colorful paper.
It’s a festive way to brighten up the house and let your child’s creativity shine.
Materials
- Clear contact paper
- Colorful tissue paper in emerald green, ruby red, golden yellow, deep purple, and other festive shades
- Scissors
- Pencil
- Christmas tree template or a simple tree shape to trace
- Tape
- A clean window with plenty of natural sunlight
Instructions
1. Prepare the Christmas tree shapes
Draw several Christmas tree silhouettes on paper, making them different sizes if desired. Cut out the templates carefully, including a small rectangular trunk at the bottom of each tree.
2. Cut the tissue paper into small pieces
Tear or cut the colorful tissue paper into small, irregular pieces. Use a mixture of colors and sizes so the finished trees have a natural, textured appearance rather than looking perfectly uniform.
3. Prepare the clear contact paper
Cut a piece of clear contact paper large enough for one Christmas tree. Carefully peel away the backing to expose the sticky surface, then place it flat with the adhesive side facing upward.
4. Arrange the tissue paper on the contact paper
Place the tissue paper pieces across the sticky surface, overlapping some pieces to create beautiful color variations. Fill the entire Christmas tree area while keeping the tissue pieces relatively close together.
5. Seal the tissue paper between contact paper
Place another piece of clear contact paper over the tissue paper, adhesive side down. Smooth it gently from the center outward to remove air bubbles and seal all the colorful pieces inside.
6. Cut out the Christmas tree
Place the tree template over the sealed tissue-paper design and carefully cut around the outline. Make clean cuts around the branches and trunk so the tree has a recognizable Christmas tree shape.
7. Add a festive star
Cut a small star from yellow or golden tissue paper or another translucent material. Seal it between two pieces of contact paper and attach it to the top of the Christmas tree.
8. Attach the suncatchers to the window
Use small pieces of removable tape to secure each finished tree directly onto the window. Arrange the trees in rows or create a playful scattered display with different colors and sizes.
9. Let the sunlight illuminate the designs
Position the suncatchers where they receive direct or bright natural sunlight. As the light passes through the tissue paper, the colors become more vibrant and create beautiful glowing patterns on the window sill and surrounding wall.
Tip
For the most luminous effect, use thin, brightly colored tissue paper and avoid using too many layers in one area. Overlapping two or three different colors can create especially pretty translucent shades when sunlight shines through them.
10. Button Wreath
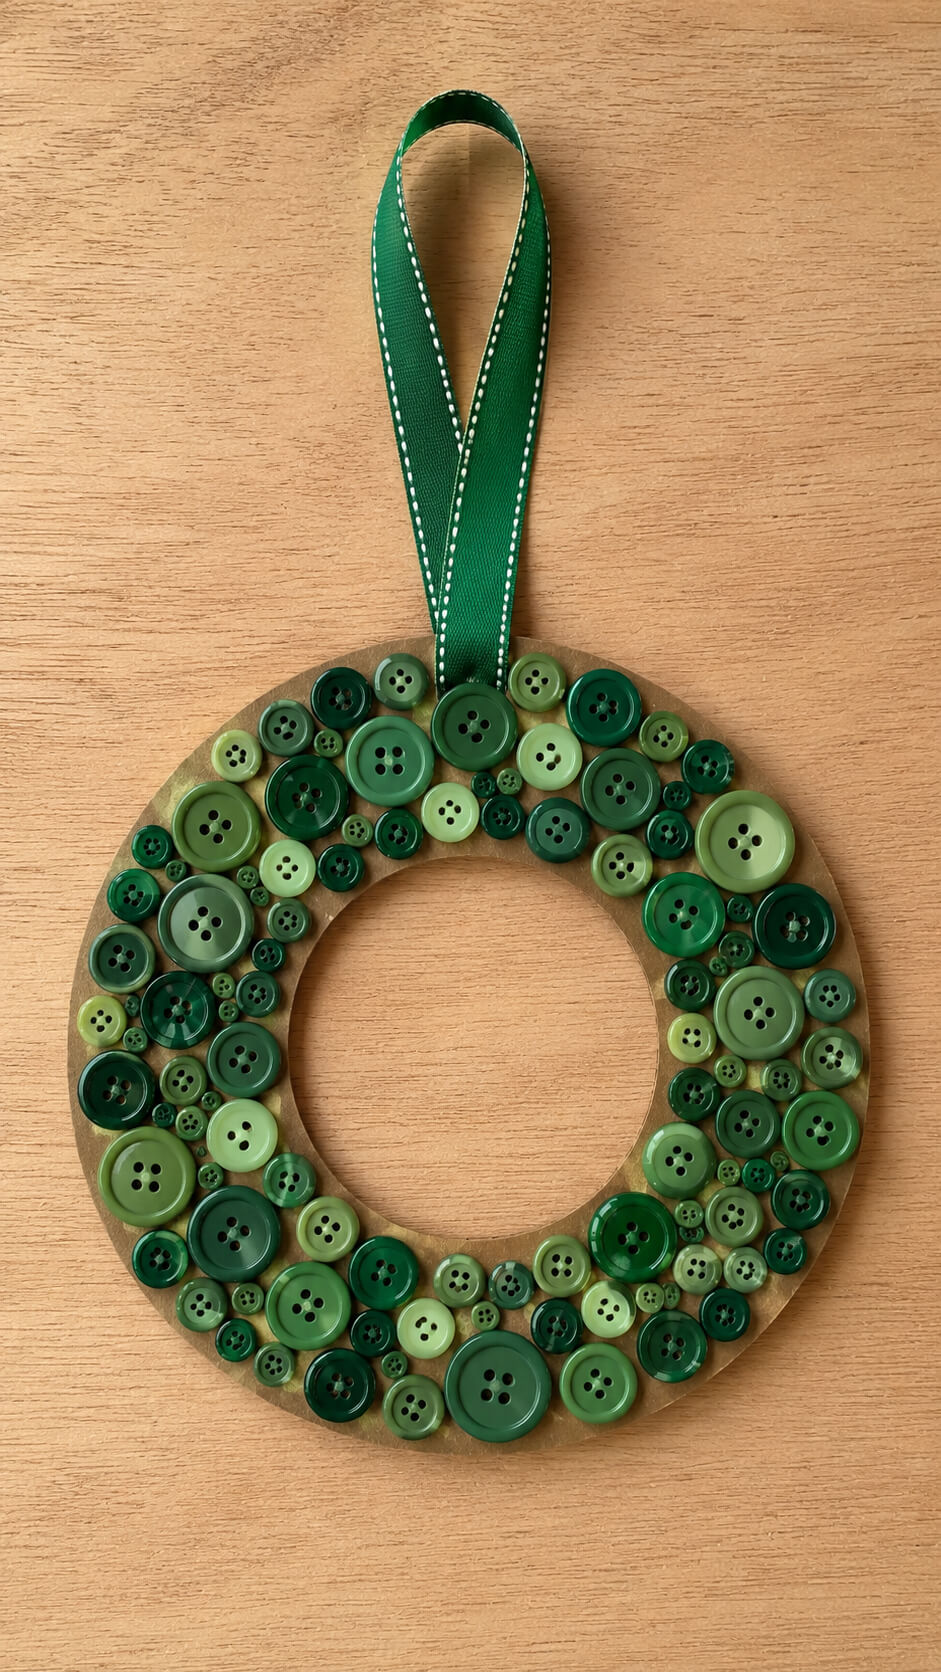
Gather up a mix of buttons in different colors and sizes, and let kids glue them into a wreath shape on a piece of cardboard.
Add a ribbon to hang it up, and you’ve got a cute and crafty holiday decoration.
It’s a great way to use up spare buttons while making something beautiful.
Materials
- Green buttons in different sizes and shades
- Thick brown paper or lightweight cardboard
- Scissors
- Pencil
- Round plate or bowl for tracing
- Glue suitable for paper and buttons
- Green ribbon
- Ruler
Instructions
1. Create the wreath base
Trace a large circle onto the thick brown paper using a plate or bowl as a guide. Place a smaller round object in the center and trace another circle to create the open middle of the wreath. Carefully cut around both circles to make a ring-shaped base.
2. Arrange the green buttons
Before gluing, arrange the green buttons around the brown paper ring. Mix different sizes and shades of green to create a full, textured appearance, while keeping the buttons close together so very little of the brown base shows through.
3. Glue the buttons in place
Starting around the outer edge, glue each button onto the paper base. Continue working around the wreath, filling empty spaces with smaller buttons until the entire ring is covered. Allow the glue to set according to its instructions.
4. Fill the smaller gaps
Look carefully for any noticeable empty spaces between the larger buttons. Add a few small green buttons to these areas to give the wreath a fuller and more finished appearance.
5. Attach the hanging ribbon
Cut a piece of green ribbon and fold it into a loop. Glue or securely attach the ends to the back of the wreath at the top, making sure the ribbon is strong enough to support the craft when it is hung.
6. Let the wreath dry completely
Place the finished wreath flat on the table and allow all the glue to dry completely. Avoid moving or lifting it while the buttons are still loose so the arrangement stays neat.
7. Display your finished wreath
Once everything is firmly attached, hang the button wreath on a door, wall, or other suitable spot as a simple handmade Christmas decoration.
Tip
For a more interesting wreath, combine dark forest green, medium green, and light green buttons in different sizes. Keep the arrangement slightly varied rather than perfectly uniform to give the craft a charming handmade look.
11. Fingerprint Christmas Lights
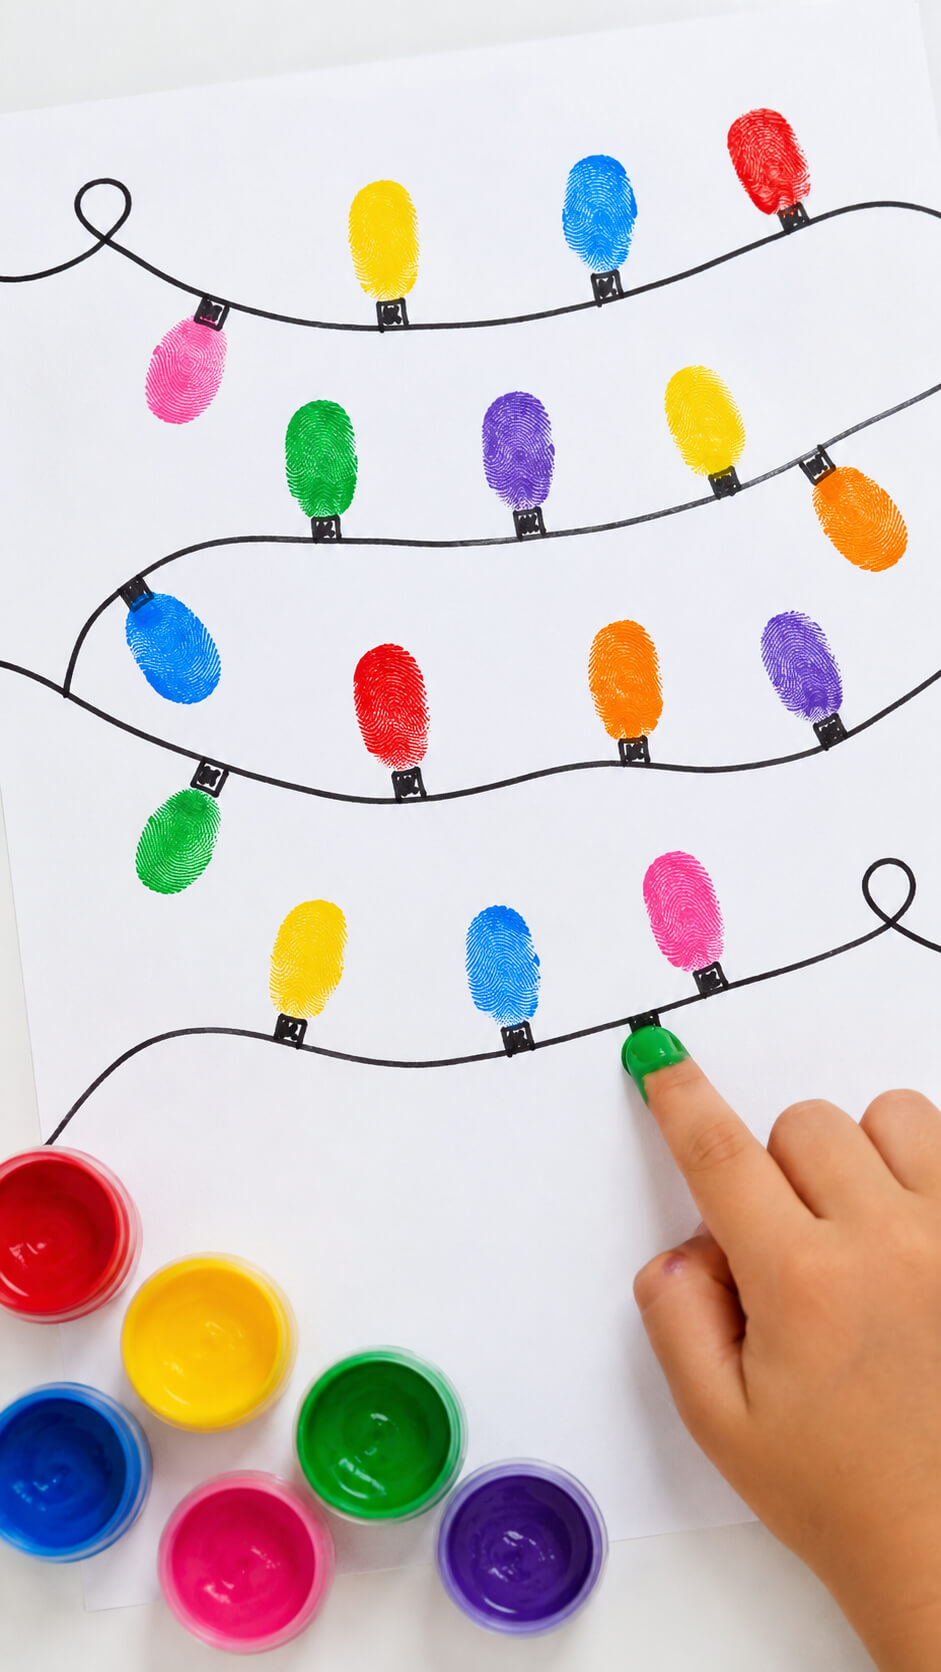
Turn your child’s fingerprints into Christmas lights with this easy craft.
Using paint in various colors, kids can dip their fingers and stamp them onto a piece of paper, then draw lines connecting the “bulbs.”
It’s a fun, quick craft that can double as a homemade Christmas card.
Materials
- White paper
- Washable paint in bright colors
- Small paint containers
- Black marker
- A child’s finger for making the fingerprints
- Paper towel or wipes for cleaning fingers
Instructions
1. Draw the Christmas light cords
Use a black marker to draw several gently curving lines across the white paper. Leave enough space between the lines for the colorful fingerprint bulbs.
2. Add small bulb holders
Draw tiny rectangular or square shapes underneath different points along the black cords. These will make the fingerprints look like Christmas light bulbs.
3. Prepare the colorful paints
Pour small amounts of bright-colored washable paint into separate containers. Choose festive colors such as red, green, yellow, blue, pink, purple, and orange.
4. Dip a finger into the paint
Have the child gently dip one fingertip into a small amount of paint. Make sure the fingertip is covered evenly without using too much paint.
5. Press fingerprints onto the paper
Press the painted fingertip onto the paper directly above the small bulb holders. Lift the finger straight up to leave a clear fingerprint that looks like a colorful Christmas light.
6. Repeat with different colors
Continue adding fingerprints along the black cords, changing colors as desired. Varying the colors creates a bright and playful string of Christmas lights.
7. Let the artwork dry
Place the finished artwork somewhere flat and allow the paint to dry completely. Avoid touching the fingerprints while they are still wet so their shapes stay neat.
Tip
For cleaner fingerprint bulbs, use only a thin layer of paint on the fingertip and make a few practice prints on scrap paper before decorating the Christmas lights.
12. Felt Christmas Trees
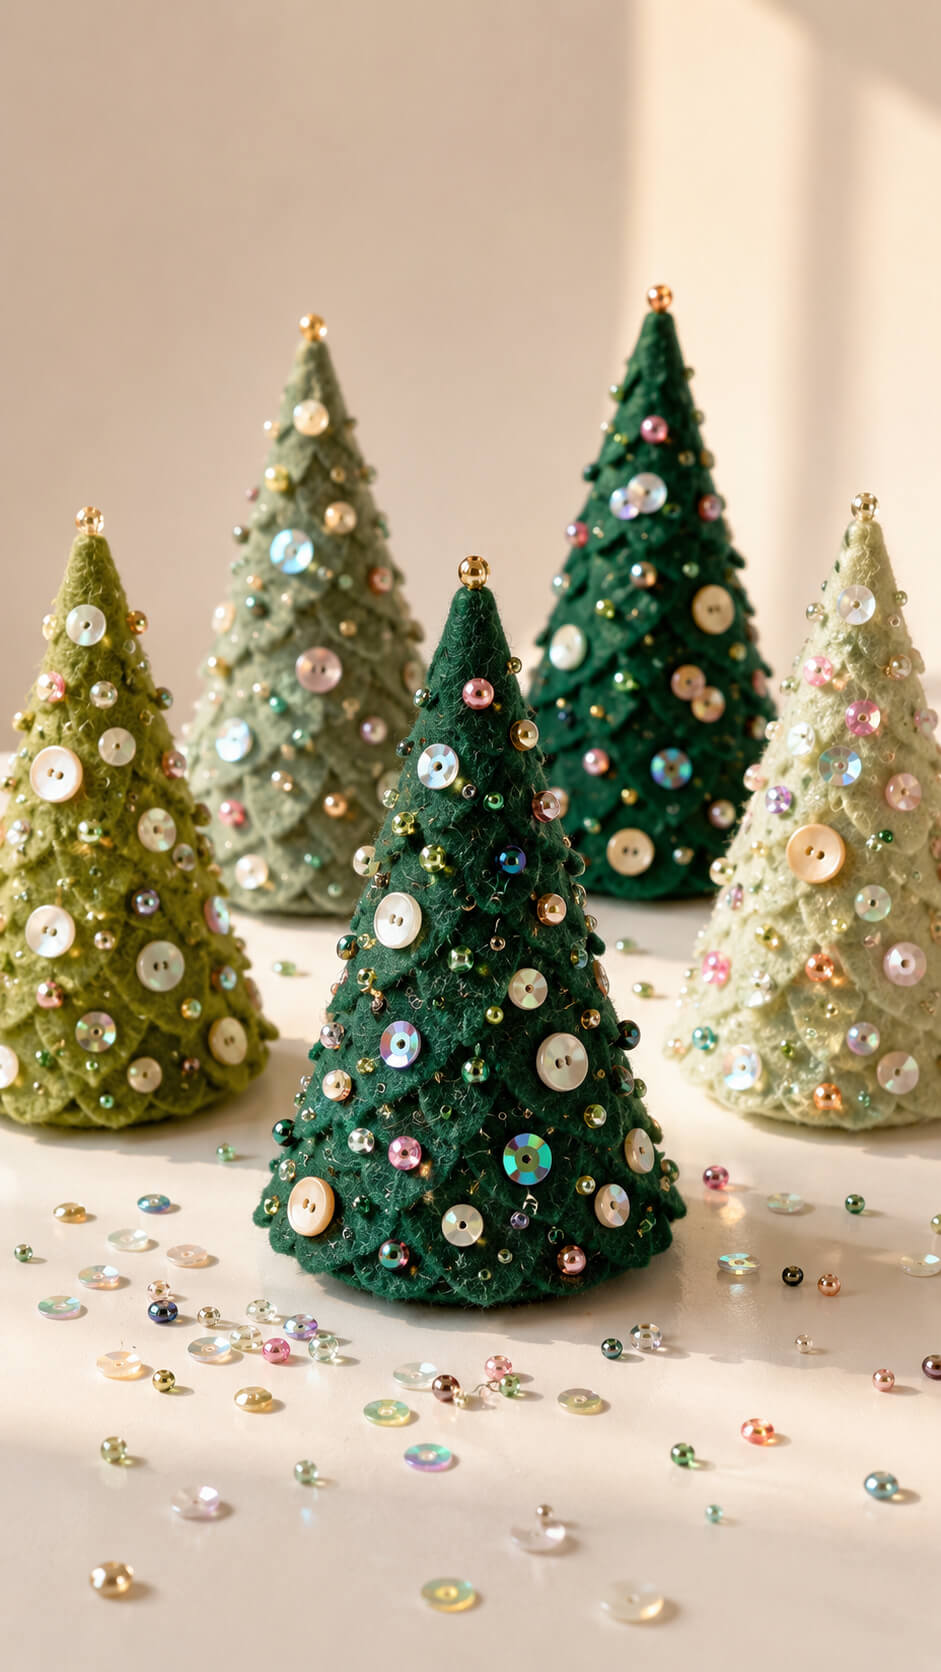
Create mini Christmas trees from felt fabric.
Cut out tree shapes, and let the kids decorate them with sequins, beads, and small buttons as ornaments.
They can even add a star at the top!
This is a soft and tactile craft that kids will love assembling and showing off.
Materials You’ll Need
- Green felt
- Cardboard or cardstock
- Scissors
- Craft glue
- Iridescent sequins
- Small glass beads
- Tiny round mother-of-pearl buttons
- Pencil
- Ruler
- Small amount of stuffing or cotton, if desired
Instructions
1. Create the Christmas tree template
Draw a tall triangle on a piece of cardboard or cardstock, approximately six inches tall, with a slightly curved or rounded base. Cut out the template carefully so it can be used to create evenly shaped felt trees.
2. Cut the felt pieces
Place the template over the green felt and trace around it. Cut out two identical triangular felt pieces for each tree, keeping the edges smooth and even.
3. Join the felt tree pieces
Place the two felt triangles together and apply a thin line of craft glue around the edges, leaving a small opening at the bottom. If you prefer a more structured tree, you can sew the edges together instead.
4. Give the tree its shape
Add a small amount of stuffing through the opening if you want the tree to look slightly rounded and dimensional. Avoid overfilling it so the finished tree maintains its neat triangular shape.
5. Seal the bottom of the tree
Once the tree has the desired shape, close the remaining opening with craft glue or a few small stitches. Allow the adhesive to dry completely before decorating.
6. Decorate the felt tree
Arrange iridescent sequins, colorful glass beads, and tiny mother-of-pearl buttons across the felt surface. Use different sizes and colors to create a whimsical handmade appearance while leaving enough felt visible to keep the design from looking overcrowded.
7. Add a finishing detail
Place a small bead or sequin at the top of the tree as a simple finishing accent. Make sure all decorations are securely attached and allow the glue to dry completely.
8. Arrange the finished trees
Place several miniature trees together on a smooth white surface. Scatter a few loose sequins and beads naturally around their bases to create a playful crafting effect, while keeping everything else off the table.
Tip
For the most polished result, use a limited selection of complementary bead and sequin colors rather than decorating every area heavily. A little empty felt space helps the iridescent decorations stand out beautifully.
13. Reindeer Puppets
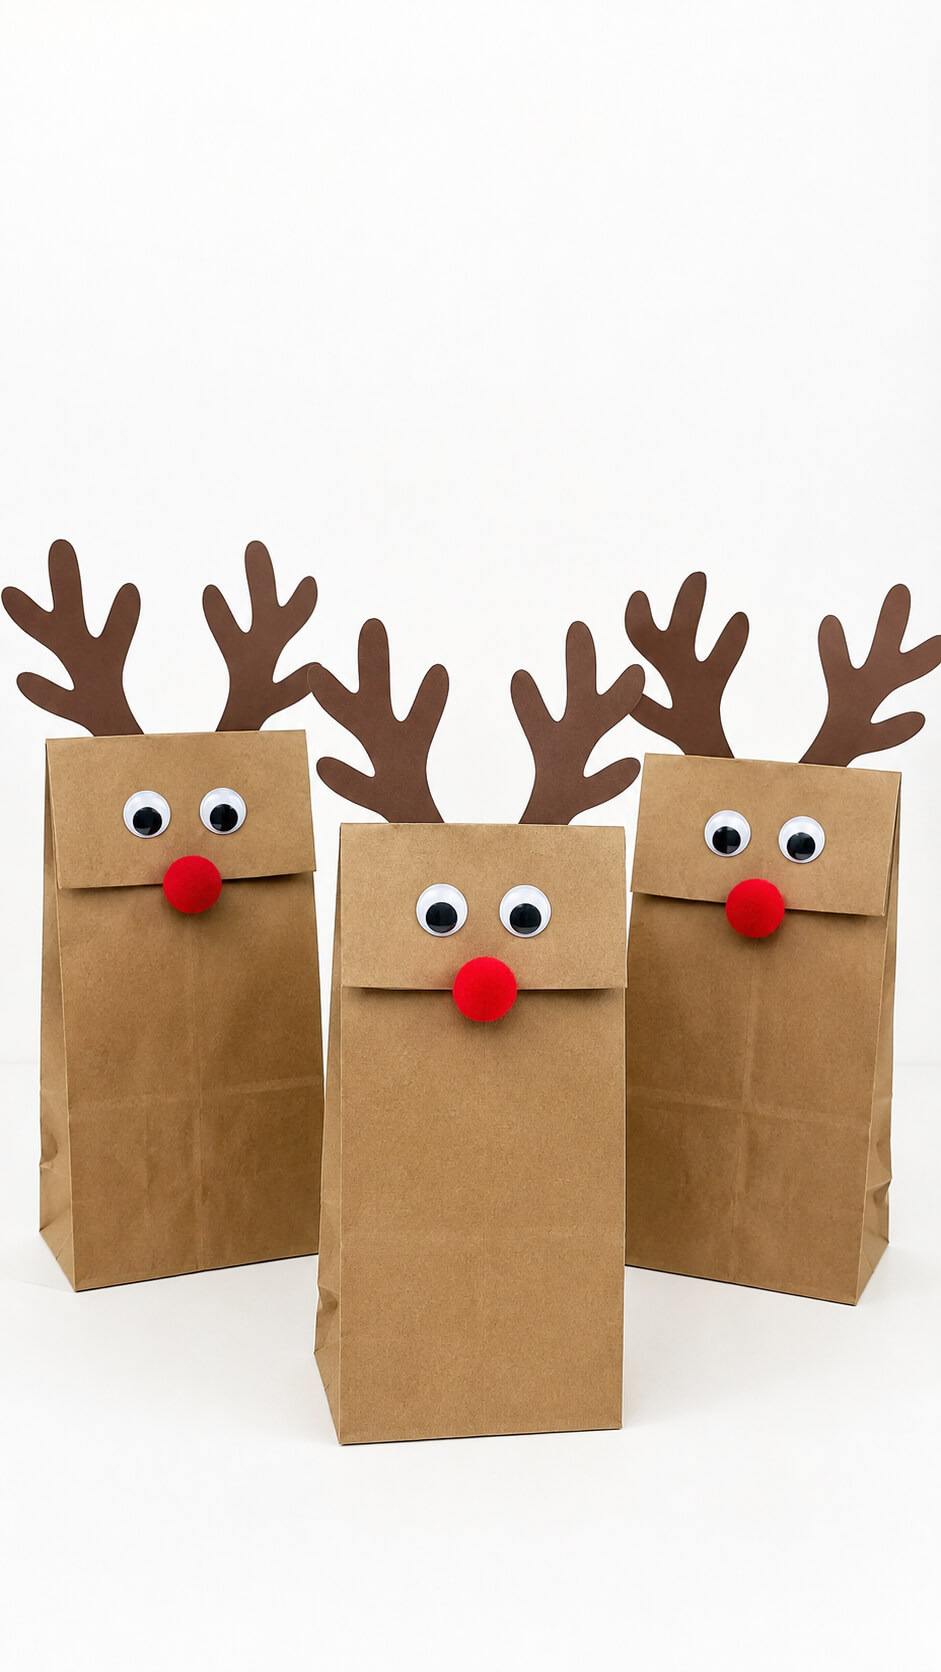
Turn brown paper bags into reindeer puppets!
Kids can glue on googly eyes, a red nose, and antlers made from construction paper.
Once finished, they’ll have a fun puppet to play with during the holiday season, adding a bit of Christmas cheer to their imaginative play.
Materials
- Brown paper lunch bags
- Brown construction paper or cardstock
- Googly eyes
- Red pom-poms
- Scissors
- Glue or glue stick
- Pencil
- Ruler
- Optional: black marker and additional decorations
Instructions
1. Prepare the paper bags
Place each brown paper bag flat with the folded flap facing toward you. The flap will become the reindeer’s face, while the rest of the bag forms its body.
2. Cut out the antlers
Draw two simple reindeer antlers on brown construction paper or cardstock. Make the antlers large enough to extend above the top of the paper bag, then carefully cut them out. You will need two antlers for each puppet.
3. Attach the antlers
Apply glue to the bottom portion of each antler and attach them to the back of the paper bag, positioning them so they extend above the head. Allow the glue to dry before moving the puppet.
4. Add the googly eyes
Glue two googly eyes onto the folded flap of the paper bag, leaving enough space below them for the reindeer’s nose.
5. Add the red nose
Glue a bright red pom-pom beneath the eyes to create the reindeer’s classic Rudolph-style nose. Press it gently into place until the glue holds.
6. Let the puppet dry
Leave the finished reindeer puppets flat for several minutes so the glue can set completely. Once everything is secure, carefully place your hand inside the bag to turn it into a puppet.
7. Decorate your reindeer
Give each reindeer its own personality by adding a smile, eyebrows, ears, a bow, a scarf, or small festive decorations. You can also use different sizes of googly eyes and pom-poms to create a whole family of reindeer.
Tip
For sturdier antlers, glue two layers of brown construction paper together before cutting them out. If children are making the puppets, pre-cutting the antlers can make the craft quicker and easier, especially for younger kids.
14. Paper Plate Wreaths
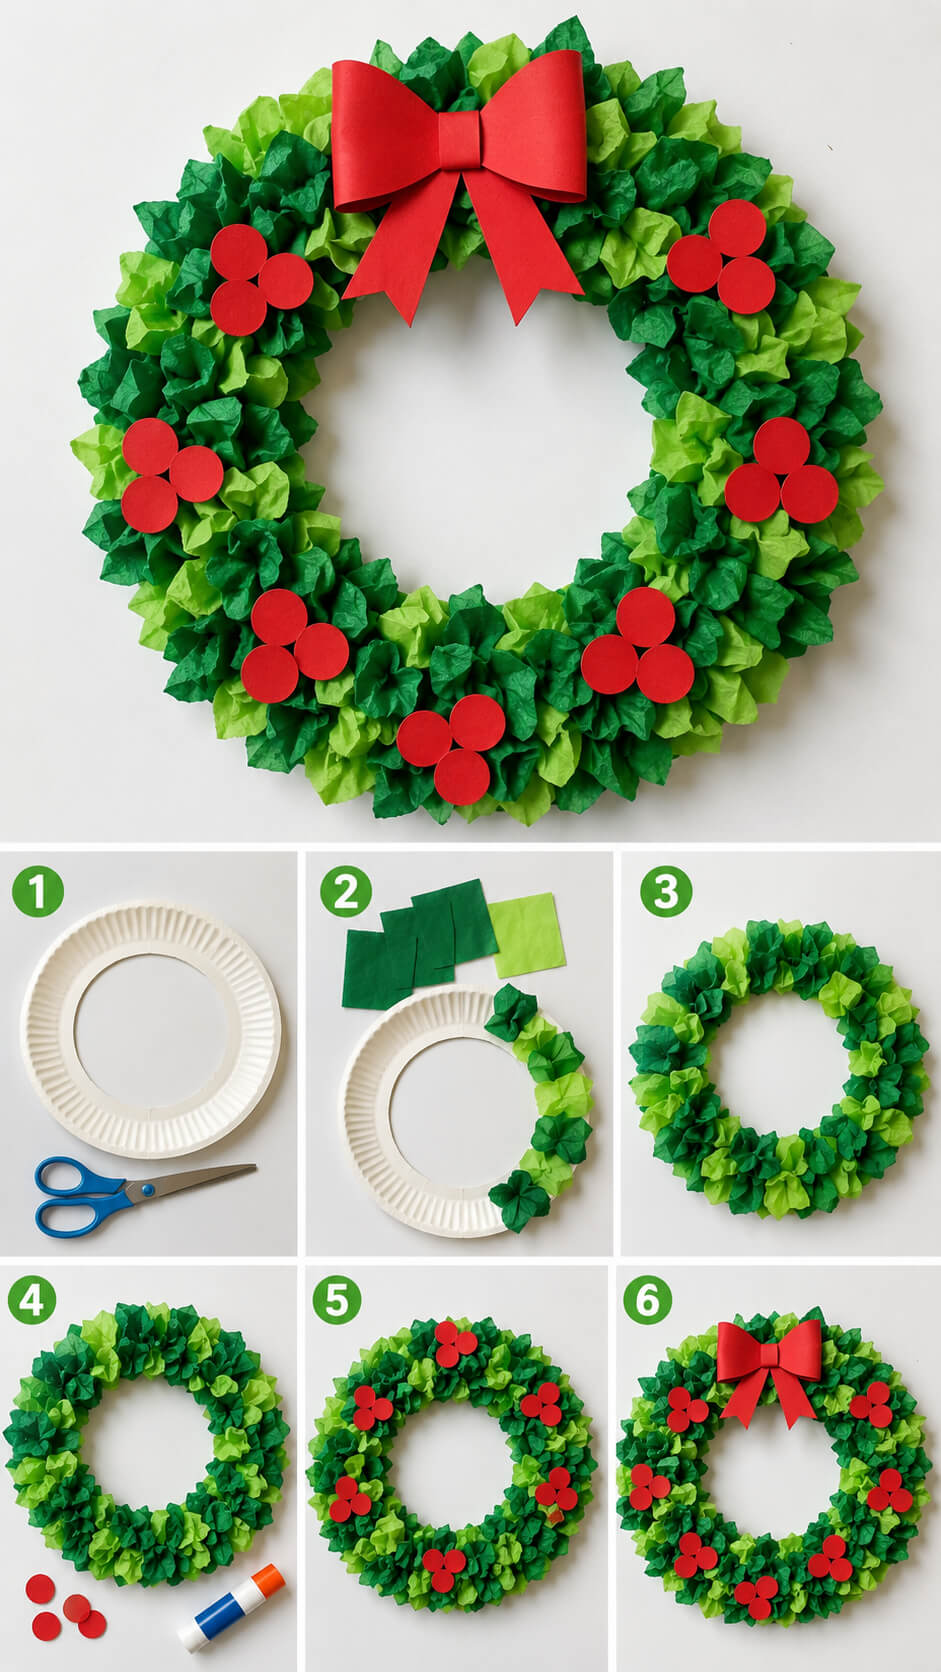
Another fun use for paper plates is making wreaths.
Cut out the center of the plate, leaving just the outer ring, and let kids glue on green tissue paper or construction paper leaves.
Add red berries or a bow, and you’ve got a festive wreath to hang on the door or wall.
Materials
- Paper plate
- Green tissue paper in light and dark shades
- Red construction paper
- Scissors
- Glue or glue stick
- Pencil
- Red ribbon or construction paper for the bow
Instructions
1. Cut out the center of the paper plate
Use scissors to carefully cut out the middle section of the paper plate, leaving the outer rim intact. This ring will form the base of your wreath.
2. Cut the green tissue paper into pieces
Cut the green tissue paper into small squares or roughly sized pieces. Use different shades of green to give the wreath a fuller and more colorful appearance.
3. Attach the tissue paper to the wreath
Apply small amounts of glue to sections of the paper-plate ring, then scrunch or pinch the tissue-paper pieces and press them onto the glue. Continue around the entire ring, layering the pieces closely together until the plate is completely covered.
4. Make the red paper berries
Cut several small circles from red construction paper. Arrange three circles together to create small berry clusters, then glue them onto different areas of the green wreath.
5. Add the berry clusters to the wreath
Place the red berry clusters evenly around the wreath and glue them firmly onto the tissue paper. Spread them around the ring so the decoration looks balanced.
6. Finish the wreath with a red bow
Make a simple bow from red ribbon or construction paper and attach it to the top of the wreath. Adjust the tissue paper and berries as needed to create a full, festive look.
Tip
For a fuller wreath, use plenty of tissue-paper pieces and overlap them slightly. Mixing several shades of green will give the finished craft more texture and make the red berries stand out beautifully.
15. Pom-Pom Christmas Trees
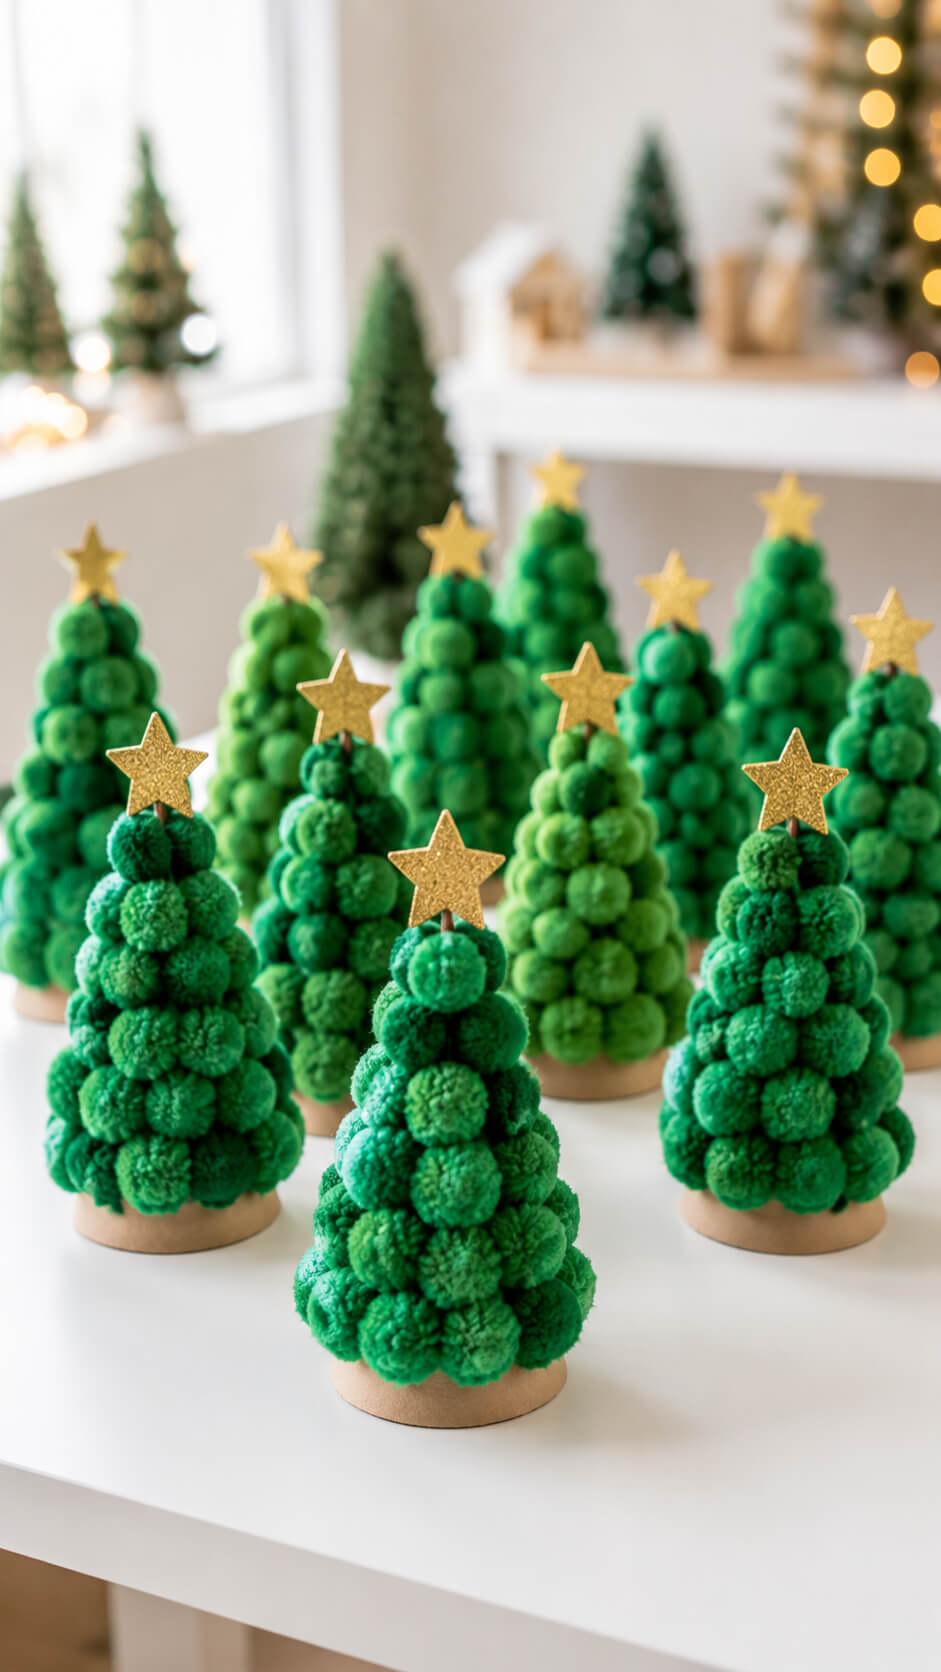
Using green yarn or pom-poms, kids can create their own mini Christmas trees.
Glue them onto a cone-shaped base and add tiny decorations like stars or beads to finish the look.
These little trees are a great way to let kids work with different textures and materials.
Materials You’ll Need
- Green pom-poms in different shades and sizes
- Small cardboard or foam cones
- Gold star embellishments
- Small wooden or cardboard circles for the bases
- Craft glue or a hot glue gun
- Scissors
- Pencil
- Ruler
- Optional: gold glitter, ribbon, or small beads
Instructions
1. Prepare the Christmas tree base
Cut or prepare a small cone from sturdy cardboard or use a ready-made foam cone. Make sure the cone stands upright and has a stable bottom. If you are making several trees like the ones pictured, prepare cones in different heights for a more natural arrangement.
2. Cover the cone with green pom-poms
Starting at the bottom of the cone, glue green pom-poms closely together around the surface. Continue working upward, placing each pom-pom beside the previous ones so the cone underneath is hidden. Slightly overlap the pom-poms to create the thick, fluffy appearance shown in the picture.
3. Mix different shades of green
Use several shades of green pom-poms instead of covering each tree with only one color. Combine dark emerald, medium green, and lighter green pom-poms throughout the tree. This gives the finished decoration more texture and makes it look fuller.
4. Fill all visible gaps
Continue adding pom-poms until you reach the top of the cone. Check the tree from different angles and glue additional pom-poms into any areas where cardboard or foam is visible. Keep the pom-poms close together so the finished tree looks dense and rounded.
5. Create the golden tree topper
Choose a small gold star for the top of each tree. If your stars do not already have a stem, glue a short wooden skewer or piece of sturdy craft wire to the back of each star. Allow the glue to dry completely before attaching the stars.
6. Attach the star to the tree
Place the bottom of the star’s stem into the top of the pom-pom tree. Add a small amount of glue around the stem if necessary, then gently press it into the top pom-poms. Hold it upright until the glue sets.
7. Make the wooden tree bases
Cut small circles from lightweight wood or thick cardboard, or use pre-cut wooden craft discs. The base should be slightly wider than the bottom of the cone so the tree can stand securely.
8. Secure each tree to its base
Apply glue to the bottom of the pom-pom-covered cone and carefully place it in the center of the wooden base. Hold it firmly for a few seconds and allow the adhesive to dry completely before moving the tree.
9. Arrange the finished Christmas trees
Make several trees in different heights and shades of green. Place the tallest trees toward the back and the shorter ones toward the front. Grouping them together creates the layered miniature Christmas forest effect seen in the image.
Tip
For the fluffiest-looking trees, use pom-poms in several sizes and avoid arranging them in perfectly straight rows. Slightly uneven placement gives each Christmas tree a fuller, handmade appearance. Use a low-temperature glue gun if children are helping with the craft, with adult supervision.
16. Gingerbread Paper Dolls
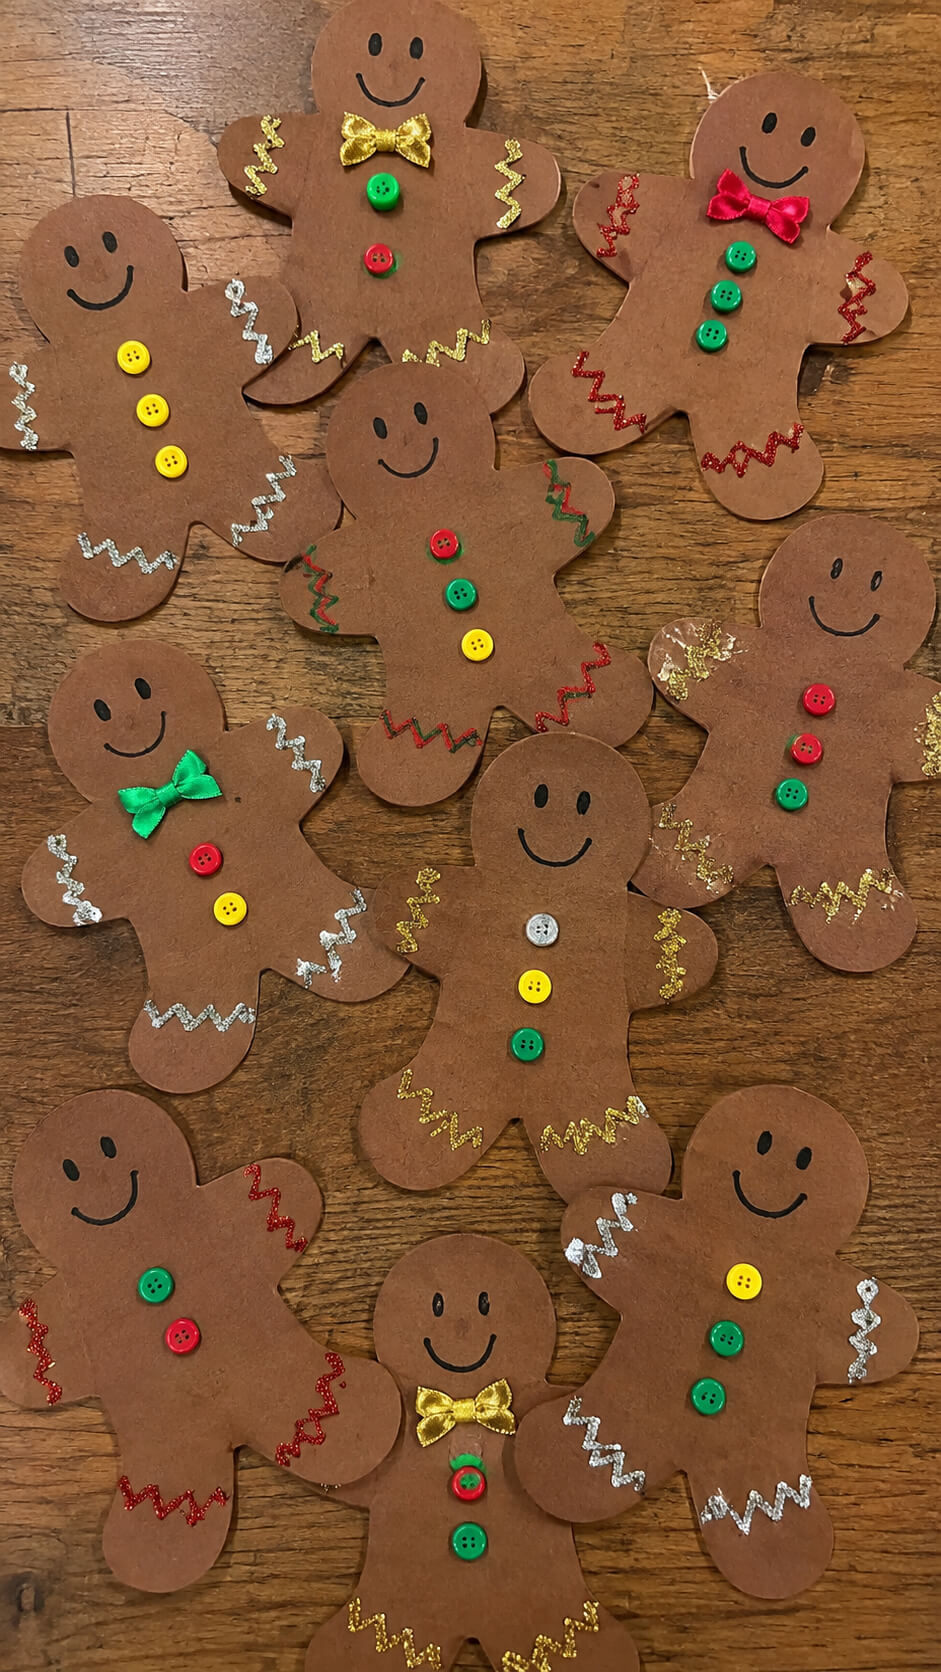
Instead of baking gingerbread men, why not make paper ones?
Cut out gingerbread shapes from brown construction paper, and let kids decorate them with markers, glitter, and buttons.
These paper gingerbread dolls are a fun, mess-free alternative to cookie decorating.
Materials
- Brown construction paper or brown cardstock
- Scissors
- Red, green, and yellow buttons
- Gold and silver glitter
- Black marker
- Ribbon scraps
- Craft glue
- Pencil
- Gingerbread man template or cookie cutter for tracing
Instructions
1. Trace the gingerbread man shapes
Place a gingerbread man template or cookie cutter on the brown construction paper and carefully trace around it with a pencil. Make several different-sized figures so the finished craft has plenty of variety.
2. Cut out the gingerbread men
Use scissors to carefully cut along the pencil outlines. Smooth any rough edges and make sure each gingerbread figure has clearly defined arms, legs, and a rounded head.
3. Draw cheerful faces
Use a black marker to draw two small eyes and a curved smile on each gingerbread man. Give each face a slightly different expression to make the handmade characters look playful and unique.
4. Add colorful buttons
Glue red, green, and yellow buttons down the center of each gingerbread figure to create colorful buttons. Mix the colors and use different numbers of buttons on each figure for a fun assortment.
5. Decorate with glitter
Apply small lines of craft glue along the arms, legs, and other areas of the gingerbread men. Sprinkle gold and silver glitter over the glue, then gently shake away the excess to create sparkling decorative accents.
6. Attach ribbon bow ties
Cut small pieces of colorful ribbon and tie or shape them into tiny bows. Glue a bow onto the upper body of selected gingerbread men to give them a cute, festive finishing detail.
7. Create colorful zigzag patterns
Use glue, glitter, or markers to make colorful zigzag patterns across the arms and legs. Combine red, green, gold, and silver decorations to give each paper gingerbread man its own style.
8. Let the decorations dry
Place the decorated gingerbread men flat on the wooden table and allow the glue and glitter to dry completely. Avoid moving the figures while they are drying so the buttons, bows, and glitter stay securely attached.
Tip
For a more cheerful display, use a mixture of large and small gingerbread men and vary the buttons, glitter colors, bows, and zigzag patterns. This makes every paper figure look handmade and different.
17. Clothespin Angels
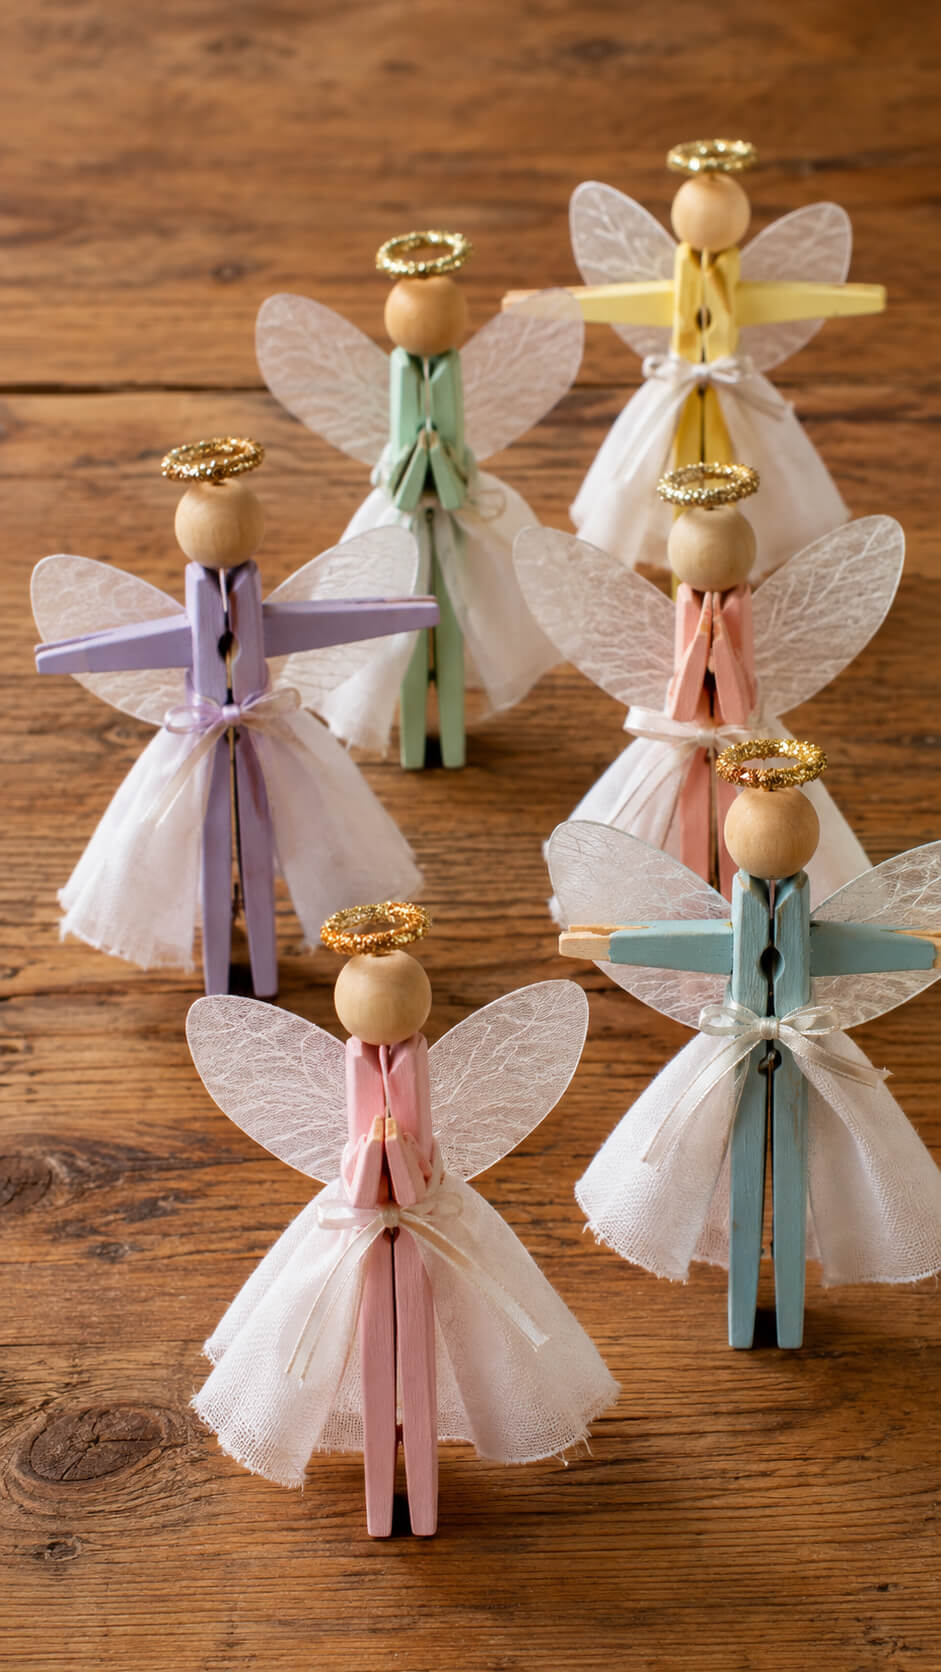
With a few simple supplies like clothespins, paper wings, and some glitter, kids can create adorable little angels to hang on the tree or display on the mantle.
This is a great craft for developing fine motor skills and creating something meaningful for the holiday season.
Materials
- Wooden clothespins
- Small wooden beads for the heads
- White fabric or lightweight gauze
- Translucent paper or vellum for the wings
- Gold glitter or gold glitter paper
- White or pastel-colored paint
- Small ribbon
- White craft glue
- Scissors
- Paintbrush
- Pencil
- Optional fine-tip marker
Instructions
1. Paint the clothespins in pastel colors
Paint the wooden clothespins in soft shades such as pink, lavender, mint green, pale blue, peach, or yellow. Apply a thin, even coat and allow the paint to dry completely before adding the other details. Leave the lower portion of the clothespin free so the angel can stand upright.
2. Attach a wooden bead for the head
Place a small wooden bead at the top of each painted clothespin to create the angel’s head. Secure it with a small amount of strong craft glue and hold it in position until the glue begins to set. Allow it to dry fully so the head stays firmly attached.
3. Create the delicate angel wings
Draw a simple pair of symmetrical wings on translucent paper or vellum and carefully cut them out. Make the wings slightly wider than the angel’s body so they are clearly visible from the front. Add subtle lines or patterns with a pencil if you want to give the wings more texture.
4. Glue the wings behind the body
Apply a small amount of craft glue to the center of the wings and attach them to the back of the clothespin. Position them evenly on both sides and let the glue dry completely. The translucent material will catch the light and give the finished angels a delicate appearance.
5. Make the flowing white dresses
Cut small pieces of lightweight white fabric into simple skirt shapes. Gather the fabric around the middle of each clothespin and secure it with a tiny ribbon bow. Arrange the fabric so it falls loosely around the body, creating a soft, flowing angel dress.
6. Add the glittering halos
Cut small rings from gold glitter paper or create tiny circles from craft wire before covering them with gold glitter. Glue one halo above each wooden bead head. Make sure the halos are securely attached and centered for a neat finished look.
7. Create different angel poses
Arrange the clothespins’ arms in different positions to give each angel its own personality. Some can have their arms stretched outward, while others can have their hands positioned together in a prayer-like pose. Varying the poses makes the collection look more playful and handmade.
8. Add the finishing details
Check each angel for loose fabric, uneven ribbons, or areas that need another touch of paint. Add small ribbon bows or tiny decorative details where needed, then allow every piece to dry completely. Keep the decorations light so the angels remain delicate and easy to display.
9. Arrange the finished clothespin angels
Place the completed angels upright on a rustic wooden table or another simple display surface. Arrange them at different angles and heights so their pastel bodies, white dresses, translucent wings, and gold halos can all be seen clearly. Keep the surrounding surface completely empty to let the handmade angels remain the focus.
Tip
For the sweetest homemade look, use several soft pastel colors rather than making every angel identical. Slight differences in the wings, poses, ribbons, and dress shapes will make the collection feel more charming and handcrafted.
18. Christmas Tree Cards
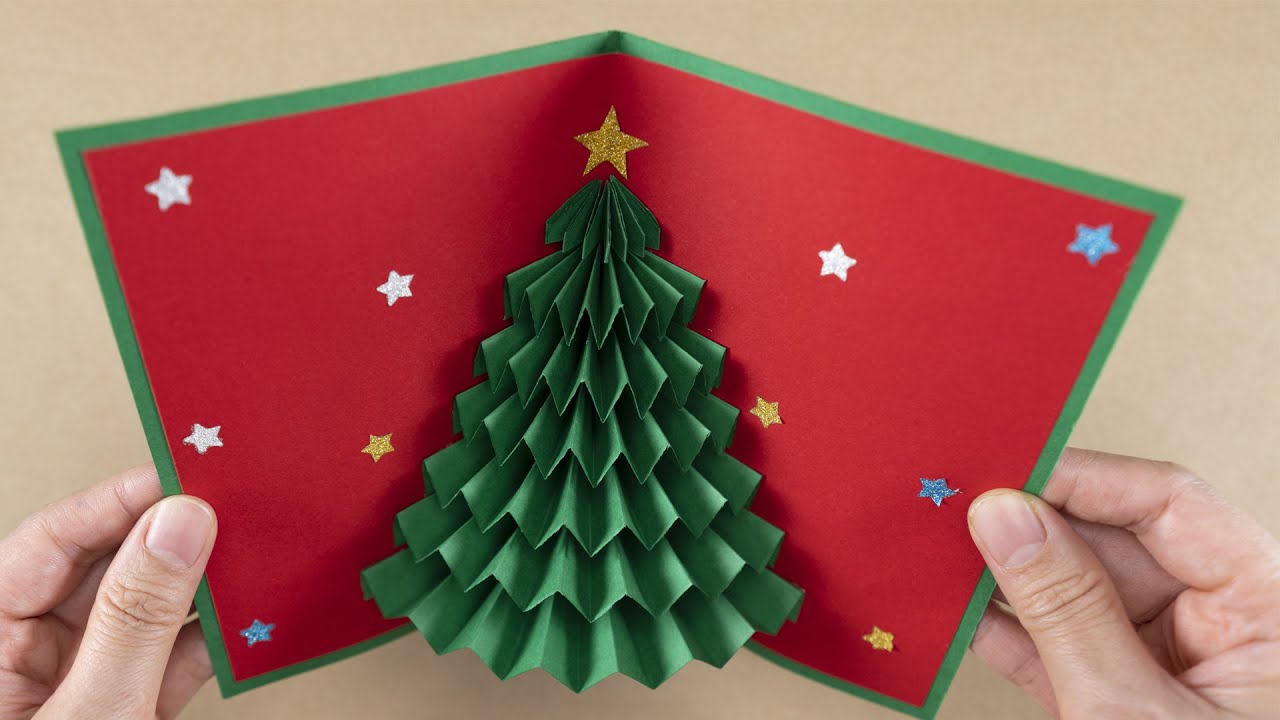
Have kids design their own Christmas cards using construction paper, stickers, and markers.
They can cut out Christmas tree shapes, decorate them, and write a special holiday message inside.
These handmade cards are perfect for giving to friends, family, or teachers.
19. Marshmallow Snowflakes
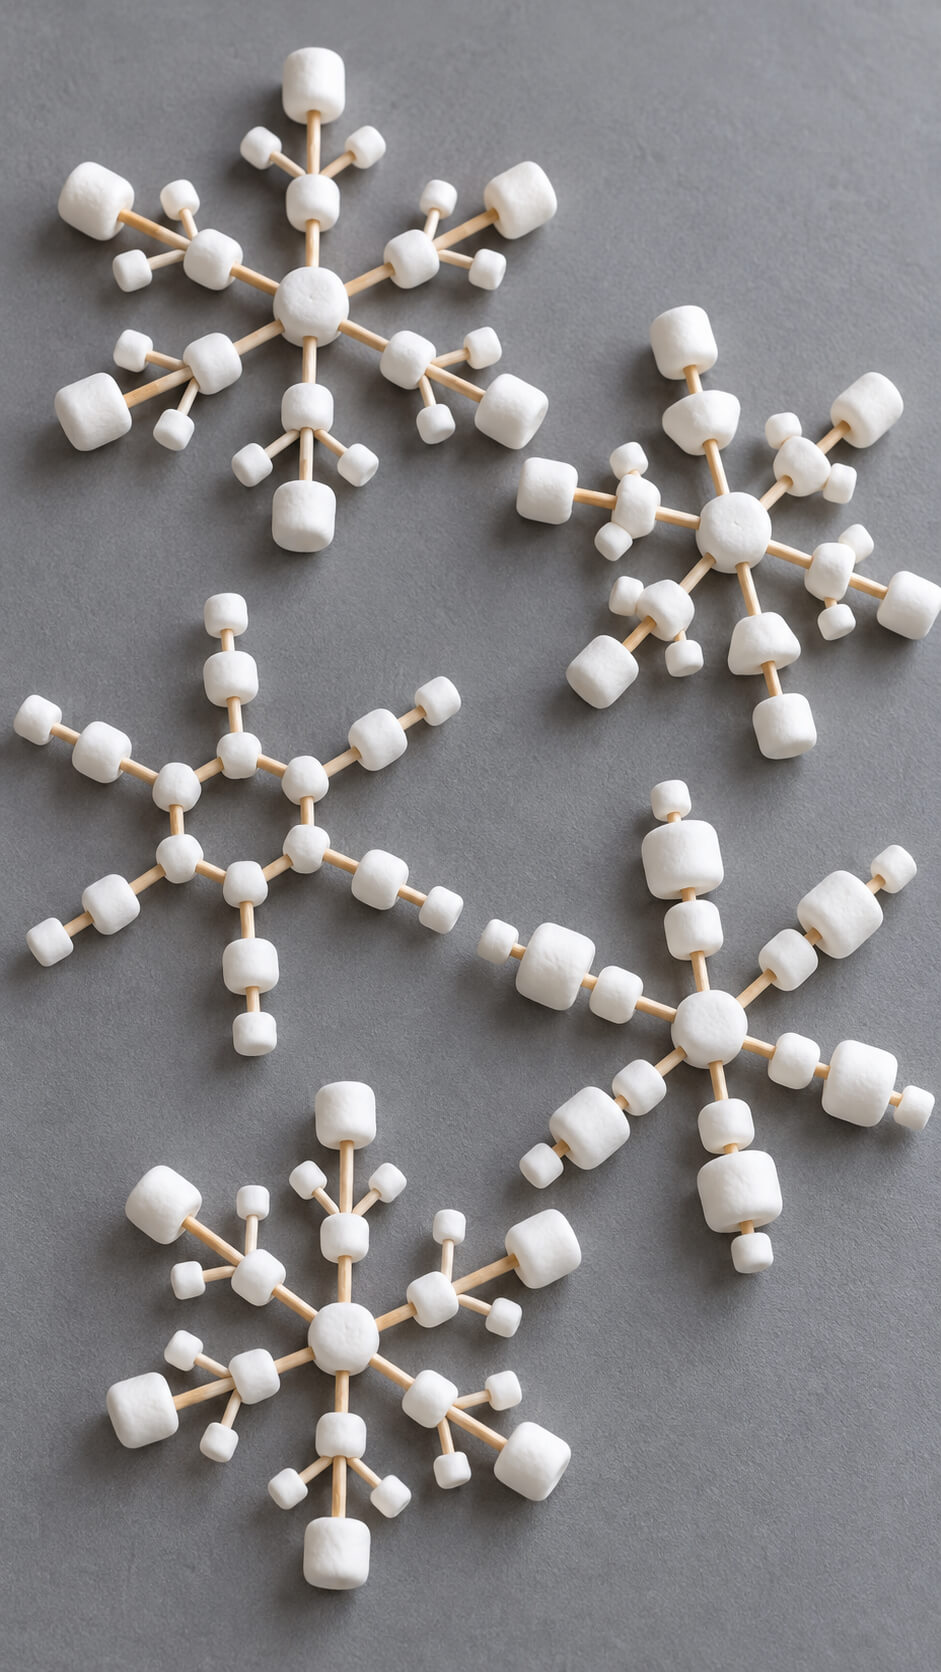
Grab some mini marshmallows and toothpicks, and let kids create edible snowflakes!
They can arrange the marshmallows into fun, intricate designs while learning a bit about geometry.
Plus, there’s a bonus snack involved, making it a tasty craft idea for kids.
20. Christmas Slime
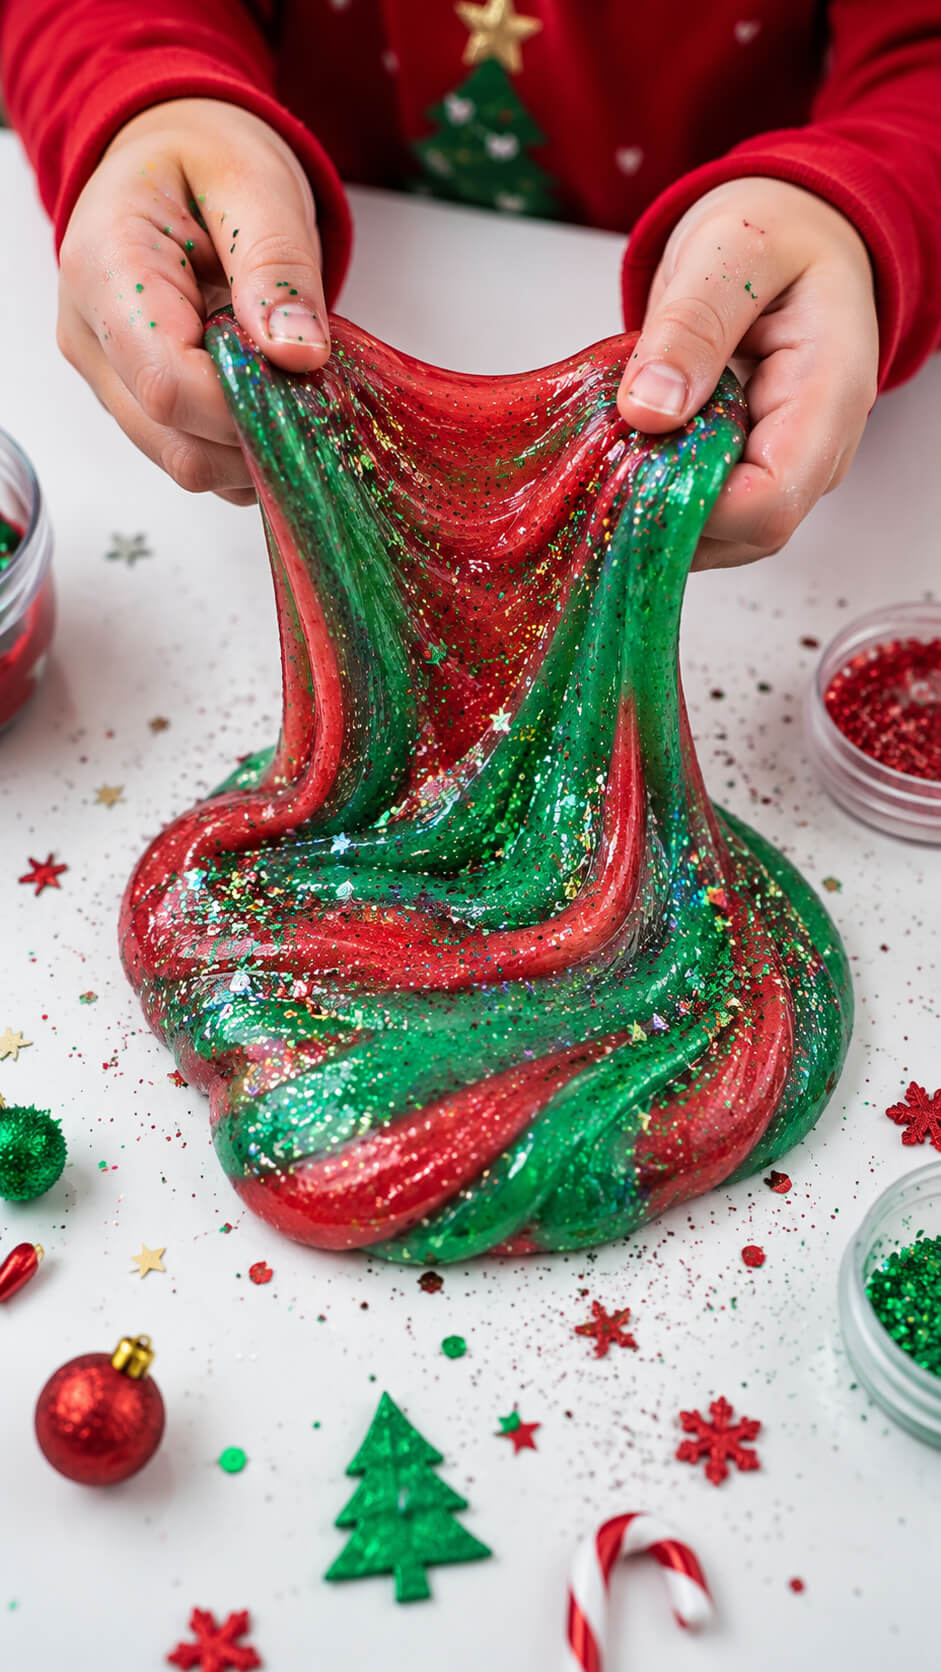
Kids love slime, and what better way to bring holiday fun into it than by making Christmas-themed slime?
Use red, green, and gold glitter or confetti to create a festive version of this beloved sensory activity.
It’s a bit messy but loads of fun, especially for a holiday playdate.
What You’ll Need
- Clear or white slime
- Red and green slime coloring
- Iridescent or holographic glitter
- Red and green glitter
- Christmas-themed confetti
- Star-shaped confetti
- Small holiday decorations
- Two mixing bowls
- Craft table or white tray
- Disposable gloves, optional
Instructions
1. Prepare the slime
Divide your slime into two equal portions. Place one portion in each mixing bowl so you can create separate festive red and green colors.
2. Add the Christmas colors
Mix a small amount of red coloring into one portion and green coloring into the other. Knead each slime gently until the color is evenly distributed and the slime has a vibrant Christmas appearance.
3. Add the glitter
Sprinkle iridescent glitter and fine red or green glitter into both portions. Fold the glitter through the slime slowly so the sparkles become suspended throughout the glossy mixture.
4. Add holiday confetti
Mix tiny stars, snowflakes, Christmas shapes, or other small craft confetti into the slime. Avoid oversized or sharp pieces that could scratch little hands.
5. Combine the red and green slime
Place the red and green slime portions next to each other and gently press them together. Don’t completely mix the colors—keeping them partially separate creates beautiful red-and-green swirls.
6. Stretch the slime
Have the child slowly pull the slime apart with both hands. Stretch it wide, fold it back together, and repeat the process to create mesmerizing ribbons of red, green, and glitter.
7. Create a festive slime display
Place the stretched slime on a clean white craft table or tray. Scatter a small amount of glitter, star confetti, and miniature Christmas decorations around it to create a cheerful holiday crafting scene.
8. Play and manipulate the slime
Let the child squeeze, stretch, fold, and twist the slime to explore its soft, stretchy texture. The repeated movement will create new patterns as the red and green colors blend together.
9. Store the slime
When finished, place the slime in an airtight container or resealable bag. Keep it away from food, pets, and very young children, and wash hands and the crafting surface after play.
Tip
For the most dramatic Christmas effect, use clear slime with fine holographic glitter and keep the red and green portions only partially mixed. This preserves distinct colorful swirls while allowing the glitter to catch the light beautifully.
21. Snow Globe Jars
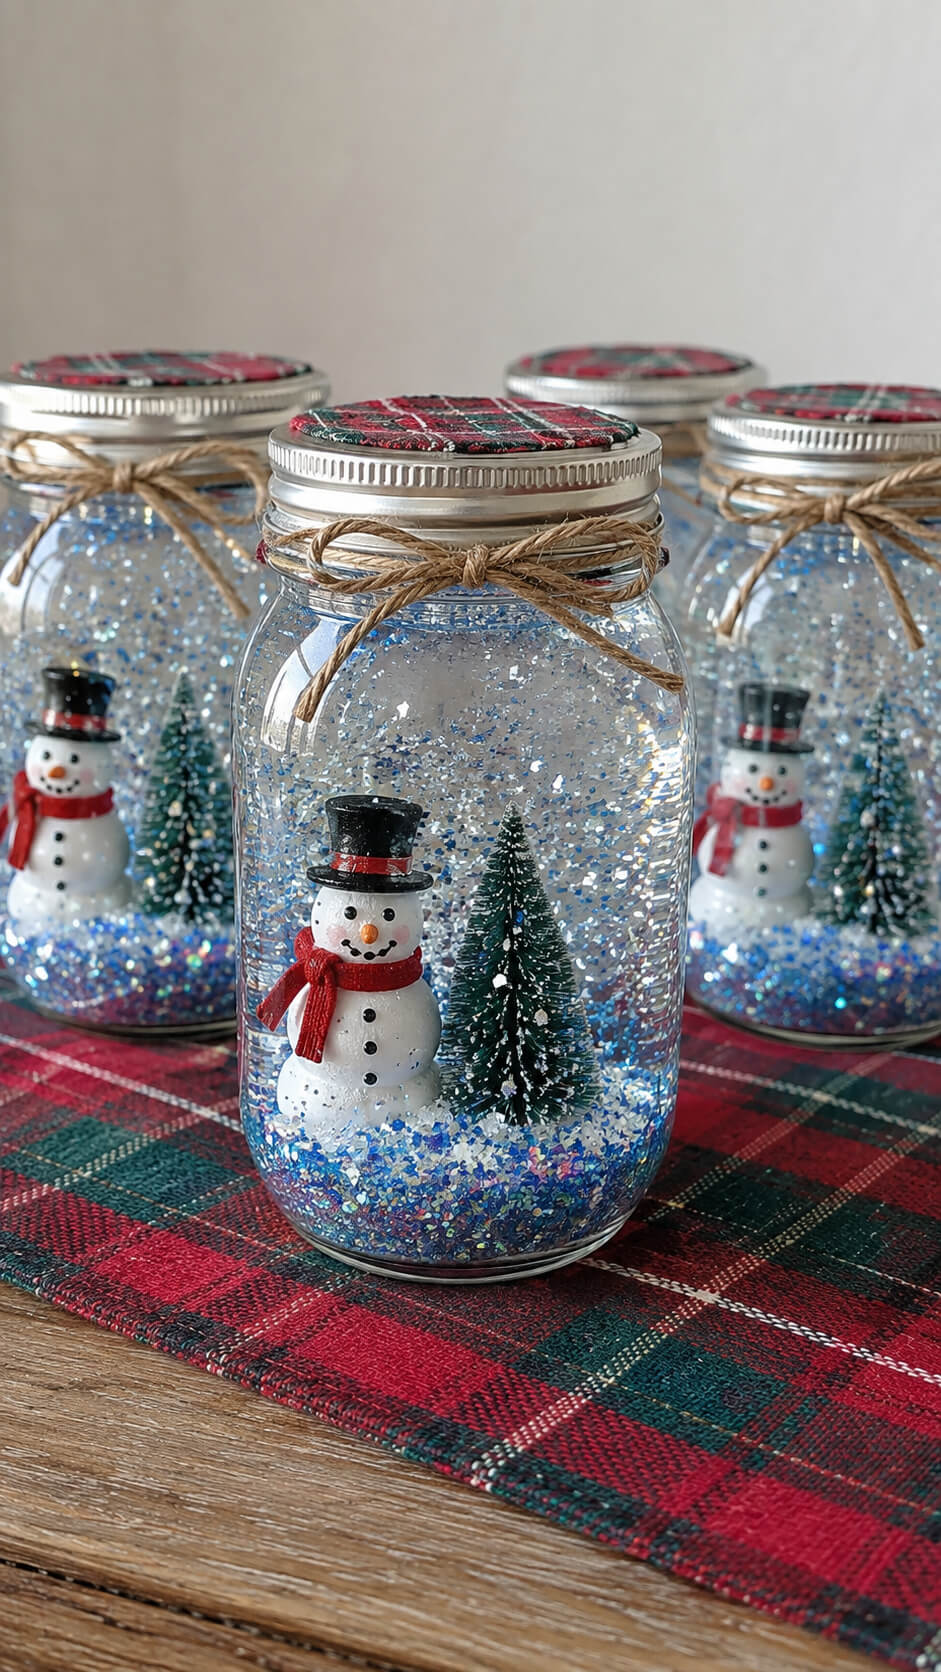
Create DIY snow globes using mason jars, water, glitter, and small holiday figurines.
Kids can help assemble the pieces and then enjoy shaking the jars to watch their homemade snowstorm come to life.
These also make excellent gifts for grandparents or friends.
Materials
- Clear glass jars with lids
- Miniature plastic snowmen with black top hats
- Miniature evergreen trees
- Iridescent blue and silver glitter
- Distilled or clear water
- Waterproof craft glue or strong adhesive
- Red and green plaid fabric
- Twine or decorative ribbon
- Scissors
- Small funnel
- Spoon or measuring cup
Instructions
1. Clean the glass jars
Wash the glass jars and lids thoroughly with warm soapy water. Rinse them well and allow them to dry completely. Clean glass will make the finished snow globes look clearer and more polished.
2. Attach the miniature decorations
Apply a small amount of waterproof craft glue to the bottom of each miniature snowman and evergreen tree. Carefully attach them to the inside of the jar lid, making sure they are positioned so they will fit inside the jar when the lid is screwed on. Allow the adhesive to dry completely according to the glue manufacturer’s instructions.
3. Prepare the glitter
Place a small amount of iridescent blue and silver glitter into each empty jar. Use a mixture of the two colors to create a shimmering, snowy appearance. Avoid adding too much glitter because it can make the water cloudy and hide the miniature decorations.
4. Fill the jars with water
Slowly pour clear distilled water into each jar, leaving a small amount of space at the top. A small funnel makes this easier and helps prevent water from spilling onto the outside of the jar.
5. Add the miniature holiday scene
Once the glued decorations are completely dry, carefully place the lid onto the filled jar. The snowman and evergreen tree should extend downward into the water and remain upright when the jar is turned over.
6. Seal the snow globe
Tighten the lid firmly and check that it is securely closed. If necessary, apply a thin line of waterproof adhesive around the inside edge of the lid to help prevent leaks. Allow the sealant to cure fully before moving the jar.
7. Decorate the jar lids
Cut small pieces of red and green plaid fabric and place them over the jar lids. Secure the fabric around the lid with twine or decorative ribbon. This adds the cozy Christmas-craft appearance shown in the finished design.
8. Shake the snow globes
Carefully turn each jar upside down and gently shake it. Watch as the blue and silver glitter swirls around the snowman and miniature evergreen tree, creating a simple homemade winter scene.
9. Arrange the finished jars
Place the completed snow-globe jars on a weathered wooden table covered with a red and green plaid cloth. Arrange several jars together at different positions to create a festive holiday craft display.
Tip
For the clearest snow-globe effect, use distilled water instead of tap water and allow all glue or sealant to cure completely before adding the water. A small amount of glitter goes a long way—the goal is to let the snowman and tree remain clearly visible through the swirling glitter.
22. Yarn-Wrapped Stars

Help kids create beautiful yarn-wrapped stars for the holidays.
Using cardboard cutouts of star shapes, kids can wrap colorful yarn around the star until it’s fully covered.
This craft is simple, keeps little hands busy, and makes a lovely decoration for your tree or home.
Materials
- Cardboard or thin wooden star shapes
- Green, red, and yellow yarn
- Twine or string
- Scissors
- Craft glue
- Pencil
- Star-shaped template
- Optional: small paintbrush
Instructions
1. Cut out the star shapes
Trace a star template onto sturdy cardboard and carefully cut out the shapes with scissors. Make sure each star has clean, defined points so the finished ornaments have a neat appearance.
2. Secure the yarn to the star
Place a small amount of craft glue near the center or back of the star and press the end of the yarn into it. Allow the glue to hold for a few seconds before beginning to wrap.
3. Wrap the star with yarn
Wind the yarn tightly around the cardboard star, moving across the points and center until the entire surface is covered. Overlap the strands slightly as you work to prevent gaps and create a thick, textured finish.
4. Cover the star points carefully
Wrap additional yarn around each point of the star, changing directions when necessary to keep the yarn securely in place. Take your time around the narrow tips so the cardboard does not show through.
5. Secure and trim the yarn
Once the entire star is covered, cut the yarn and secure the loose end with a small drop of craft glue. Tuck the end underneath nearby strands so the ornament has a clean, finished look.
6. Add the hanging loop
Cut a short piece of twine or string and fold it in half to create a loop. Attach the ends to the top point of the star with glue, making sure the connection is strong enough to support the ornament when hanging.
7. Make stars in different colors
Repeat the process with green, red, and yellow yarn to create a colorful collection. You can make all three stars the same size or experiment with different sizes for a more playful festive display.
8. Let the ornaments dry completely
Place the finished stars on a flat surface and allow the glue to dry thoroughly before hanging them. Once dry, gently check the yarn and hanging loops to make sure everything is secure.
Tip
For a fuller and more polished appearance, use thick yarn and wrap it tightly without leaving visible gaps. You can also combine different shades of the same color or add a small decorative bead to the center of each star for extra festive detail.
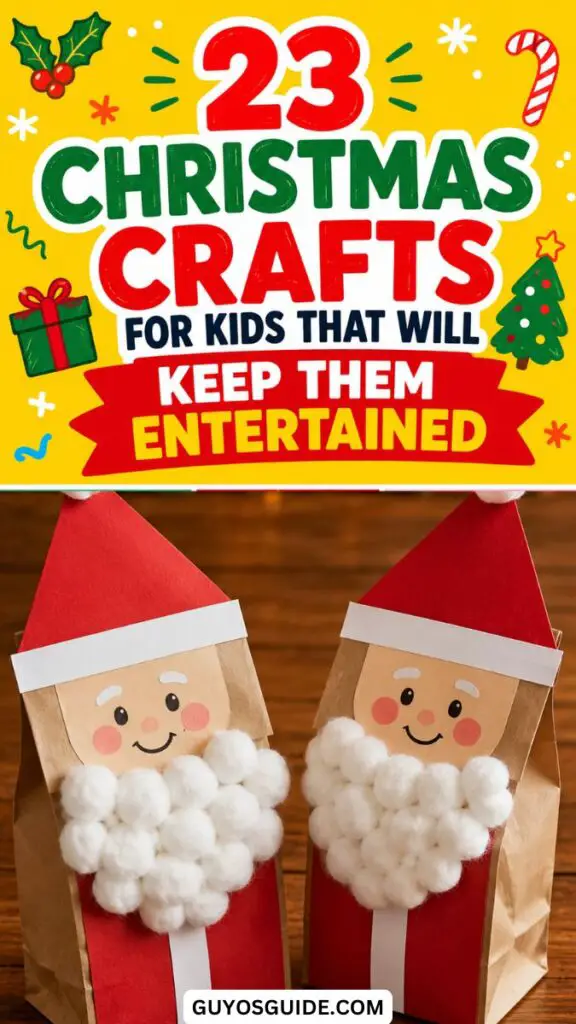
23. Santa Hand Puppets
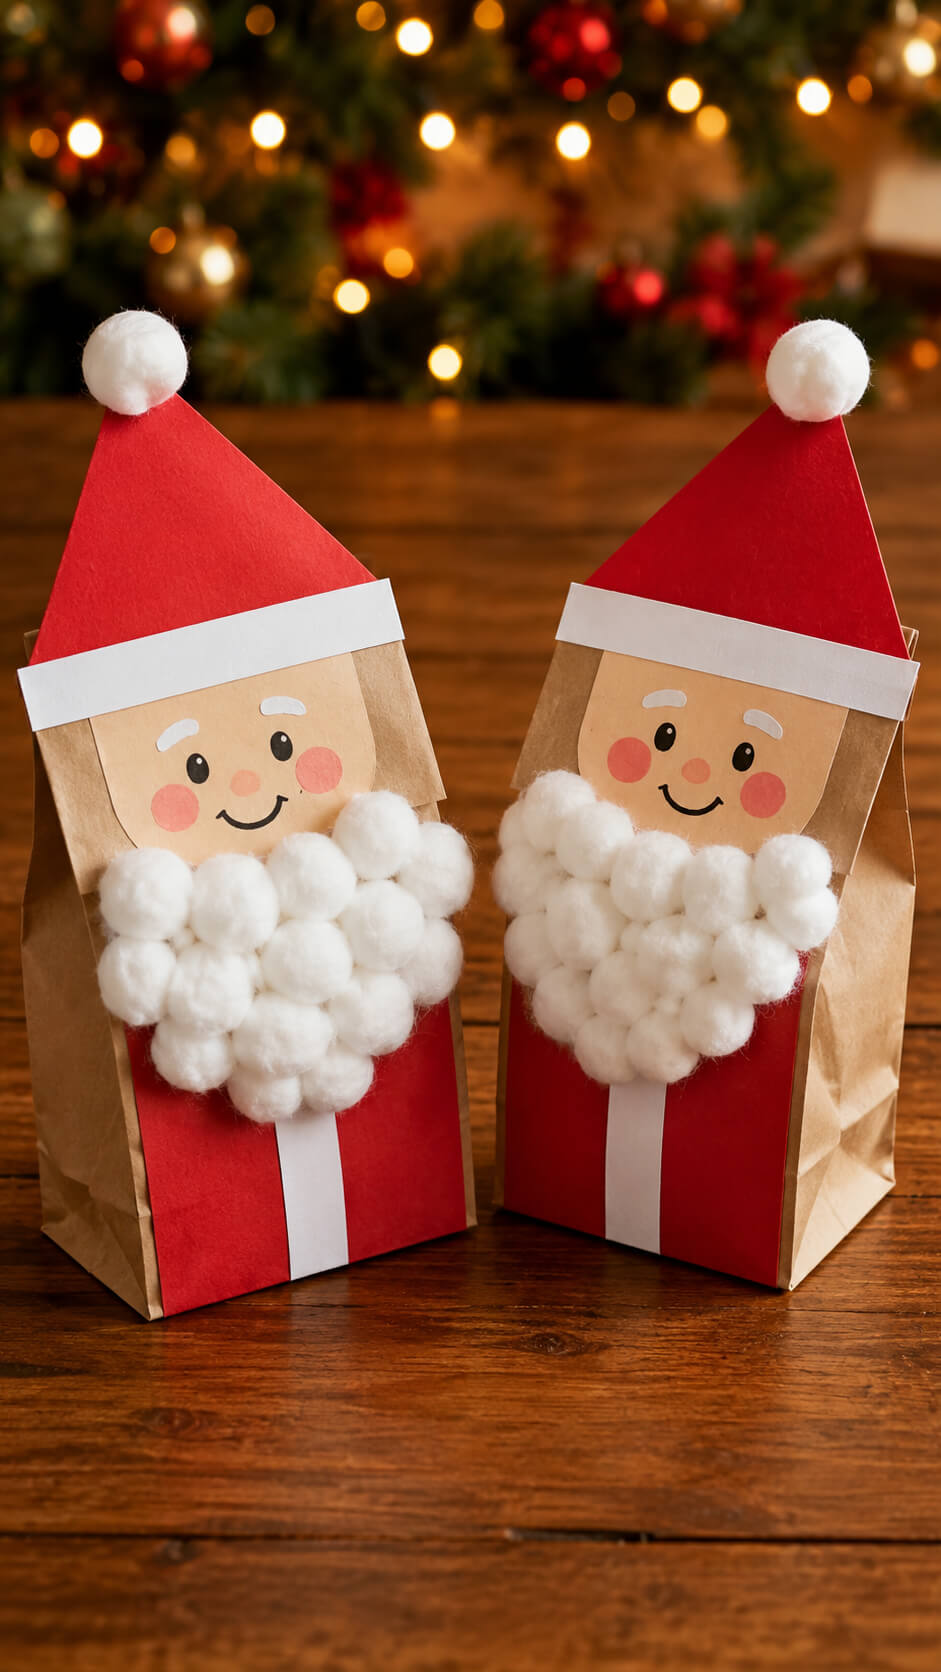
Kids will love making their own Santa puppets from paper bags, cotton balls, and red construction paper.
They can create Santa’s face with a fluffy beard, and afterward, use the puppets for a fun holiday-themed puppet show.
This craft is great for imaginative play and creative expression!
Materials
- Brown paper lunch bags
- Red construction paper
- White construction paper
- White cotton balls
- Glue
- Black marker
- Pink or red crayon/colored pencil
- Scissors
- Pencil
Instructions
1. Gather and prepare the paper bag
Place a brown paper lunch bag flat on your work surface with the bottom flap facing upward. This folded flap will become Santa’s face, while the rest of the bag will form his body.
2. Create Santa’s red body
Cut a piece of red construction paper to fit the front lower portion of the paper bag. Glue it in place, leaving the folded flap uncovered for Santa’s face.
3. Make Santa’s hat
Cut a large triangle from red construction paper to create Santa’s pointed hat. Add a strip of white construction paper along the bottom edge of the hat and glue a fluffy white cotton ball to the tip.
4. Attach Santa’s hat
Position the hat across the top of the folded paper-bag flap, making sure the white trim sits neatly along the top of Santa’s face. Glue it securely in place.
5. Draw Santa’s cheerful face
Use a black marker to draw two eyes, eyebrows, and a smiling mouth on the paper-bag flap. Add small rosy cheeks with a pink or red crayon to give Santa a cheerful expression.
6. Create Santa’s fluffy beard
Glue white cotton balls across the lower part of Santa’s face, arranging them closely together to form a thick, fluffy beard. Leave the eyes, cheeks, and smile visible.
7. Add the white suit trim
Cut a narrow strip of white construction paper and glue it vertically down the center of Santa’s red body to resemble the white trim on his Christmas suit.
8. Let the puppet dry completely
Allow all of the glued pieces to dry before moving or playing with the puppet. Once dry, place your hand inside the paper bag and gently move the folded flap to make Santa talk.
Tip
For an extra festive look, make two or more Santa puppets with slightly different facial expressions and position them at different angles so they look like they’re having a cheerful Christmas conversation.
Wrap Up
With these 23 Christmas crafts, kids will have a blast making festive decorations and gifts.
Each craft is simple, fun, and perfect for spreading holiday cheer.
So, gather your supplies, get creative, and make this holiday season extra special.
Happy crafting!