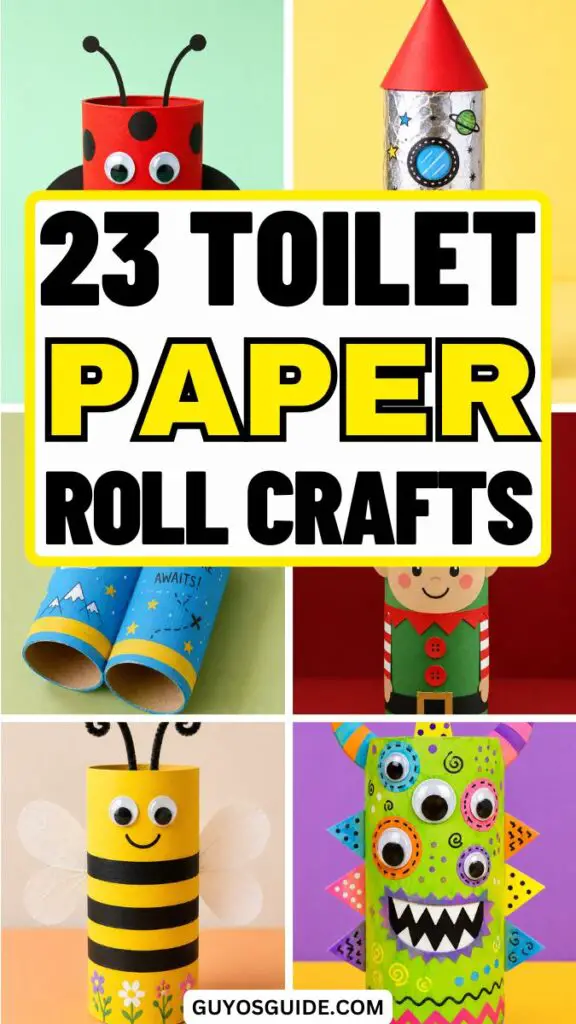
23 Creative Toilet Paper Roll Crafts for Kids and Adults

I’ll admit it—I used to toss empty toilet paper rolls straight into the recycling bin without a second thought.
Then one rainy afternoon, I needed a quick craft project, and those simple cardboard tubes suddenly looked full of possibilities.
A little paint, a few supplies, and some creativity turned them into fun decorations, cute toys, and even useful organizers.
The best part? These crafts are budget-friendly, easy to make, and great for kids and adults alike.
So if you have a few empty rolls lying around, don’t throw them away just yet. Let’s explore some creative toilet paper roll crafts you can make today.
Let’s get started!
1. Toilet Paper Roll Binoculars
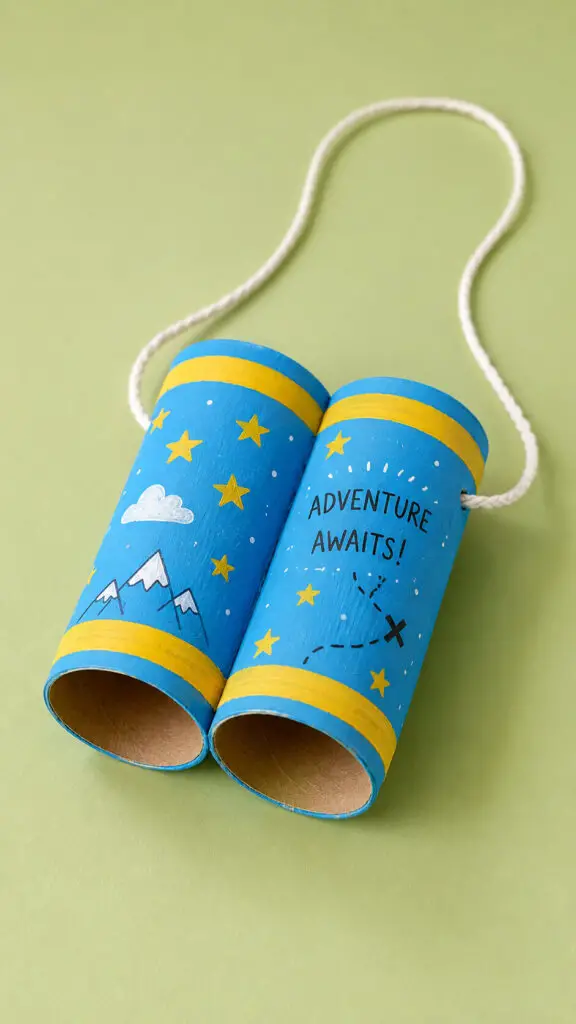
Turn two toilet paper rolls into a pair of adventure-ready binoculars that kids will love.
Glue the rolls side by side, decorate them with paint, stickers, or washi tape, and attach a string for wearing around the neck.
This classic craft encourages imaginative play, whether little explorers are searching for backyard birds or pretending to be jungle adventurers.
It’s simple, affordable, and always a crowd-pleaser at home or in the classroom.
Materials Needed
- 2 empty toilet paper rolls
- Blue paint
- Yellow paint or yellow paper strips
- Paintbrush
- White string or yarn
- Glue
- Black marker
- Hole punch (optional)
How to Make Paper Roll Binoculars
1. Paint the toilet paper rolls blue
Paint both toilet paper rolls with a bright blue color, covering the entire outer surface evenly. Allow the paint to dry completely before moving on to the next part of the project. Applying two thin coats often creates a smoother and more vibrant finish than one thick coat.
2. Add yellow decorative bands
Use yellow paint or glue thin strips of yellow paper around both ends of each toilet paper roll. These colorful bands help the binoculars stand out and give them a fun, adventurous appearance that children love.
3. Glue the rolls together
Place the two toilet paper rolls side by side and apply glue along the touching edges. Press them together firmly and hold them in place for a few moments. Let the glue dry completely so the binoculars stay securely attached.
4. Decorate the binoculars
Use a black marker to draw stars, arrows, zigzags, hearts, or other fun designs on the blue surface. This is the perfect opportunity for kids to personalize their binoculars and make them unique.
5. Create holes for the string
Punch or carefully make a small hole near the top outer edge of each roll. The holes should be positioned opposite each other so the string can be attached evenly.
6. Attach the neck strap
Thread the white string through the holes and tie secure knots on both ends. Adjust the string length so the binoculars can comfortably hang around a child’s neck during pretend adventures.
7. Let everything dry completely
Check that the paint, decorations, glue, and knots are secure before using the binoculars. Once dry, they are ready for backyard safaris, treasure hunts, and imaginative exploration.
Tip
Encourage children to customize their binoculars with stickers, animal drawings, glow-in-the-dark stars, or their favorite colors. Personal touches make the craft even more exciting and help spark imaginative play long after the project is finished.
2. Toilet Paper Roll Butterfly

A toilet paper roll butterfly is one of those crafts that never goes out of style.
Paint the tube in cheerful colors and add paper wings decorated with markers, glitter, or patterns.
Finish with pipe cleaner antennae and googly eyes.
Kids enjoy personalizing their butterflies, and no two creations ever look alike.
They make beautiful spring decorations and look lovely displayed on windows or bulletin boards.
Materials Needed
- 1 empty toilet paper roll
- Colored construction paper or cardstock
- Pink paint (or any preferred color)
- Paintbrush
- Glue
- Scissors
- 2 googly eyes
- Pipe cleaner
- Black marker
- Pencil
How to Make a Paper Roll Butterfly
1. Paint the toilet paper roll
Cover the entire toilet paper roll with pink paint or your child’s favorite color. Make sure the paint is applied evenly across the surface. Set the roll aside and allow it to dry completely before adding any decorations.
2. Draw the butterfly wings
Use a pencil to sketch two large butterfly wings onto colored construction paper. Create rounded, symmetrical shapes that are slightly larger than the toilet paper roll so the butterfly will have a balanced and eye-catching appearance.
3. Cut out the wings
Carefully cut along the outlines of the wings. If desired, cut additional smaller wing layers from different colors of paper to create a layered effect that adds depth and visual interest to the finished butterfly.
4. Decorate the wings
Use markers to add colorful patterns such as swirls, hearts, dots, flowers, stripes, and loops. The more creative the designs, the more unique the butterfly will look. Allow kids to experiment with different colors and combinations.
5. Attach the wings to the roll
Apply glue to the center of the wings and press them onto the back of the painted toilet paper roll. Position them evenly so both sides extend outward and create the classic butterfly shape.
6. Add the eyes
Glue two googly eyes near the top front of the toilet paper roll. Place them evenly to give the butterfly a friendly and playful expression.
7. Create the antennae
Cut a pipe cleaner in half and bend it into a gentle V shape. Curl the ends slightly to resemble butterfly antennae. Glue or insert the antennae inside the top opening of the toilet paper roll.
8. Draw a smiling face
Use a black marker to add a simple smile beneath the eyes. You can also draw small eyelashes, rosy cheeks, or other facial details to give the butterfly extra personality.
9. Let the butterfly dry
Allow all glued pieces to dry completely before handling the craft. Once everything is secure, gently adjust the wings and antennae to achieve the perfect finished look.
Tip
For an extra magical touch, add a little glitter glue to the wings or use metallic markers to outline the patterns. When displayed near a sunny window, the butterfly will look bright, colorful, and full of life.
3. Toilet Paper Roll Rocket Ship
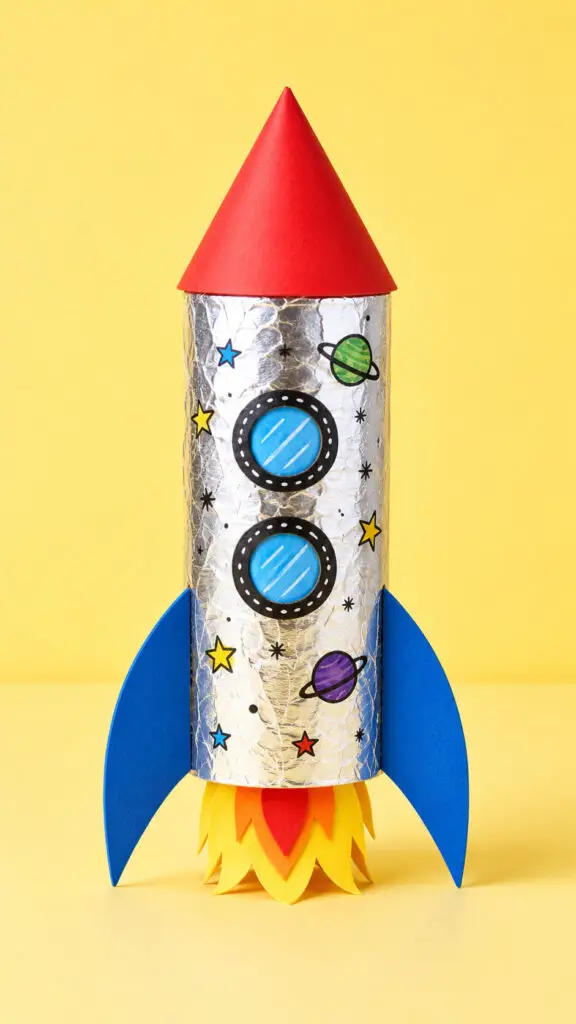
Blast off into creativity with a homemade rocket ship.
Cover the roll with foil or colorful paper, then add a cone-shaped top and paper fins.
Kids can decorate their rockets with stars, planets, and astronaut stickers.
This craft combines art and imagination perfectly, inspiring conversations about space while providing hours of pretend-play adventures through the galaxy.
Materials Needed
- 1 empty toilet paper roll
- Silver paper, aluminum foil, or gray paint
- Red cardstock or construction paper
- Blue cardstock or construction paper
- Yellow and orange paper
- Glue
- Scissors
- Black marker
- Pencil
How to Make a Paper Roll Rocket Ship
1. Cover the toilet paper roll
Wrap the toilet paper roll with silver paper or aluminum foil to create a shiny rocket body. If you don’t have either, paint the roll gray or silver and allow it to dry completely before continuing.
2. Create the rocket nose cone
Draw a large circle on red cardstock and cut it out. Cut a slit from the edge to the center, then overlap the edges to form a cone shape. Glue the cone together securely to create the rocket’s pointed top.
3. Attach the nose cone
Apply glue around the top edge of the toilet paper roll and carefully place the red cone on top. Press gently and allow it to dry so the rocket remains sturdy.
4. Cut out the rocket fins
Draw three or four matching fin shapes on blue cardstock. Cut them out carefully and fold a small tab along one side of each fin to make attaching them easier.
5. Glue the fins to the rocket
Attach the fins evenly around the bottom of the rocket body using the folded tabs. Space them equally so the rocket looks balanced from every angle.
6. Make the rocket flames
Cut flame shapes from yellow and orange paper. Layer the colors together to create a realistic blast-off effect. Glue the flames inside the bottom opening of the toilet paper roll so they extend outward.
7. Add space-themed details
Use a black marker to draw windows, stars, planets, stripes, or mission numbers on the rocket. These small details help bring the spacecraft to life and make it feel ready for launch.
8. Allow the rocket to dry completely
Set the rocket aside until all glued pieces are secure. Once dry, check that the fins and nose cone are firmly attached before handling or displaying the craft.
Tip
For an extra exciting display, suspend the finished rocket from clear fishing line or string in a child’s room. Hanging it near paper stars and planets creates the illusion that the rocket is soaring through outer space. 🚀
4. Toilet Paper Roll Owl
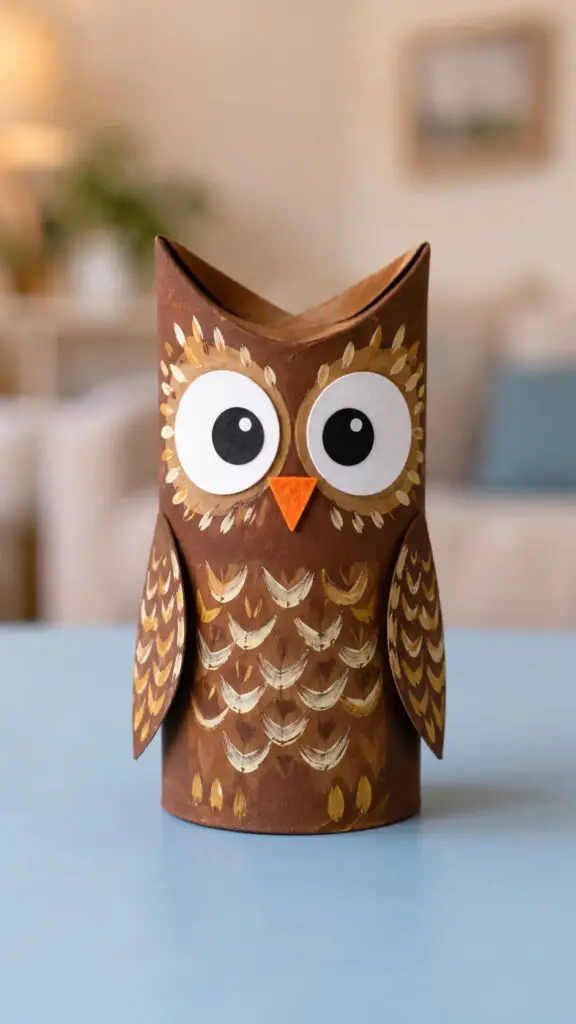
Owls are adorable and surprisingly easy to make from cardboard tubes.
Fold the top edges inward to create ears, paint the roll in earthy tones, and attach large paper eyes.
Add feathers, wings, or patterned details for extra charm.
These little owls make wonderful fall decorations and are a great way to introduce children to woodland animals.
Materials Needed
- 1 empty toilet paper roll
- Brown paint
- Paintbrush
- Orange construction paper
- White construction paper
- Black marker
- Glue
- Scissors
- Googly eyes (optional)
How to Make a Paper Roll Owl
1. Paint the toilet paper roll brown
Cover the entire toilet paper roll with brown paint to create the owl’s body. Make sure all visible cardboard is painted evenly. Set it aside and allow it to dry completely before continuing with the craft.
2. Fold the top edges inward to create owl ears
Gently press the front and back edges of the top opening inward toward the center. This creates two pointed corners that resemble owl ears and instantly gives the toilet paper roll its owl shape.
3. Cut out the owl’s eyes
Cut two large circles from white construction paper. These circles should be big enough to stand out on the front of the owl. Draw black pupils in the center with a marker or attach googly eyes for a playful look.
4. Make an orange paper beak
Cut a small triangle from orange construction paper. Fold it slightly down the middle to give it dimension and make it look more realistic once attached to the owl.
5. Glue the facial features onto the owl
Attach the eyes to the front of the painted roll. Position the orange beak directly below and between the eyes. Press each piece firmly so everything stays securely in place.
6. Add feather details to the body
Use a black marker to draw rows of feathers across the front and sides of the owl. Small curved shapes, scallops, or layered feather patterns work especially well and add texture to the finished craft.
7. Create and attach wings
Cut two wing shapes from brown paper and decorate them with feather lines using a marker. Glue one wing to each side of the toilet paper roll, making sure they are positioned evenly.
8. Add final decorative touches
Draw eyelashes, eyebrows, extra feather patterns, or small chest markings to give your owl personality. This is a great time to make each owl unique and expressive.
9. Allow the craft to dry completely
Let all glued pieces dry thoroughly before displaying or playing with the owl. Once dry, the owl is ready to be used as a decoration, classroom display, or imaginative woodland character.
Tip
Try using different shades of brown, gray, white, or even colorful paints to create a whole family of owls. Display several together on a shelf or bulletin board for an adorable woodland-themed craft collection.
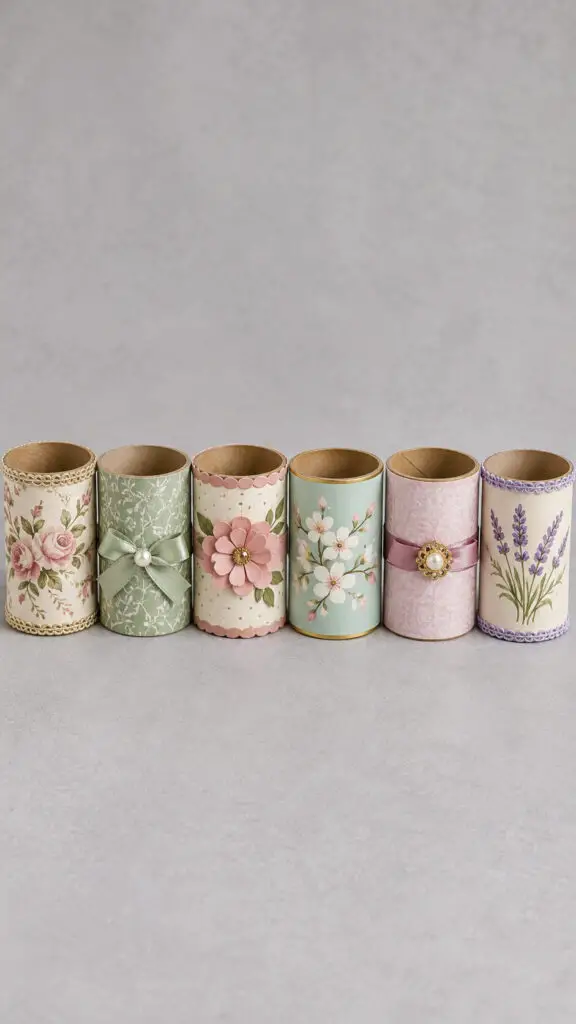
5. Toilet Paper Roll Pencil Holder

Why buy desk organizers when you can make one?
Decorate a toilet paper roll with paint, wrapping paper, fabric scraps, or stickers, then glue it onto a sturdy cardboard base.
The finished holder keeps pencils, markers, and crayons neatly organized.
It’s practical, creative, and teaches kids that handmade projects can be useful as well as fun.
Materials Needed
- 1 empty toilet paper roll
- Thick cardboard for the base
- Decorative paper, wrapping paper, or scrapbook paper
- Glue
- Scissors
- Ribbon, stickers, or other embellishments (optional)
- Ruler
- Pencil
How to Make a Paper Roll Pencil Holder
1. Cut a sturdy cardboard base
Trace a circle or square onto thick cardboard that is slightly larger than the toilet paper roll. Carefully cut it out to create a stable foundation for the pencil holder. A sturdy base helps prevent the holder from tipping over when filled with pencils and markers.
2. Measure and cover the toilet paper roll
Measure the height and circumference of the toilet paper roll. Cut a piece of decorative paper to fit those dimensions, then glue it neatly around the outside of the roll. Smooth out any wrinkles so the surface looks clean and polished.
3. Decorate the cardboard base
Cover the cardboard base with matching decorative paper or paint it in a coordinating color. This creates a finished look and ties the entire project together. Allow any paint or glue to dry before continuing.
4. Attach the roll to the base
Apply a generous amount of glue to the bottom edge of the decorated toilet paper roll. Position it in the center of the cardboard base and press down firmly. Hold it in place for a few seconds and allow the glue to dry completely.
5. Add decorative details
Enhance the pencil holder by attaching ribbons around the top and bottom edges. You can also add stickers, gems, buttons, washi tape, or hand-drawn designs to make the holder unique and colorful.
6. Check that everything is secure
Inspect the pencil holder to make sure all decorations are firmly attached and the roll is securely glued to the base. If needed, add a little extra glue to any loose areas and allow it to dry thoroughly.
7. Fill the holder with supplies
Once the pencil holder is completely dry, place pencils, pens, markers, crayons, or paintbrushes inside. The finished project is both decorative and practical, making it perfect for desks, homework stations, or craft areas.
Tip
Create a set of matching pencil holders using different colors and patterns. Use one for pencils, one for markers, and another for crayons to keep art supplies organized while adding a cheerful handmade touch to your workspace.
6. Toilet Paper Roll Ladybug
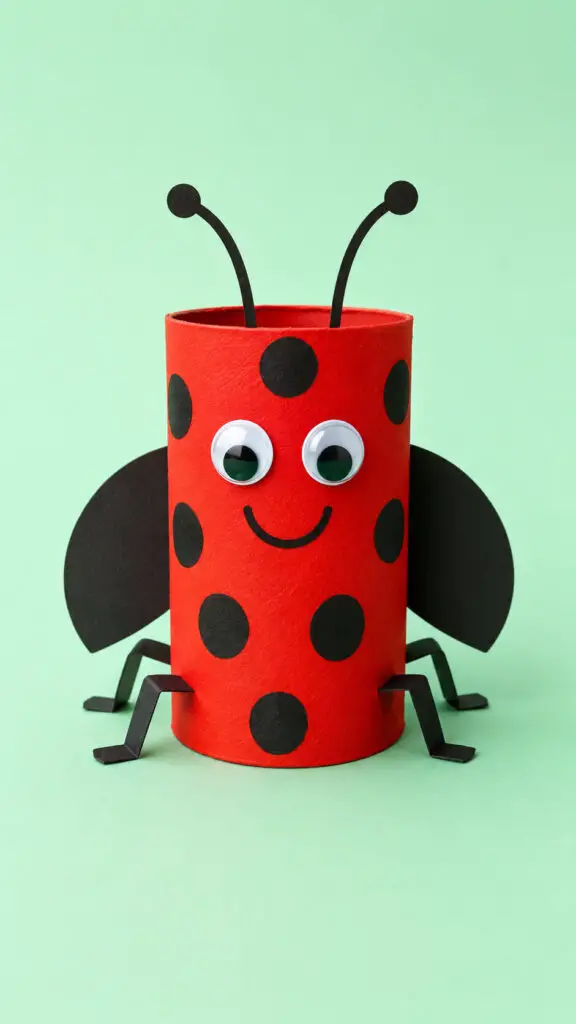
Bright red paint, black spots, and a little imagination are all you need for this cheerful ladybug craft.
Add paper wings, antennae, and googly eyes to bring it to life.
Kids love making these friendly insects, especially during spring and summer.
They can be displayed in a garden-themed craft collection or used as cute room decorations.
Materials Needed
- 1 empty toilet paper roll
- Red paint
- Black paint or black marker
- Black construction paper
- 2 googly eyes
- Black pipe cleaner
- Glue
- Paintbrush
- Scissors
How to Make a Paper Roll Ladybug
1. Paint the toilet paper roll red
Cover the entire toilet paper roll with bright red paint. Make sure all visible areas are painted evenly for a vibrant ladybug body. Set it aside and allow the paint to dry completely before continuing.
2. Create the ladybug spots
Using black paint or a black marker, add several round spots across the red tube. Space the spots evenly around the body to give the craft a classic ladybug appearance.
3. Cut out the wings
Cut two oval shapes from black construction paper. These will become the ladybug’s wings. You can make them large for a dramatic look or slightly smaller for a cute, cartoon-style design.
4. Attach the wings to the body
Apply glue to one side of each paper wing and attach them to the back of the toilet paper roll. Position them so they slightly extend outward, creating the appearance of folded wings resting on the ladybug’s back.
5. Add the googly eyes
Glue two googly eyes near the top front section of the roll. Place them evenly so the ladybug has a friendly and balanced expression.
6. Make the antennae
Cut a black pipe cleaner into two equal pieces. Bend each piece slightly to create curved antennae and glue them behind the eyes. Allow the glue to dry so the antennae remain securely attached.
7. Draw a smiling face
Use a black marker to draw a small smile beneath the eyes. This simple detail gives the ladybug extra personality and makes it more appealing to children.
8. Let the craft dry completely
Check all glued pieces to ensure they are firmly attached. Once everything is dry, the ladybug is ready to display on a shelf, classroom bulletin board, or nature-themed craft collection.
Tip
For extra creativity, add tiny paper flowers around the ladybug or use glitter glue on the spots for a sparkling finish. Every ladybug can be decorated differently, making each one unique and special.
7. Toilet Paper Roll Castle
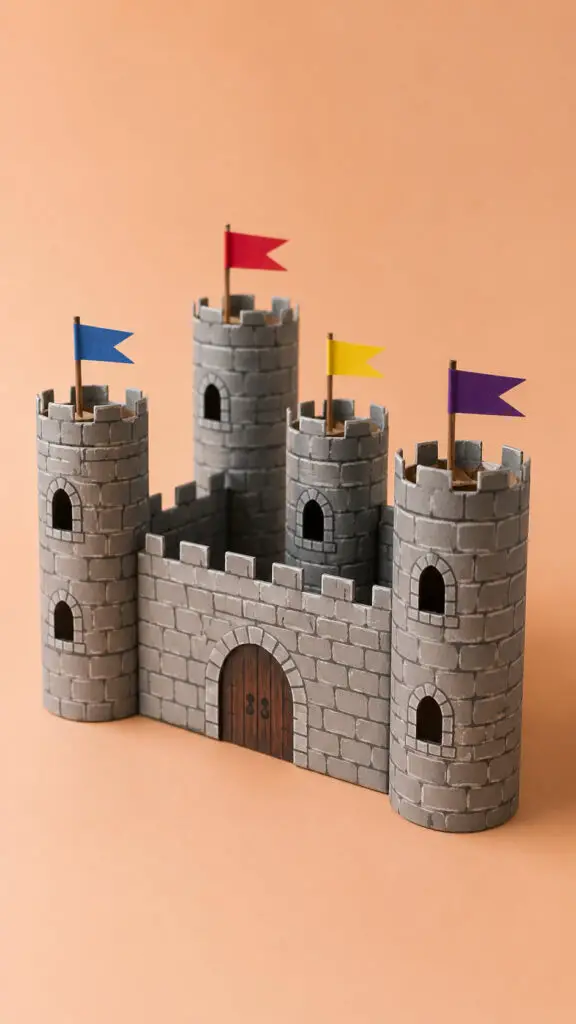
Transform ordinary rolls into castle towers fit for kings, queens, and dragons.
Paint them in stone-like colors, cut battlements along the top, and connect multiple tubes with cardboard walls.
Children can build entire kingdoms from recycled materials.
This project sparks storytelling and imaginative play while introducing basic construction and design concepts.
Materials Needed
- 4 to 6 empty toilet paper rolls
- Gray paint
- Paintbrush
- Cardboard sheet
- Glue
- Scissors
- Colored paper (for flags and decorations)
- Black marker
- Ruler (optional)
How to Make a Paper Roll Castle
1. Paint the toilet paper rolls gray
Paint all of the toilet paper rolls with gray paint to resemble stone castle towers. Let the paint dry completely before continuing. For a more realistic castle look, use a sponge or dry brush to add lighter and darker gray shades.
2. Cut battlements into the tower tops
Using scissors, carefully cut small rectangular notches around the top edge of each toilet paper roll. These notches create the classic battlement design seen on castle towers and instantly make the structure look more authentic.
3. Draw stone block details
Use a black marker to draw rows of stone blocks around each tower. Vary the sizes slightly to create a more natural appearance. Adding a few cracks and weathered lines can give the castle extra character.
4. Create the castle walls
Cut strips of cardboard long enough to connect the towers. Paint the cardboard strips gray to match the towers, then draw stone patterns on them using the marker. Allow the paint to dry before assembly.
5. Attach the towers to a cardboard base
Cut a large piece of cardboard to serve as the castle foundation. Arrange the towers in your desired layout and glue them securely onto the base. Leave enough space between towers for the connecting walls.
6. Glue the walls between the towers
Attach the painted cardboard wall sections between the towers using glue. Hold them in place until secure. The walls should connect the towers and create the outline of your castle.
7. Add windows and a castle gate
Cut or draw small castle windows on the towers and create a larger entrance gate on one side of the castle. You can make the gate arched for a traditional medieval appearance.
8. Make colorful castle flags
Cut small flag shapes from colored paper and glue them to toothpicks, craft sticks, or rolled paper poles. Attach the flags to the tops of the towers to give the castle a royal finishing touch.
9. Decorate the castle with extra details
Add drawbridges, banners, shields, vines, or royal symbols to personalize your castle. These small additions help transform a simple craft into a miniature kingdom full of personality.
10. Allow the castle to dry and display it
Make sure all glued pieces are completely dry before moving the castle. Once finished, place it on a shelf, use it for storytelling, or incorporate it into imaginative play adventures.
Tip
For an even more impressive castle, create additional towers of different heights and add a moat made from blue paper around the base. This simple upgrade makes the finished castle look larger, more detailed, and even more magical.
8. Toilet Paper Roll Bird Feeder
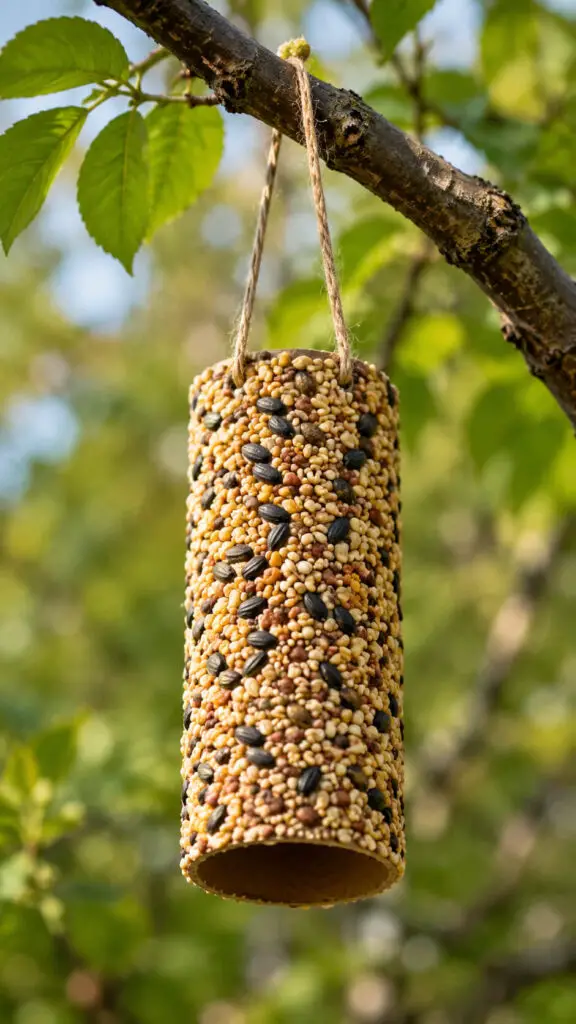
Bring nature closer with a simple bird feeder craft.
Spread peanut butter or a suitable alternative around the tube and roll it in birdseed.
Slide it onto a tree branch and watch visiting birds enjoy the treat.
This project combines crafting with outdoor learning and gives children an exciting opportunity to observe local wildlife.
Materials Needed
- 1 empty toilet paper roll
- Peanut butter or sunflower seed butter (for allergy-friendly options)
- Birdseed
- String or twine
- Spoon or craft stick for spreading
- Paper plate or shallow tray
How to Make a Paper Roll Bird Feeder
1. Thread the string through the toilet paper roll
Slide a piece of string or twine through the center of the toilet paper roll. Leave enough length on both sides so the feeder can easily hang from a tree branch later. Set the string aside while you decorate the feeder.
2. Spread the peanut butter on the roll
Using a spoon or craft stick, cover the outside of the toilet paper roll with a generous layer of peanut butter or sunflower seed butter. Make sure the coating reaches all sides so plenty of birdseed can stick to the surface.
3. Pour birdseed into a tray
Place birdseed onto a paper plate or shallow tray. Spread it out into an even layer to make rolling the feeder easier and less messy.
4. Roll the feeder in birdseed
Carefully roll the peanut butter-covered toilet paper roll through the birdseed. Continue turning it until the entire surface is coated. Gently press extra birdseed onto any bare spots to create a thick, even covering.
5. Check for empty areas
Inspect the feeder and add additional peanut butter and birdseed wherever needed. A well-covered feeder will attract more birds and look more appealing once hung outside.
6. Tie the hanging loop
Gather the ends of the string and tie them together securely to create a hanging loop. Double-knot the string to ensure it can safely support the feeder outdoors.
7. Hang the bird feeder outside
Choose a tree branch, garden hook, or fence area where birds frequently visit. Hang the feeder securely and make sure it is easy to see from a window if you would like to watch the birds enjoy their treat.
8. Observe and enjoy visiting birds
Keep an eye on the feeder over the next few days. Different bird species may stop by to snack, turning your simple craft into a fun nature observation activity.
Tip
Hang the bird feeder near shrubs or trees where birds feel safe, but place it far enough from dense hiding spots that squirrels cannot easily reach it. Keeping a small notebook to record visiting bird species can make the activity even more educational and exciting for children.
9. Toilet Paper Roll Dragon
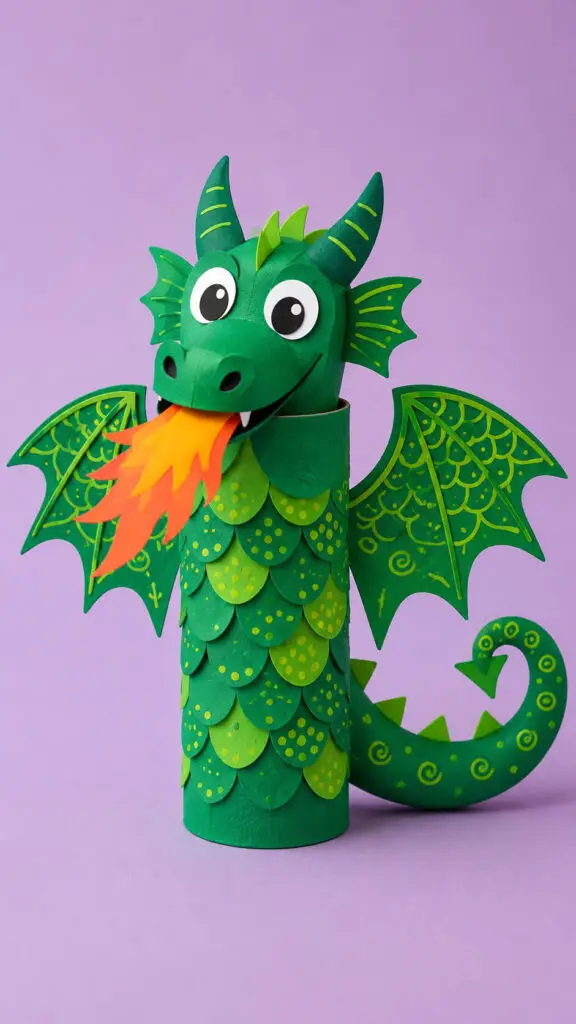
Every craft collection needs a dragon.
Paint the tube in bold colors and add scales, wings, a tail, and paper flames.
Kids can create friendly dragons, fierce dragons, or silly dragons with funny faces.
This project allows plenty of creative freedom and is perfect for children who enjoy fantasy stories and magical adventures.
Materials Needed
- 1 empty toilet paper roll
- Green craft paper or green paint
- Light green craft paper
- Dark green craft paper
- Scissors
- Glue
- Black marker
- White and black paper for the eyes
- Orange paper
- Yellow paper
How to Make a Paper Roll Dragon
1. Cover the toilet paper roll with green paper
Wrap the entire toilet paper roll with dark green craft paper or paint it green. This will become the dragon’s body. Make sure the surface is smooth and fully covered before adding any decorative details.
2. Cut and attach layered scales
Cut multiple oval or teardrop-shaped scales from light and dark green paper. Starting at the bottom of the roll, glue the scales in overlapping rows. Continue layering upward until most of the dragon’s body is covered, creating a textured, dragon-like appearance.
3. Create the dragon’s head
Cut a large dragon head shape from green craft paper. Make it slightly wider than the toilet paper roll so it stands out. Fold a small tab at the bottom of the head and glue it inside the top opening of the roll to keep it upright.
4. Add large cartoon eyes
Cut two large white circles and two smaller black circles for the eyes. Glue the black circles onto the white circles and attach them to the dragon’s face. Oversized eyes help give the dragon the playful and friendly look shown in the example.
5. Make the nostrils and smile
Cut two small black circles or ovals and glue them onto the snout for nostrils. Use a black marker to draw a curved smile on one side of the face. Add two small white paper fangs underneath the mouth for extra character.
6. Attach horns and head spikes
Cut two curved horn shapes from dark green paper and decorate them with yellow stripes. Glue one horn on each side of the dragon’s head. Then create a few smaller spikes from light green paper and glue them along the top center of the head.
7. Create the side fins
Cut two decorative fin shapes from green paper and add yellow lines for detail. Attach one fin to each side of the dragon’s head. These fins help make the dragon look more magical and detailed.
8. Make the dragon wings
Cut two large wing shapes from dark green paper. Decorate them with hand-drawn scales, swirls, and lines using a yellow marker or paint. Glue the wings securely to the back sides of the toilet paper roll so they extend outward evenly.
9. Add a curled dragon tail
Cut a long tail shape from dark green paper and decorate it with circles, dots, and swirl patterns. Curl the tail gently around a pencil to create a spiral effect, then glue it to the back of the roll. Add small triangular spikes along the top edge of the tail.
10. Create the fire breath
Cut several flame shapes from orange and yellow paper. Layer the flames together, placing the yellow flame behind the orange flame for depth. Glue the finished flame inside the dragon’s mouth so it looks like the dragon is breathing fire.
11. Add final decorative details
Use a yellow marker or paint to add dots, scales, and decorative patterns across the wings, body scales, horns, and tail. These finishing touches make the dragon look more vibrant and magical.
12. Allow the dragon to dry completely
Check that all pieces are firmly attached and allow the glue to dry fully. Once dry, your dragon is ready to display as a fun fantasy-themed decoration or imaginative play craft.
Tip
For a dragon that looks even closer to the example image, use at least two shades of green for the scales and wings. The color variation creates depth and makes the dragon appear much more detailed and professional while still keeping it a simple homemade craft.
10. Toilet Paper Roll Snake
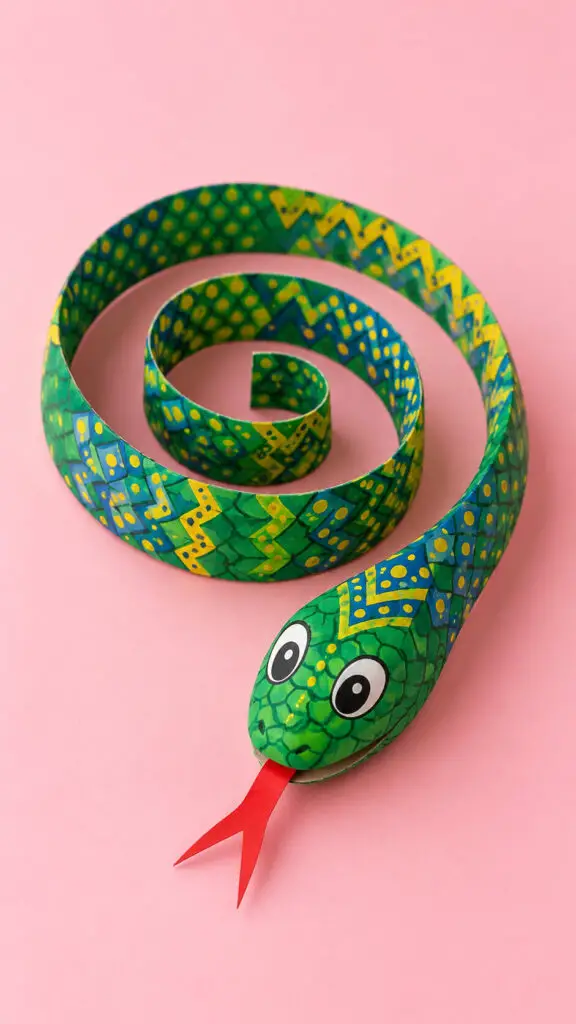
A toilet paper roll snake is surprisingly impressive once finished.
Paint the tube in colorful patterns, then carefully cut it into a spiral shape.
As it unwinds, it transforms into a hanging snake that twists and curls. Add eyes and a paper tongue for extra personality.
Kids are always amazed by the transformation from a simple tube to a slithering creature.
Materials Needed
- 1 empty toilet paper roll
- Green paint
- Blue paint
- Yellow paint
- Paintbrushes
- Black marker
- White paper
- Black paper or marker
- Red construction paper
- Scissors
- Glue
How to Make a Paper Roll Snake
1. Paint the toilet paper roll green
Cover the entire toilet paper roll with green paint and allow it to dry completely. This green base will become the main body color of your snake and will help the decorative patterns stand out beautifully.
2. Draw a scale pattern across the roll
Using a darker green marker or paint, draw small overlapping scale shapes over the entire surface of the roll. Continue the pattern from one end to the other to give the snake a realistic textured appearance.
3. Add blue decorative sections
Paint or draw blue zigzag bands and geometric shapes around different sections of the roll. These bold accents create a colorful, playful design similar to the example snake and make the craft look more eye-catching.
4. Decorate with yellow details
Use yellow paint to add dots, lines, zigzags, and decorative markings throughout the blue and green sections. The bright yellow highlights create contrast and make the patterns pop against the darker colors.
5. Shape the snake’s head
Gently flatten one end of the toilet paper roll slightly to create a rounded snake head. Press carefully so the head appears wider than the rest of the body while still maintaining a smooth shape.
6. Create large cartoon eyes
Cut two large circles from white paper and two smaller circles from black paper. Glue the black circles onto the white circles to create eyes, then attach them to the top of the snake’s head. Large eyes help give the snake a friendly personality.
7. Draw facial details
Use a black marker to draw small nostrils and additional scale details around the face. These small touches help define the snake’s features and make the head more expressive.
8. Cut a forked red tongue
Cut a long strip of red construction paper and trim one end into a forked shape. This classic snake tongue instantly makes the craft recognizable and adds a fun finishing detail.
9. Attach the tongue inside the mouth
Apply a small amount of glue and secure the tongue inside the front opening of the snake’s head. Allow the tongue to extend outward naturally so it appears the snake is flicking its tongue.
10. Cut the roll into a spiral
Starting at the tail end, carefully cut the toilet paper roll into one continuous spiral. Keep the strip width fairly even as you work around the roll to create a smooth, balanced coil.
11. Expand the spiral body
Once the spiral is fully cut, gently pull it apart to reveal the snake’s long coiled body. The cardboard will naturally curl into an attractive spiral shape similar to the finished example.
12. Arrange the snake into a coil
Carefully position the spiral into a circular or winding coil. Adjust the curves until the snake looks balanced and displays its colorful patterns clearly from every angle.
13. Let the craft dry completely
Allow all paint, glue, and decorative details to dry thoroughly before handling the snake. This helps preserve the vibrant colors and keeps the spiral shape intact.
Tip
To achieve a look similar to the example image, layer several pattern styles together. Combine scales, dots, zigzags, and geometric shapes using different shades of green, blue, and yellow. The mix of patterns creates a vibrant, whimsical snake that looks far more detailed while still being easy for kids to make.
11. Toilet Paper Roll Flower Bouquet
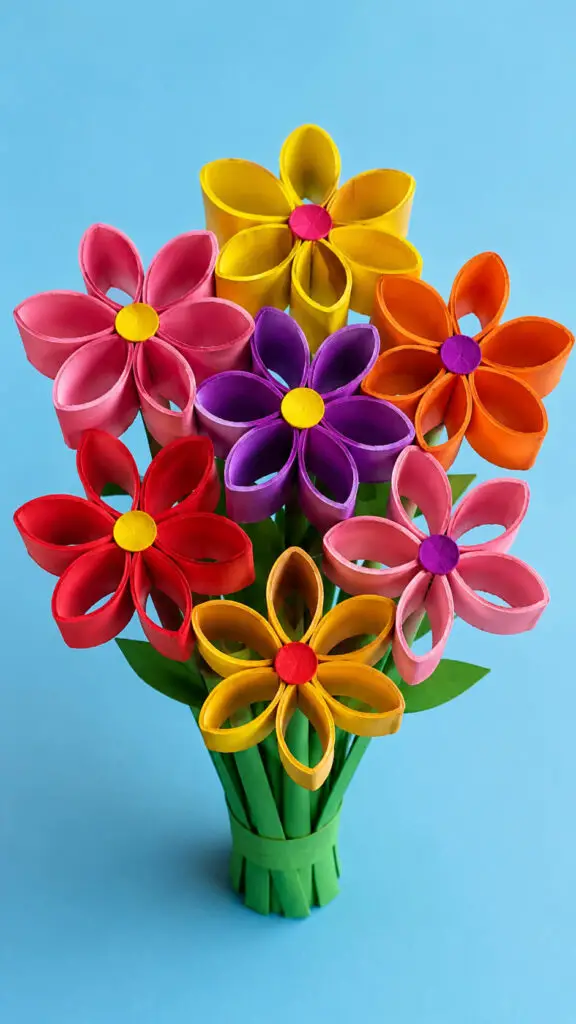
Create a bouquet that never wilts by turning toilet paper rolls into flowers.
Cut the tubes into rings, shape them into petals, and paint them in vibrant colors.
Glue the petals together and attach stems made from craft sticks or pipe cleaners.
These flowers make wonderful gifts for parents, grandparents, teachers, or anyone who appreciates handmade treasures.
Materials Needed
- 3–5 empty toilet paper rolls
- Scissors
- Acrylic paint or craft paint in various colors
- Paintbrush
- Glue
- Green pipe cleaners, craft sticks, or paper straws for stems
- Small buttons, pom-poms, or paper circles for flower centers
- Cardboard scrap (optional for support)
How to Make a Paper Roll Flower Bouquet
1. Flatten the toilet paper rolls
Gently press each toilet paper roll flat with your hands. This makes it easier to cut uniform petal shapes and helps create flowers with a neat, symmetrical appearance.
2. Cut the rolls into petal rings
Using scissors, cut each flattened roll into evenly sized rings about ½ inch wide. Once released, the rings naturally form petal-like shapes that will be used to build the flowers.
3. Paint the flower petals
Paint the cardboard rings in bright floral colors such as pink, yellow, purple, orange, red, or blue. Cover all sides for a polished look and allow the paint to dry completely before assembling the flowers.
4. Arrange the petals into flower shapes
Lay five or six painted rings in a circular pattern so the edges touch and resemble flower petals. Experiment with different arrangements until you find a shape you like.
5. Glue the petals together
Apply a small amount of glue where the petals meet and press them together carefully. Hold them briefly to ensure a secure bond, then set the flower aside to dry.
6. Add decorative flower centers
Glue a button, pom-pom, or paper circle in the middle of each flower. The center adds contrast and helps the flower design look complete and eye-catching.
7. Attach the stems
Glue a green pipe cleaner, craft stick, or paper straw to the back of each flower. Make sure the stem is centered and secure so the flower remains balanced when displayed.
8. Create multiple flowers
Repeat the process to make several flowers in different colors and sizes. A bouquet looks more realistic and vibrant when it includes a variety of flower styles and shades.
9. Arrange the bouquet
Gather all the finished flowers together and gently spread the stems apart to create a full bouquet shape. You can tie them with ribbon or secure them with a decorative paper wrap if desired.
10. Display your finished creation
Place the bouquet in a vase, small container, or decorative holder. The colorful flowers make wonderful handmade decorations and thoughtful gifts for family members, teachers, or friends.
Tip
For a more realistic bouquet, paint some petals with two colors instead of one. Blending a lighter shade toward the center and a darker shade along the edges creates beautiful depth and makes the flowers look even more vibrant and professional.
12. Toilet Paper Roll Pirate Telescope
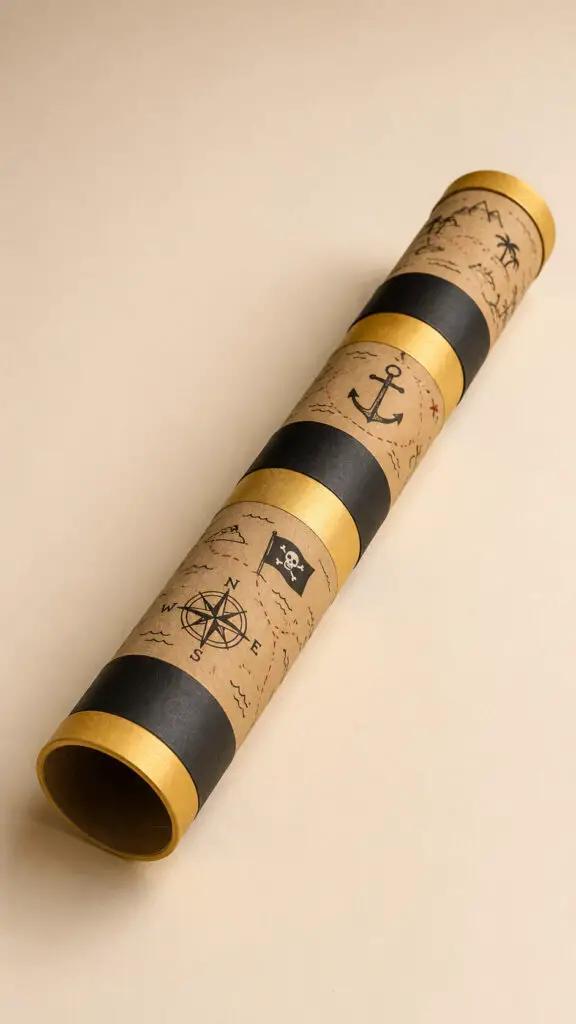
Young pirates will love making their own telescope for treasure hunts.
Decorate the roll with gold accents, pirate stickers, or painted stripes.
Extend the fun by creating a treasure map to accompany the telescope.
This simple craft encourages imaginative adventures and transforms an ordinary afternoon into a high-seas expedition.
Materials Needed
- 1 empty toilet paper roll
- Black construction paper
- Gold construction paper or gold paint
- Glue
- Scissors
- Black marker
- Ruler (optional)
- String or thin ribbon (optional for decoration)
How to Make a Paper Roll Pirate Telescope
1. Cover the toilet paper roll with black paper
Wrap the toilet paper roll with black construction paper and glue it securely in place. Smooth out any wrinkles so the surface looks neat and even. This creates the classic pirate telescope appearance and provides a great base for decorations.
2. Add gold bands to both ends
Cut two strips of gold paper and wrap them around each end of the tube. Glue them firmly in place. These gold accents make the telescope look more realistic and give it a treasure-hunting, pirate-inspired style.
3. Draw pirate-themed designs
Use a black marker or metallic marker to add small pirate symbols around the telescope. Draw items such as anchors, treasure chests, ships, compasses, palm trees, waves, or tiny skull-and-crossbones designs to enhance the adventurous theme.
4. Create a decorative center band
Cut an additional strip of gold paper and place it around the middle of the telescope. This extra detail makes the finished craft look more polished and visually interesting.
5. Add personalized details
Write a pirate name, draw a treasure map pattern, or add hand-drawn stars and ocean-inspired decorations. Kids can customize their telescope to match their own imaginary pirate character.
6. Attach a carrying strap if desired
Punch a small hole near each end of the telescope and thread a piece of string or ribbon through the holes. Tie knots securely on both sides. This allows children to carry the telescope during pretend adventures.
7. Inspect and finish the telescope
Make sure all glued pieces are secure and that the decorations are completely dry. Gently smooth any loose edges and check that the telescope feels sturdy enough for play.
Tip
For an extra-authentic pirate look, lightly crumple the black paper before attaching it and add a few hand-drawn “weathered” lines around the edges. This gives the telescope an aged treasure-hunter appearance without requiring any complicated techniques.
13. Toilet Paper Roll Bee
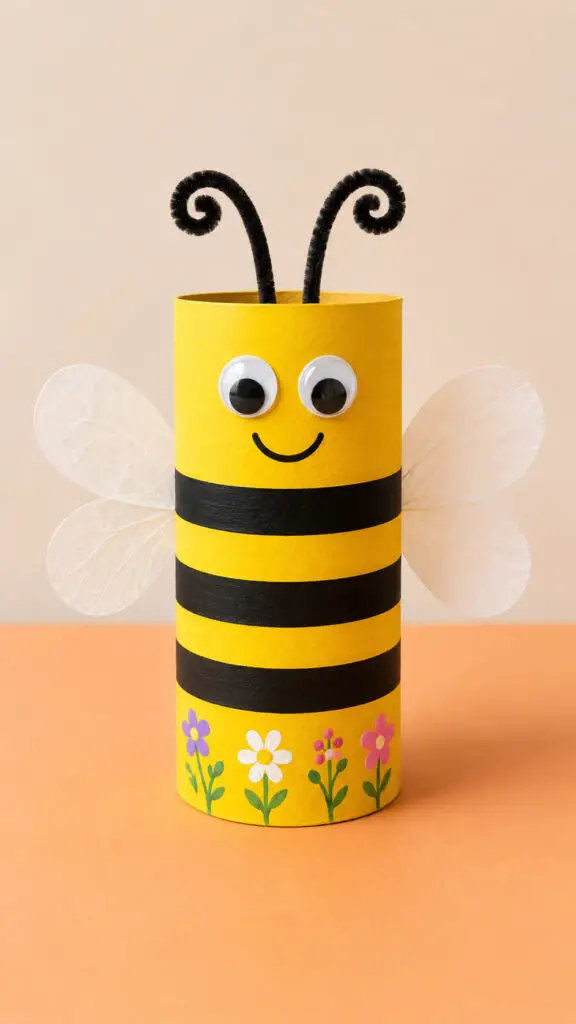
Buzzing bees are always a favorite craft project.
Paint the roll yellow with black stripes and attach wings made from paper or recycled plastic.
Add antennae and a smiling face for extra charm.
This cheerful craft is perfect for spring lessons about pollinators and helps children learn about the important role bees play in nature.
Materials Needed
- 1 empty toilet paper roll
- Yellow paint
- Black paint or black marker
- White paper or cardstock
- Black pipe cleaner
- 2 googly eyes
- Glue
- Scissors
How to Make a Paper Roll Bee
1. Paint the toilet paper roll yellow
Cover the entire toilet paper roll with bright yellow paint. Make sure all sides are evenly coated for a clean and vibrant look. Allow the paint to dry completely before adding any other details.
2. Create the bee’s black stripes
Use black paint or a black marker to add several horizontal stripes around the roll. Space the stripes evenly to give the bee its classic look. Let the paint dry if you are using paint.
3. Cut out the wings
Draw two matching wing shapes on white paper or cardstock and carefully cut them out. The wings can be oval, teardrop-shaped, or slightly curved to resemble real bee wings.
4. Attach the wings to the body
Apply glue to the back of each wing and attach them to opposite sides of the toilet paper roll. Position them slightly above the center so they are clearly visible from the front.
5. Add the bee’s eyes
Glue two googly eyes near the top front of the roll. Place them evenly to create a friendly and cheerful expression.
6. Make the antennae
Cut a black pipe cleaner into two equal pieces. Bend one end of each piece into a small curl and glue the straight ends inside the top of the roll. The curled antennae will give the bee extra personality.
7. Draw a smiling face
Use a black marker to draw a simple smile beneath the eyes. You can also add rosy cheeks or tiny eyebrows for a more playful appearance.
8. Add decorative details
Enhance the bee by drawing small flowers, hearts, or dots around the body. These extra touches make the craft more colorful and unique while keeping the bee as the main focus.
9. Allow the craft to dry completely
Leave the bee undisturbed until all glued pieces are secure. Once everything is dry, the bee is ready to display, use in a classroom project, or include in a spring-themed decoration.
Tip
For extra sparkle, lightly brush the wings with glitter glue after attaching them. The subtle shimmer catches the light beautifully and makes the bee look even more magical without making the craft difficult for kids to create.
14. Toilet Paper Roll Christmas Elf
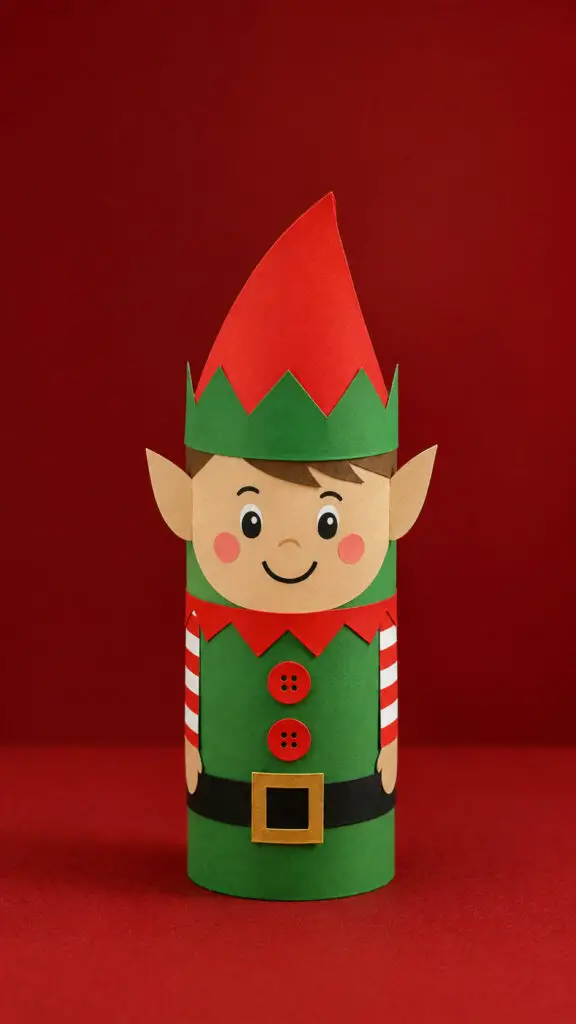
Holiday crafting becomes extra magical with a toilet paper roll elf.
Dress the tube in festive colors, add a paper hat, and draw a cheerful face.
Kids can create entire elf families to display around the house.
These adorable decorations bring holiday spirit to classrooms and homes without requiring expensive supplies.
Materials Needed
- 1 empty toilet paper roll
- Green paint
- Red paint
- Black paint or black marker
- White paper
- Red paper
- Glue
- Scissors
- Googly eyes (optional)
- Paintbrush
How to Make a Paper Roll Elf
1. Paint the toilet paper roll green
Cover the outside of the toilet paper roll with green paint to create the elf’s outfit. Make sure the paint is applied evenly around the entire tube. Set it aside and allow it to dry completely before adding any additional details.
2. Create the elf’s face
Use the upper portion of the roll as the elf’s face. Leave this area unpainted or paint it a light skin-tone color. Draw a cheerful smile, rosy cheeks, and eyebrows. Attach googly eyes or draw eyes with a marker for a friendly expression.
3. Add the elf’s jacket details
Paint or draw a black belt around the middle of the roll. Add a small gold buckle in the center and decorate the front of the jacket with red buttons. These simple details instantly make the character look like a festive holiday elf.
4. Make the elf hat
Cut a large triangle from red paper and roll it into a cone shape. Secure the edge with glue to form the hat. The cone should fit comfortably on top of the toilet paper roll without covering the elf’s face.
5. Decorate the hat
Add a green band around the base of the hat and glue a small white paper circle to the tip to resemble a fluffy pom-pom. These extra details make the hat look more playful and festive.
6. Attach the hat to the elf
Apply glue around the bottom edge of the paper hat and carefully place it on top of the toilet paper roll. Hold it in place for a few moments until it stays secure.
7. Create paper arms
Cut two thin strips from white paper and attach them to the sides of the roll as arms. You can bend them slightly outward to make the elf appear more animated and full of personality.
8. Add finishing touches
Draw additional details such as striped sleeves, tiny shoes, freckles, or holiday patterns on the outfit. Review the craft and make sure all glued pieces are secure before displaying it.
Tip
For an extra festive touch, sprinkle a little glitter on the hat or jacket while the glue is still wet. You can also create a whole family of elves using different hat colors and facial expressions to make a fun holiday display.
15. Toilet Paper Roll Bunny
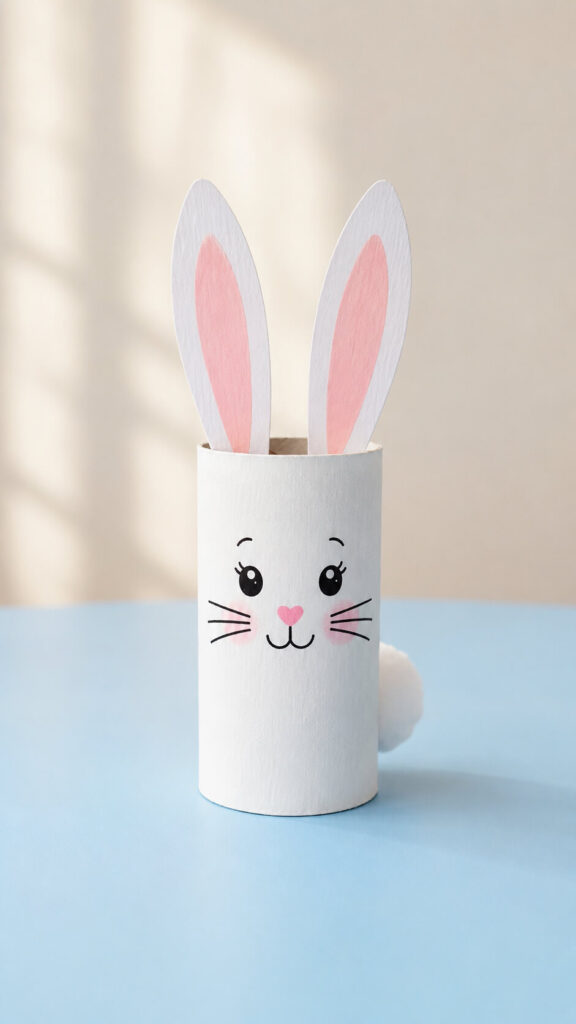
This sweet bunny craft is especially popular during springtime.
Paint the tube in pastel colors and attach long paper ears, a fluffy tail, and a cute little nose.
Add whiskers and bright eyes to complete the look.
These bunnies are perfect for seasonal displays and are always a hit with younger children.
Materials Needed
- 1 empty toilet paper roll
- White paint
- Pink paint
- Paintbrush
- White cardstock or construction paper
- Pink construction paper
- Cotton ball or white pom-pom
- Googly eyes
- Black marker
- Pink pom-pom or pink paper circle for the nose
- Glue
- Scissors
How to Make a Paper Roll Bunny
1. Paint the toilet paper roll white
Cover the entire toilet paper roll with white paint to create the bunny’s body. Apply the paint evenly and allow it to dry completely. If needed, add a second coat to achieve a bright, clean finish.
2. Create the bunny ears
Cut two long bunny ear shapes from white cardstock or construction paper. Then cut two smaller ear shapes from pink paper and glue them in the center of the white ears. This layered look gives the ears more detail and makes them stand out.
3. Attach the ears to the roll
Glue the completed ears to the inside top edge of the toilet paper roll. Position them so they stand upright and are evenly spaced. Hold them in place for a few moments until the glue begins to set.
4. Add the bunny’s eyes
Glue two googly eyes to the front of the roll, placing them near the upper section of the bunny’s face. Make sure they are level so the bunny has a balanced and friendly expression.
5. Create the nose and whiskers
Attach a small pink pom-pom or a pink paper circle below the eyes to form the nose. Use a black marker to draw whiskers extending from each side of the nose and add a small smiling mouth underneath.
6. Attach the fluffy tail
Glue a cotton ball or white pom-pom to the back of the toilet paper roll. This simple addition instantly gives the bunny its classic fluffy tail and adds extra texture to the craft.
7. Add finishing details
Use a marker to draw small details such as eyelashes, rosy cheeks, or tiny paw designs. Check that all pieces are securely attached and allow the glue to dry completely before displaying the bunny.
Tip
For an extra-cute spring display, make several bunnies in different pastel colors and arrange them together as a bunny family. Kids can even give each bunny a name and unique facial expression to make the project more personal and fun.
16. Toilet Paper Roll Monster
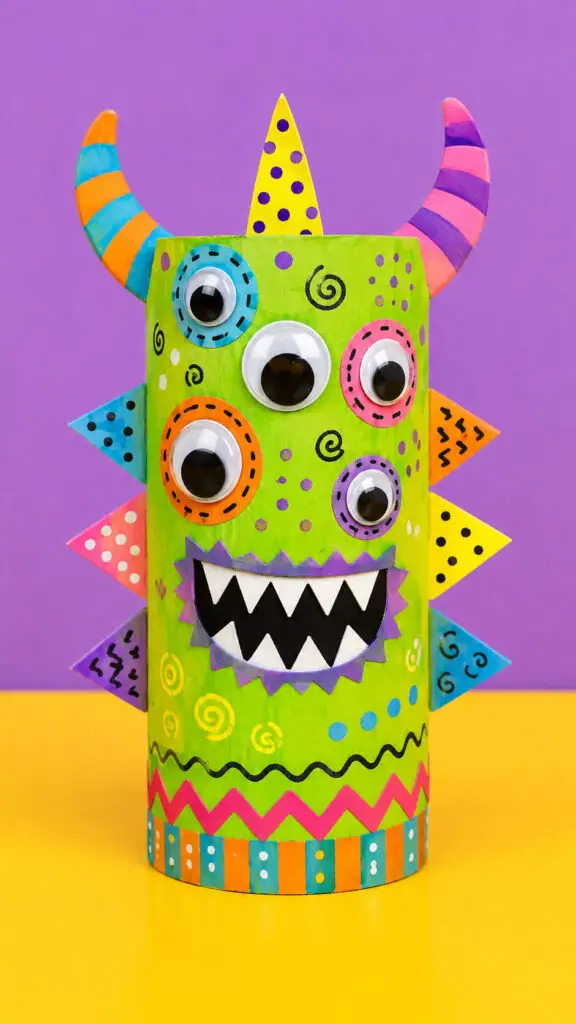
Sometimes the best crafts are the silliest ones.
Let kids design their own monsters using paint, paper scraps, googly eyes, and pipe cleaners.
Some monsters might have one eye, while others have ten.
There are no rules, which makes this project wonderfully freeing.
The result is a collection of hilarious characters full of personality.
Materials Needed
- 1 empty toilet paper roll
- Lime green paint (or any color of choice)
- Paintbrush
- Colored construction paper
- Googly eyes
- Glue
- Black marker
- Scissors
- Pipe cleaners (optional)
How to Make a Paper Roll Monster
1. Paint the toilet paper roll
Cover the entire toilet paper roll with lime green paint or your favorite monster color. Make sure the paint is applied evenly around the outside surface. Set it aside and allow it to dry completely before adding decorations.
2. Create the monster’s eyes
Glue several googly eyes onto the front of the roll. Place them at different heights and angles to give your monster a silly and unique personality. You can use one eye, three eyes, or even a whole row of eyes for extra fun.
3. Cut out colorful horns
Use colored construction paper to cut out two or more monster horns. Triangles, spirals, zigzags, or curved shapes all work well. Glue the horns to the inside top edge of the toilet paper roll so they stick up above the monster’s head.
4. Add a funny monster mouth
Draw a large monster mouth on colored paper and cut it out. Add sharp triangular teeth, crooked teeth, or goofy oversized teeth depending on the personality you want. Glue the mouth to the front of the roll beneath the eyes.
5. Decorate the monster’s body
Use markers to add polka dots, stripes, swirls, stars, zigzags, or other playful patterns all over the monster. Mixing different shapes and colors helps make the design more creative and eye-catching.
6. Attach extra features
Glue on paper ears, tiny arms, paper feet, or pipe-cleaner antennae. These extra details make the monster look more complete and give it even more character.
7. Draw finishing details
Use a black marker to add eyebrows, freckles, eyelashes, claws, or other small details. These finishing touches help bring the monster to life and make it look expressive and unique.
8. Let the craft dry completely
Allow all glued pieces to dry securely before handling the monster. Once everything is attached firmly, the craft is ready to display or use in imaginative monster-themed play.
Tip
There is no wrong way to make a monster. Encourage kids to be as creative and silly as possible by mixing bright colors, unusual eye arrangements, funny teeth, and unexpected decorations. The more unique the monster looks, the more memorable and fun the craft becomes.
17. Toilet Paper Roll Wind Chime
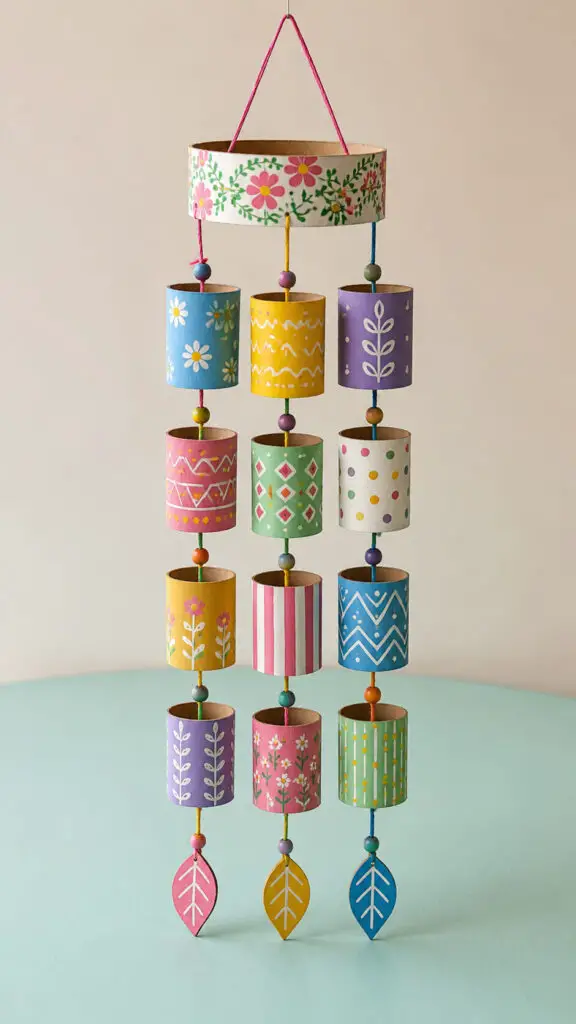
Create a colorful wind chime using painted toilet paper rolls strung together with yarn or ribbon.
Add beads, bells, or small decorations for extra movement and sound.
Hang it on a porch, balcony, or garden fence.
This project combines creativity with outdoor décor and helps children explore simple concepts about wind and movement.
Materials Needed
- 4–6 empty toilet paper rolls
- Acrylic paint or craft paint in various colors
- Paintbrushes
- String, yarn, or ribbon
- Beads (optional)
- Hole punch
- Glue
- Scissors
How to Make a Paper Roll Wind Chime
1. Paint the toilet paper rolls in colorful designs
Paint each toilet paper roll using different colors and patterns. You can create stripes, polka dots, flowers, geometric shapes, or abstract designs. Cover the entire surface and allow the paint to dry completely before continuing.
2. Cut the rolls into decorative sections
Using scissors, cut some of the toilet paper rolls into smaller rings or sections. Leave a few full-length pieces if desired. Mixing different sizes creates a more interesting and balanced wind chime design.
3. Punch holes for hanging
Use a hole punch to make holes near the top and bottom edges of each roll section. These holes will be used to thread the string and connect the pieces together. Make sure the holes are evenly spaced for a neat appearance.
4. Add decorative details
Enhance the painted rolls with extra decorations such as glitter, stickers, hand-drawn patterns, or small paper cutouts. This step allows each section to have its own unique personality and style.
5. Thread string through the pieces
Cut several lengths of string and thread them through the holes in the roll sections. Tie knots to secure each piece in place. Leave small gaps between sections so they can move freely when hanging.
6. Attach beads between the sections
Slide colorful beads onto the strings between the toilet paper roll pieces if desired. Tie knots above and below the beads to keep them in position. This adds visual interest and a decorative touch to the wind chime.
7. Create a hanging loop
Gather the top strings together and tie them into a sturdy loop. This loop will allow the wind chime to be hung from a hook, tree branch, porch, or other display area.
8. Check the balance and spacing
Hold up the wind chime and make any adjustments needed. Ensure the sections hang evenly and do not overlap too much. Proper spacing helps the wind chime move gracefully.
9. Display the finished wind chime
Hang the wind chime in a location where it can gently sway in the breeze. The colorful painted sections will create a beautiful handmade decoration that brightens any space.
Tip
For a nature-inspired look, paint each toilet paper roll section with flowers, leaves, butterflies, or birds. Using a consistent theme makes the finished wind chime look even more polished and decorative while still maintaining its fun homemade charm.
18. Toilet Paper Roll Dinosaur
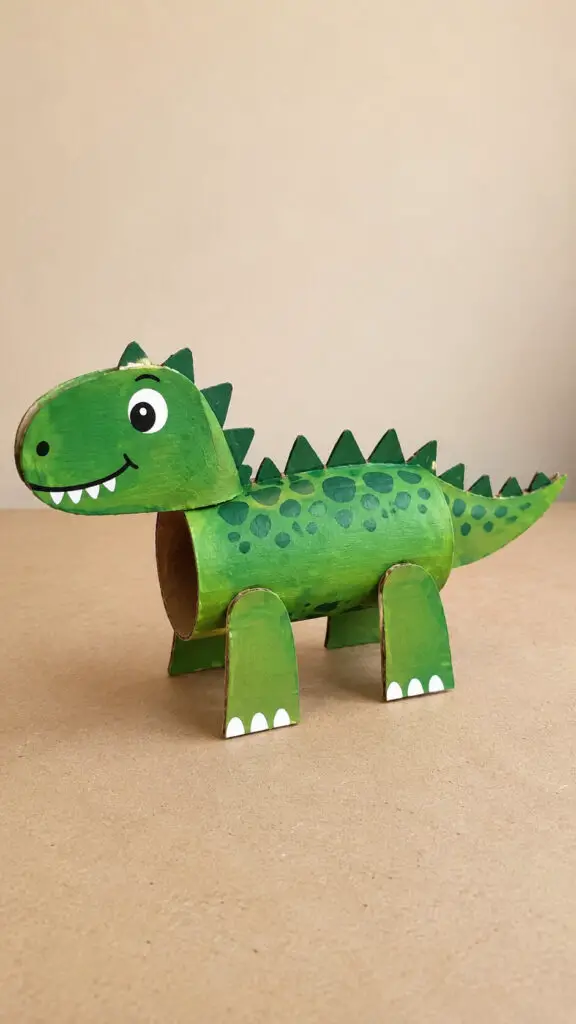
Dinosaurs never lose their popularity.
Use toilet paper rolls as the body of a dinosaur and add cardboard legs, tails, and heads.
Whether it’s a towering T-Rex or a gentle Brontosaurus, children love bringing prehistoric creatures to life.
This craft is especially fun when paired with dinosaur books and themed learning activities.
Materials Needed
- 1 empty toilet paper roll
- Green paint
- Dark green paint or marker
- Cardboard or thick craft paper
- Scissors
- Glue
- Googly eyes or paper eyes
- Black marker
- Pencil
How to Make a Paper Roll Dinosaur
1. Paint the toilet paper roll green
Cover the entire toilet paper roll with green paint to create the dinosaur’s body. Make sure all visible areas are painted evenly. Set it aside and allow it to dry completely before adding any additional pieces.
2. Draw and cut the dinosaur parts
Using cardboard or thick craft paper, draw a dinosaur head, tail, four legs, and several small triangular spikes. Sketch the pieces large enough to support the body while still keeping the dinosaur balanced and easy to assemble.
3. Paint the dinosaur pieces
Paint the head, tail, legs, and spikes to match the body. You can use the same shade of green or add darker tones for extra detail. Allow all pieces to dry thoroughly before assembling the dinosaur.
4. Attach the legs to the body
Glue the four legs evenly along the bottom sides of the toilet paper roll. Position them carefully so the dinosaur can stand upright without tipping over. Let the glue set before continuing.
5. Secure the head and tail
Glue the dinosaur head to one end of the toilet paper roll and the tail to the opposite end. Hold each piece in place for a few moments to ensure a strong bond.
6. Add the back spikes
Glue the triangular spikes along the top of the toilet paper roll, starting near the head and continuing toward the tail. Space them evenly to create a classic dinosaur appearance.
7. Create the dinosaur’s face
Attach googly eyes or paper eyes to the head. Use a black marker to draw a friendly smile, nostrils, and any additional facial details that bring your dinosaur to life.
8. Add scale details and decorations
Use dark green paint or a marker to draw scales, spots, stripes, or textured patterns along the dinosaur’s body. These details make the craft more realistic and visually interesting.
9. Allow the dinosaur to dry completely
Leave the assembled dinosaur undisturbed until all glue and paint are fully dry. Once finished, check that all parts are securely attached and the dinosaur stands steadily on its legs.
Tip
Try creating an entire dinosaur collection using different colors, spike designs, and head shapes. Kids can make a T-Rex, Stegosaurus, Brontosaurus, or Triceratops and turn the crafts into their own prehistoric display or imaginative play set.
19. Toilet Paper Roll Napkin Rings
For a craft that’s both decorative and useful, create napkin rings from toilet paper rolls.
Cut the tubes into smaller sections and decorate them with paint, ribbon, fabric, or seasonal embellishments.
These handmade table accessories add a personal touch to family dinners, holiday gatherings, and special celebrations.
Materials Needed
- 2–3 empty toilet paper rolls
- Scissors
- Acrylic paint or craft paint
- Paintbrush
- Ribbon, lace, or decorative trim
- Glue
- Small faux flowers, gems, or stickers (optional)
- Ruler (optional)
How to Make Paper Roll Napkin Rings
1. Cut the toilet paper rolls into rings
Carefully cut each toilet paper roll into sections about 1 to 1½ inches wide. Try to keep the cuts as straight as possible so the finished napkin rings look neat and uniform. Each roll can create several rings depending on the width you choose.
2. Paint the rings in your chosen colors
Apply paint to the outside and inside of each cardboard ring. You can use a single color for a classic look or create different colors to match a holiday, party theme, or dining room décor. Allow the paint to dry completely before decorating further.
3. Add decorative patterns
Use a small brush or marker to add stripes, polka dots, flowers, swirls, geometric designs, or seasonal motifs. This extra detail transforms the simple cardboard rings into attractive table decorations and gives each one its own personality.
4. Attach ribbon or trim around the edges
Apply a thin line of glue and carefully wrap ribbon, lace, twine, or decorative trim around the ring. Smooth it gently as you work to avoid wrinkles and gaps. This step gives the napkin rings a polished, finished appearance.
5. Add embellishments for extra charm
Glue small faux flowers, gems, pearls, buttons, or stickers onto the rings if desired. Position the decorations thoughtfully so they enhance the design without making the ring bulky or difficult to use around a napkin.
6. Allow the decorations to set
Place the rings on a flat surface and give the glue enough time to dry completely. This helps ensure that ribbons and embellishments stay securely attached during use.
7. Insert napkins and arrange the table
Once everything is dry, slide a folded cloth or paper napkin through each ring. Arrange them on your table setting to add a handmade touch that guests will notice and appreciate.
Tip
Create themed napkin rings for different occasions. Use red and green decorations for Christmas, pastel colors for spring gatherings, gold accents for elegant dinner parties, or autumn leaves for Thanksgiving. Making seasonal versions allows you to reuse this simple craft idea throughout the year.
20. Toilet Paper Roll Rain Stick
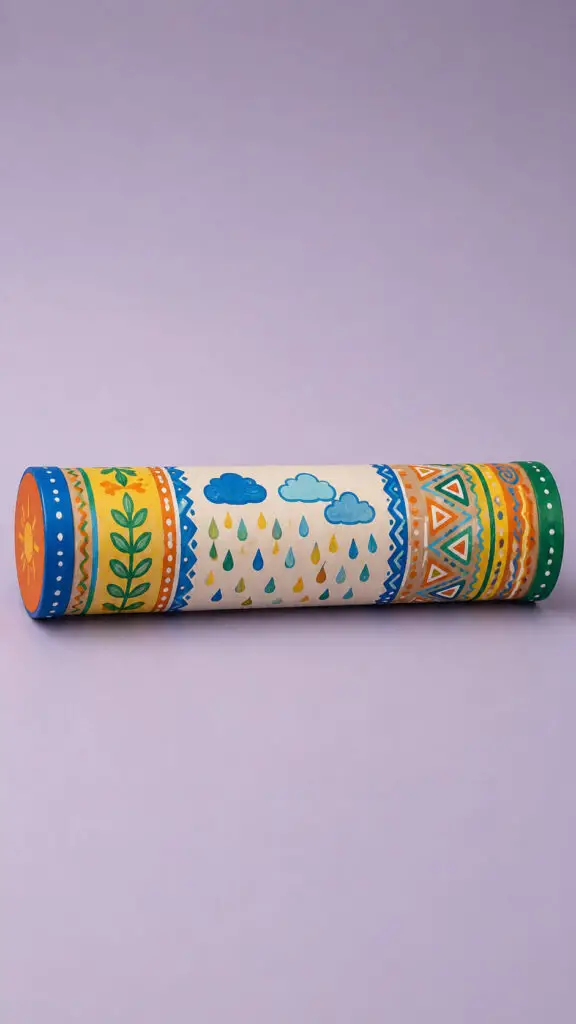
Turn a simple cardboard tube into a musical instrument.
Fill it with rice, beans, or beads and seal the ends securely.
Decorate the outside with colorful designs and patterns.
When tilted, it creates a soothing rain-like sound.
Children enjoy both making and playing this instrument, making it a fantastic blend of art and music.
Materials Needed
- 1 empty toilet paper roll
- Rice, dried beans, or small beads
- 2 circles of cardboard or sturdy paper
- Tape
- Paint
- Paintbrush
- Markers
- Glue (optional for decorations)
How to Make a Paper Roll Rain Stick
1. Seal one end of the toilet paper roll
Cover one end of the toilet paper roll with a cardboard circle or sturdy paper cutout. Secure it tightly with tape so the filler material cannot escape. Make sure there are no gaps around the edges.
2. Fill the roll with rice or beads
Pour a small amount of rice, dried beans, or beads into the tube. Avoid overfilling it, as the filler needs room to move freely inside the roll to create the gentle rain-like sound.
3. Close the other end securely
Place the second cardboard circle over the open end and tape it firmly in place. Shake the tube lightly to ensure nothing leaks out before continuing with the decorations.
4. Paint the outside of the rain stick
Cover the entire toilet paper roll with colorful paint. You can use a single color or combine several shades to create a vibrant background for your design. Allow the paint to dry completely.
5. Add decorative patterns
Use markers or additional paint to create fun designs such as raindrops, clouds, waves, zigzags, stars, geometric shapes, or nature-inspired patterns. Decorate the entire surface to give your rain stick a unique handmade look.
6. Let all decorations dry
Place the rain stick aside until all paint and decorative details are completely dry. This prevents smudging and keeps the finished design looking neat and colorful.
7. Test the rain stick sound
Slowly tilt the rain stick from one end to the other and listen to the soft sound created by the moving filler inside. Experiment with different speeds to create gentle rain showers or heavier rainfall effects.
Tip
For a more realistic rain sound, use uncooked rice instead of larger fillers. Rice creates a softer and smoother effect, while beans and beads produce louder, more dramatic sounds. You can even try different fillers to discover your favorite sound.
21. Toilet Paper Roll Caterpillar
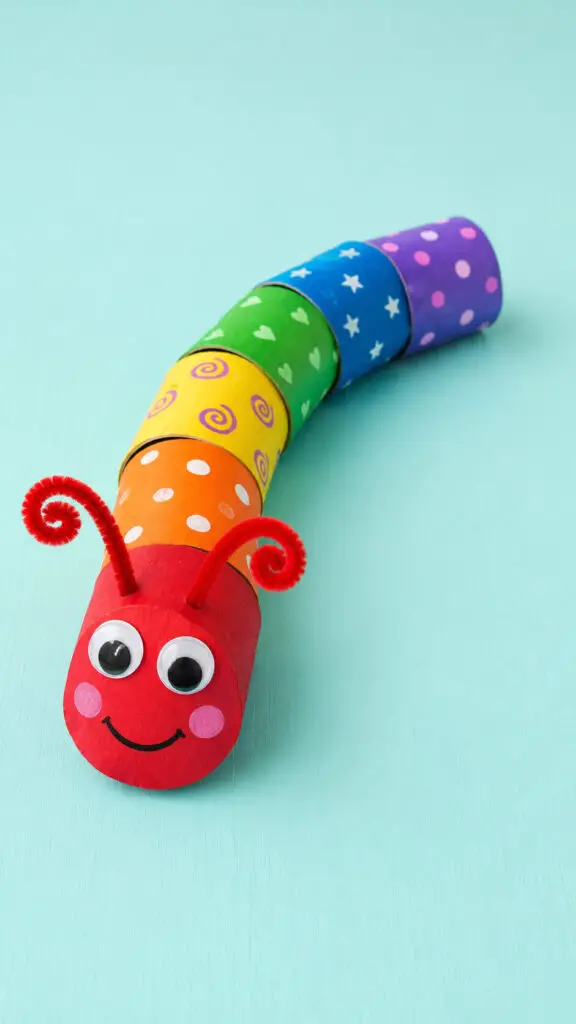
This colorful caterpillar is easy, cute, and perfect for preschoolers.
Connect several painted rolls together or create a segmented look with paper circles.
Add antennae, eyes, and a smiling face.
Kids can experiment with rainbow colors and patterns, making each caterpillar unique.
It also pairs wonderfully with lessons about butterflies and life cycles.
Materials Needed
- 4 to 6 empty toilet paper rolls
- Acrylic or washable paint in multiple colors
- Paintbrushes
- Glue
- Googly eyes
- Pipe cleaners
- Black marker
- Scissors
- Colored paper (optional)
How to Make a Paper Roll Caterpillar
1. Paint each toilet paper roll a different color
Choose bright colors such as red, orange, yellow, green, blue, and purple. Paint each toilet paper roll completely and allow them to dry. Using a variety of colors creates the classic rainbow caterpillar look and makes the finished craft more eye-catching.
2. Decorate the body segments
Add fun designs to each painted roll using a marker or additional paint. Draw polka dots, stars, swirls, stripes, hearts, or zigzag patterns. Giving every segment a different design makes the caterpillar more playful and visually interesting.
3. Create the caterpillar’s face
Select one roll to be the head. Glue on two googly eyes and draw a large smiling mouth with a black marker. You can also add rosy cheeks with pink paint or colored paper circles to give the caterpillar a friendly personality.
4. Attach the antennae
Cut a pipe cleaner into two equal pieces and bend the ends into small curls or loops. Attach them to the top of the caterpillar’s head using glue. The antennae help bring the character to life and make it instantly recognizable as a caterpillar.
5. Connect the toilet paper rolls together
Arrange the painted rolls in a colorful sequence. Apply glue to the sides where the rolls touch and carefully attach them together to form one long caterpillar body. Hold each section briefly until it stays in place.
6. Add extra decorative details
Enhance the caterpillar with paper feet, tiny bows, additional patterns, or colorful stickers. These optional embellishments make the craft more creative and allow children to express their own artistic style.
7. Allow the caterpillar to dry completely
Set the caterpillar aside until all glued sections are secure. Once dry, gently move it to ensure the body pieces remain attached and the decorations stay in place.
8. Display and enjoy your creation
Place the finished caterpillar on a shelf, classroom display, craft table, or windowsill. Its bright colors and cheerful expression make it a fun decoration for spring, nature lessons, or children’s rooms.
Tip
For an educational twist, use the rainbow-colored caterpillar to teach children about colors, counting, patterns, or the butterfly life cycle. It turns a simple craft project into a fun hands-on learning activity.
22. Toilet Paper Roll Crown
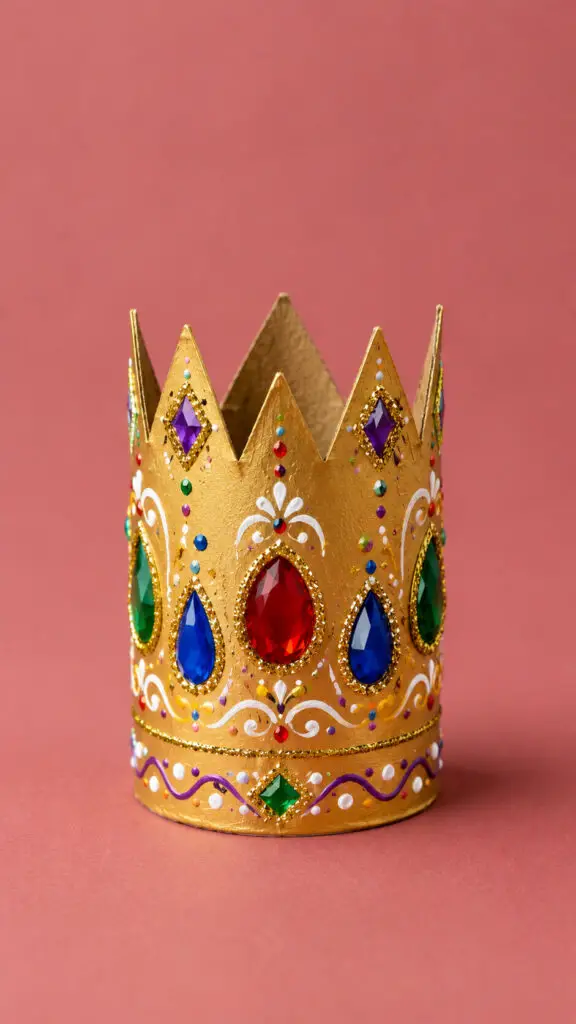
Every child deserves a crown now and then.
Cut decorative points along the top of the tube, paint it in royal colors, and add jewels, glitter, or stickers.
The finished crown can be worn by dolls, stuffed animals, or even displayed as a miniature decoration.
It’s a simple craft that instantly sparks imaginative play.
Materials Needed
- 1 empty toilet paper roll
- Gold paint
- Paintbrush
- Colored markers or paint pens
- Small craft gems, stickers, or paper jewels
- Glue
- Pencil
- Child-safe scissors
- Glitter (optional)
How to Make a Paper Roll Crown
1. Draw the crown points
Use a pencil to sketch a series of crown points around one end of the toilet paper roll. Create tall triangles or rounded points, depending on the style of crown you want. Make sure the points are evenly spaced for a balanced look.
2. Cut out the crown shape
Carefully cut along the pencil lines to remove the excess cardboard and reveal the crown design. Once finished, the top edge of the toilet paper roll should resemble a royal crown with decorative points.
3. Paint the crown gold
Cover the entire crown with gold paint, including the inside edge if desired. Apply the paint evenly and allow it to dry completely. A second coat can help create a richer, more polished appearance.
4. Add decorative patterns
Use colored markers or paint pens to draw swirls, dots, stars, lines, or other royal-inspired designs around the crown. These details add personality and make the crown look more elaborate.
5. Attach the jewels
Glue craft gems, stickers, or handmade paper jewels onto the crown. Place larger jewels near the center and smaller ones around the sides to create an eye-catching royal design.
6. Add glitter accents
If using glitter, apply a small amount of glue to selected areas and sprinkle glitter over the surface. This step adds sparkle and helps the crown stand out during play or display.
7. Allow the decorations to dry
Set the crown aside until all glue, paint, and embellishments are completely dry. This prevents decorations from shifting and ensures the crown stays sturdy.
8. Display or play with the crown
Once finished, the crown can be used for pretend play, fairy tales, royal-themed parties, classroom activities, or as a decorative handmade keepsake.
Tip
For an extra-special crown, use metallic markers to add tiny details around the jewels. These small highlights can make a simple homemade crown look surprisingly elegant and give it a true royal touch.
23. Toilet Paper Roll Animals Safari Set
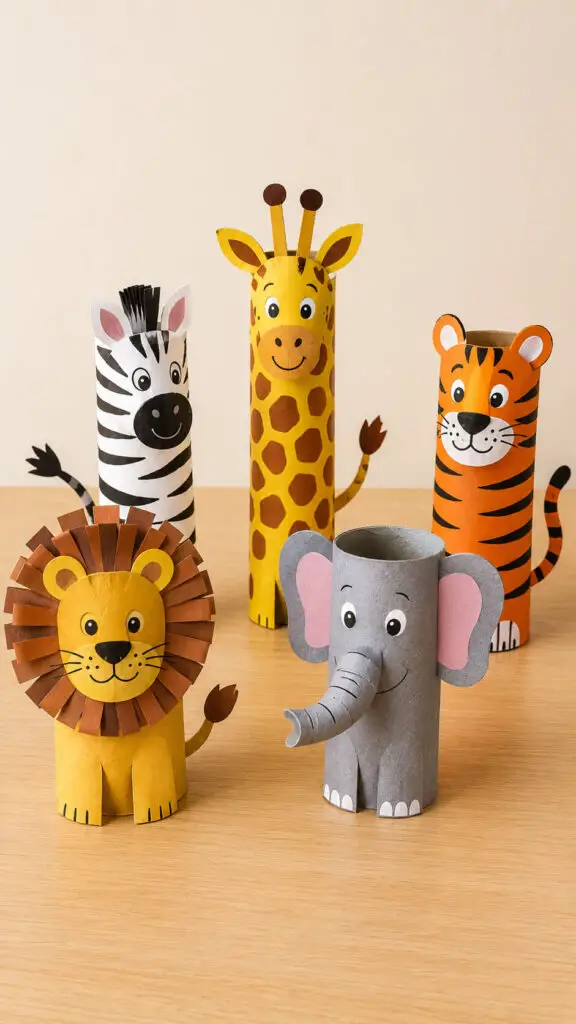
Save several rolls and create an entire safari collection featuring lions, zebras, elephants, giraffes, and more.
Each animal can be customized with paint, paper ears, tails, and unique markings.
This project keeps kids engaged longer because they build a whole collection rather than a single craft.
The finished animals are perfect for storytelling, pretend play, and educational activities about wildlife.
Materials Needed
- 5 empty toilet paper rolls
- Acrylic paint or washable craft paint
- Paintbrushes
- Colored cardstock or construction paper
- Scissors
- Glue
- Black marker
- Googly eyes (optional)
How to Make Paper Roll Safari Animals
1. Choose the safari animals you want to create
Decide which safari animals will be included in your collection. A lion, zebra, giraffe, elephant, and tiger are excellent choices because each animal has distinctive colors and features that are fun to recreate with simple craft supplies.
2. Paint each toilet paper roll
Assign one toilet paper roll to each animal and paint them accordingly. Use orange for the tiger, yellow for the lion, gray for the elephant, white for the zebra, and tan or light brown for the giraffe. Allow the paint to dry completely before adding details.
3. Add the animal patterns
Use a black marker or paint to create unique markings. Draw stripes on the zebra and tiger, spots on the giraffe, and simple facial features on the elephant and lion. These patterns instantly help each animal become recognizable.
4. Create the animal ears
Cut ears from colored cardstock or construction paper that match each animal. Make large rounded ears for the elephant, pointed ears for the tiger and lion, and smaller ears for the zebra and giraffe. Glue them securely to the top sides of each roll.
5. Make the animal faces
Draw eyes, noses, and mouths directly onto the rolls or glue on googly eyes for extra personality. Give each animal its own expression to make the collection feel lively and unique.
6. Add special features to each animal
Create a paper mane for the lion, a long paper trunk for the elephant, small paper horns for the giraffe, and tails for all the animals. These details bring the characters to life and make the safari set more realistic.
7. Attach the finishing details
Glue all remaining pieces firmly in place and check that every animal can stand upright. Add any final decorative touches, such as extra spots, stripes, or shading, to enhance the overall appearance.
8. Let the safari animals dry completely
Allow all glue and paint to dry thoroughly before handling the animals. Once finished, arrange them together to create a miniature safari scene perfect for display or imaginative play.
Tip
Place the finished animals on a piece of green cardboard decorated with paper grass, trees, and a watering hole. This simple addition transforms the individual crafts into an exciting safari habitat that children can use for storytelling and pretend adventures.