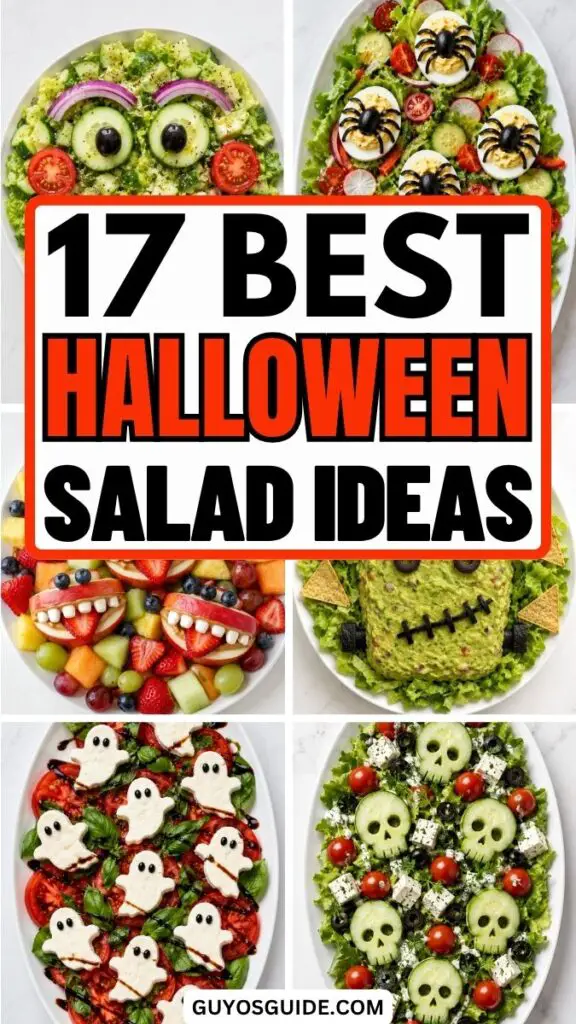
17 Best Halloween Salad Ideas to Try This Year

I never thought a salad could be the star of a Halloween party.
Then I started playing with spooky colors, fun shapes, and a few creepy-cute toppings!
Suddenly, a simple bowl of greens turned into something guests actually wanted to try.
These Halloween salad ideas are easy to make, tasty, and perfect for adding a little fright to your table.
So grab your favorite ingredients and let’s get started!
1. Cucumber Skull Salad
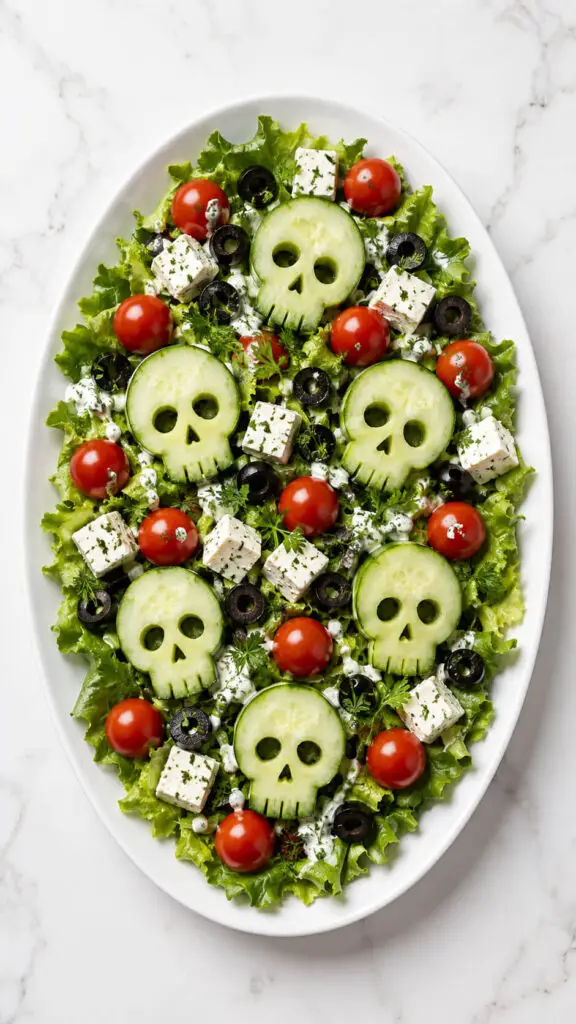
Turn ordinary cucumber slices into the star of the Halloween table with a little kitchen creativity.
Cut thick cucumber rounds, then use a small knife or mini cutters to carve simple eye sockets and a mouth into the centers.
Arrange them over crisp lettuce with cherry tomatoes, black olives, feta, and a drizzle of ranch or herby yogurt dressing.
The cucumber skulls look especially fun scattered across the top, almost like a little veggie graveyard.
This one is wonderfully fresh, crunchy, and easy enough to make while the kids are putting on their costumes.
Ingredients
- 2 large cucumbers
- 2 cups crisp green lettuce, chopped
- 1 cup cherry tomatoes, halved
- ½ cup black olives, sliced
- ¾ cup feta cheese, cut into small cubes
- ½ cup plain Greek yogurt
- 1 tablespoon lemon juice
- 1 tablespoon chopped fresh parsley
- 1 tablespoon chopped fresh dill
- 1 small garlic clove, finely minced
- 1 tablespoon olive oil
- ¼ teaspoon salt
- ⅛ teaspoon black pepper
Instructions
1. Prepare the cucumber skulls
Wash and dry the cucumbers thoroughly. Cut them into thick rounds, about ½ inch each, so they are sturdy enough to carve. Using the tip of a small sharp knife, carefully cut two small eye sockets and a simple mouth into each cucumber round. Keep the designs fairly shallow so the cucumber remains intact.
2. Make the herby yogurt dressing
Combine the Greek yogurt, lemon juice, chopped parsley, chopped dill, minced garlic, olive oil, salt, and black pepper in a small bowl. Stir until smooth and creamy. Taste and adjust the seasoning if needed. The dressing should be fresh and tangy, with enough flavor to complement the mild cucumber and salty feta.
3. Arrange the lettuce base
Spread the chopped lettuce evenly over a large white serving platter. Keep the layer fairly flat rather than piling the lettuce too high, because the cucumber skulls and colorful toppings need to remain clearly visible. Gently pat the lettuce dry beforehand if it has been washed recently.
4. Add the colorful salad ingredients
Scatter the halved cherry tomatoes, sliced black olives, and feta cubes evenly over the lettuce. Try not to cover the entire surface with toppings; leaving some green lettuce visible will create a better contrast with the white cucumber skulls and make the Halloween design stand out.
5. Place the cucumber skulls on top
Arrange the carved cucumber rounds across the salad, spacing them apart so every skull face can be seen clearly. Place a few near the center and others around the edges for a natural, playful appearance. Make sure the carved eyes and mouths face upward.
6. Add the dressing just before serving
Drizzle the herby yogurt dressing lightly around the salad rather than pouring it directly over the cucumber skulls. This keeps their carved faces visible and prevents the vegetables from becoming watery. Serve any remaining dressing in a small bowl alongside the salad if desired.
Tip
For the cleanest skull shapes, chill the cucumber rounds for about 15–20 minutes before carving. Use a small paring knife with a sharp tip and make simple designs rather than trying to cut intricate details. Most importantly, keep the cucumber skulls thick—the thicker they are, the less likely they are to bend or break when you arrange them on the salad.
2. Ghostly Caprese Salad
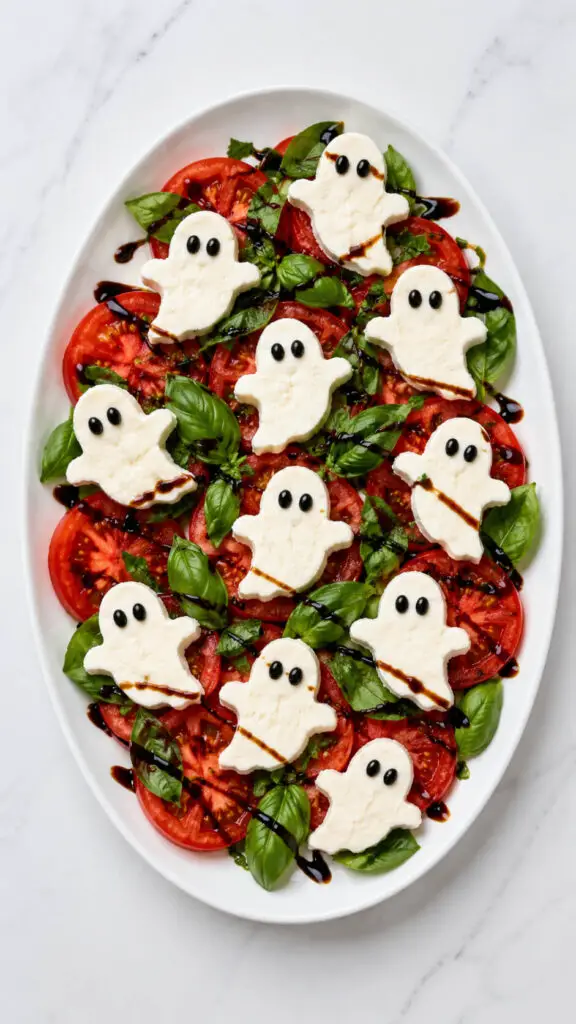
Caprese salad gets a Halloween makeover when creamy mozzarella becomes a collection of tiny ghosts.
Slice mozzarella into thick rounds or use a small ghost-shaped cutter, then add tiny olive pieces for eyes.
Arrange the ghosts over red tomatoes and fresh basil, creating a white-and-red platter that looks surprisingly dramatic.
Finish with balsamic glaze just before serving.
For a party, make several small plates rather than one enormous salad so guests can easily grab a portion.
It is elegant enough for adults but still has that playful Halloween detail children love.
Ingredients
- 8 oz (225 g) fresh mozzarella
- 3–4 medium ripe tomatoes
- 1 cup fresh basil leaves
- 10–12 black olives, pitted
- 2 tablespoons balsamic glaze
- 1 tablespoon extra-virgin olive oil
- ¼ teaspoon salt
- ⅛ teaspoon freshly ground black pepper
Instructions
1. Prepare the mozzarella ghosts
Drain the mozzarella well and pat it dry with paper towels. Cut thick mozzarella slices, then use a small ghost-shaped cookie cutter to create ghost silhouettes. If you do not have a cutter, carefully shape small mozzarella pieces with a paring knife, keeping the bodies rounded and the bottoms slightly wider.
2. Create the ghostly eyes
Slice the black olives into very small pieces. Place two tiny olive pieces on each mozzarella ghost to form the eyes. Press them gently into the soft cheese so they stay in place. Keep the eyes small and evenly spaced so the ghosts remain recognizable without making them look cartoonishly crowded.
3. Slice the tomatoes
Wash and dry the tomatoes before slicing them into medium-thick rounds. Arrange the slices so they are sturdy enough to support the mozzarella ghosts without becoming overly juicy. Pat the cut surfaces gently with paper towels if they release a lot of moisture.
4. Arrange the tomato and basil base
Spread the tomato slices across a large serving platter, slightly overlapping some pieces. Tuck fresh basil leaves between the tomatoes, distributing them evenly throughout the platter. Leave enough open space for the white mozzarella ghosts to remain clearly visible from above.
5. Add the mozzarella ghosts
Place the decorated mozzarella ghosts over the tomato slices and basil, spacing them naturally across the platter. Avoid stacking the ghosts because their shapes and little olive eyes are the main Halloween detail. Position some upright and others at slight angles for a more relaxed homemade presentation.
6. Finish the Caprese salad
Drizzle the olive oil lightly over the tomatoes, basil, and mozzarella. Season with salt and freshly ground black pepper, then add thin ribbons of balsamic glaze across the platter. Keep the glaze relatively light over the ghosts so their white shapes remain bright and easy to see.
Tip
For the clearest ghost shapes, use firm fresh mozzarella rather than very soft burrata or loose mozzarella. Make the ghosts shortly before serving, and add the balsamic glaze at the last minute so it does not stain the mozzarella or obscure their little olive eyes.
3. Jack-O’-Lantern Carrot Salad
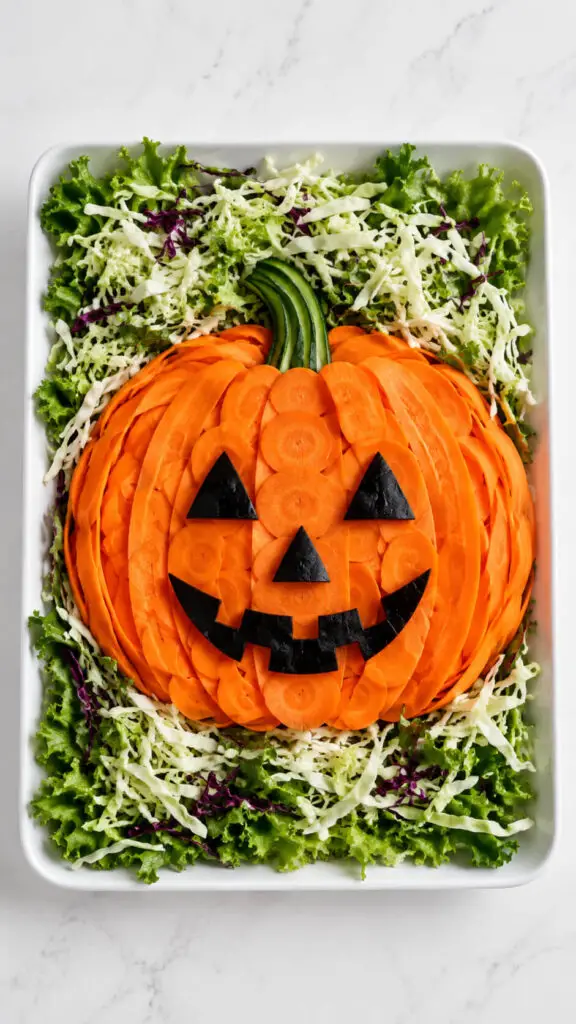
Carrots are naturally Halloween-colored, so they make a brilliant foundation for a jack-o’-lantern salad.
Shave carrots into ribbons or use thin carrot rounds, then arrange them into a large pumpkin shape on a platter.
Use cucumber strips for the stem and black olive pieces to create triangular eyes, a nose, and a crooked grin.
Add shredded cabbage or leafy greens around the pumpkin for contrast.
A honey-mustard or citrus dressing works beautifully here.
The trick is to keep the carrot pieces fairly dry so your carefully arranged pumpkin face stays recognizable until dinner.
Ingredients
- 4 large carrots
- 2 cups shredded green cabbage
- 2 cups mixed leafy greens
- 1 small cucumber
- ¼ cup black olives
- 2 tablespoons pumpkin seeds
- 2 tablespoons chopped fresh parsley
For the Dressing
- 3 tablespoons olive oil
- 2 tablespoons fresh orange juice
- 1 tablespoon lemon juice
- 1 teaspoon honey
- 1 teaspoon Dijon mustard
- ¼ teaspoon salt
- ⅛ teaspoon black pepper
Instructions
1. Prepare the carrot ribbons
Wash and peel the carrots, then use a vegetable peeler to shave them lengthwise into long, thin ribbons. Continue until you have plenty of ribbons to create a rounded pumpkin shape. Keep some ribbons slightly thicker than others so the finished design has natural texture and dimension.
2. Prepare the green vegetables
Wash and dry the cucumber, cabbage, leafy greens, and parsley. Cut the cucumber into thin strips for the pumpkin stem and finely shred the cabbage if it is not already prepared. Pat everything dry, as excess moisture can make the finished platter look watery and cause the carrot design to lose its shape.
3. Mix the citrus dressing
Whisk the olive oil, orange juice, lemon juice, honey, Dijon mustard, salt, and black pepper together in a small bowl. Continue whisking until the dressing looks smooth and slightly glossy. The citrus flavor adds brightness to the naturally sweet carrots without overpowering the Halloween presentation.
4. Create the leafy green background
Spread the mixed leafy greens across a large serving platter, leaving enough room in the center for the jack-o’-lantern. Add the shredded cabbage around the edges and slightly underneath where the pumpkin will sit. This creates a green, garden-like background while providing plenty of crunch.
5. Shape the carrot pumpkin
Arrange the carrot ribbons in the center of the platter to form a large, rounded pumpkin. Layer the ribbons in gently curved sections, following the shape of a pumpkin rather than simply piling them together. Leave subtle lines between the sections so the pumpkin shape remains clearly visible from above.
6. Add the pumpkin stem
Cut a few thin strips of cucumber and arrange them at the top of the carrot pumpkin to form a short green stem. Slightly overlap the strips so the stem looks connected to the pumpkin instead of appearing like a separate vegetable placed beside it.
7. Carve the jack-o’-lantern face
Cut small triangular pieces from the black olives for the eyes and nose. Then cut several small olive pieces and arrange them into a crooked smiling mouth. Carefully place the pieces on top of the carrot ribbons, leaving enough orange space around each feature so the face is immediately recognizable.
8. Finish with the dressing and toppings
Drizzle the citrus dressing lightly over the leafy greens and cabbage, avoiding the carrot face as much as possible. Scatter pumpkin seeds and chopped parsley around the pumpkin for extra texture and a natural autumn finish. Serve soon after assembling so the vegetables remain crisp and the jack-o’-lantern stays neat.
Tip
For the sharpest jack-o’-lantern face, chill the carrot ribbons before arranging them and use a small, very sharp knife to cut the olive features. If the carrot ribbons curl too much, lay them flat for a few minutes before building the pumpkin.
4. Eyeball Beet and Feta Salad
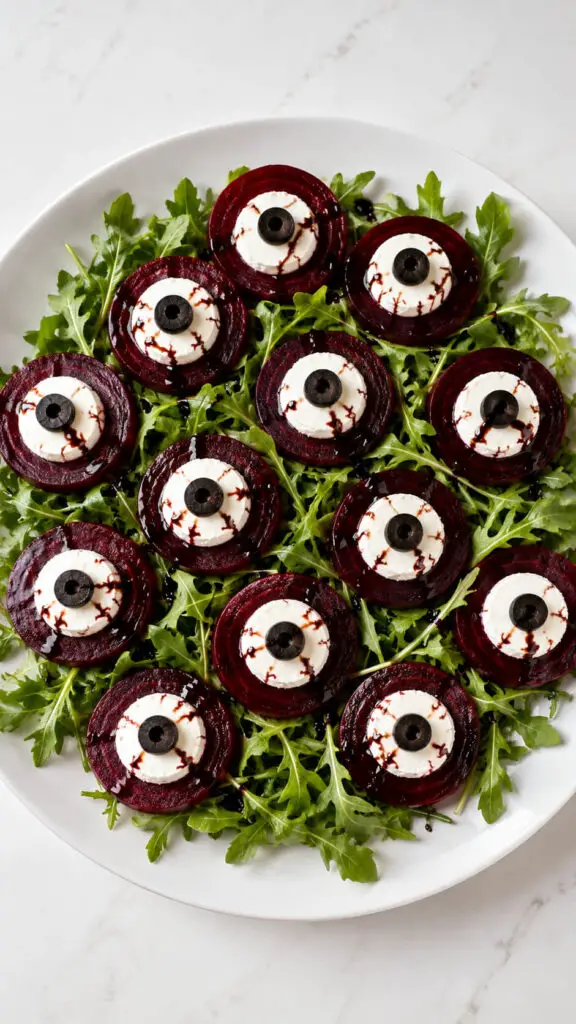
For a Halloween salad that gets a genuine double-take, make edible eyeballs from beet slices, feta, and olives.
Place rounds of cooked beetroot across a bed of arugula, add small feta circles in the centers, and finish each one with a black olive pupil.
A thin drizzle of balsamic glaze can create wonderfully creepy “bloodshot” details around the plate.
The earthy beetroot pairs beautifully with salty feta and peppery greens.
It is spooky without being childish, making it a particularly good choice for an adult Halloween dinner or cocktail party buffet.
Ingredients
- 3 medium cooked beetroots, cooled
- 4 cups fresh arugula
- ¾ cup feta cheese
- ¼ cup black olives
- 2 tablespoons balsamic glaze
- 2 tablespoons extra-virgin olive oil
- 1 tablespoon lemon juice
- ½ teaspoon honey
- ¼ teaspoon salt
- ⅛ teaspoon freshly ground black pepper
Instructions
1. Prepare the beetroot rounds
Slice the cooked beetroot into rounds about ¼ inch thick. Choose the most evenly shaped slices for the eyeball decorations and set aside any smaller or uneven pieces for the salad itself. Pat the beetroot gently with paper towels to remove excess moisture so the feta will sit neatly on top.
2. Create the feta eyeballs
Cut or crumble the feta into small round pieces that fit comfortably in the center of each beetroot slice. Place one piece of feta onto each beetroot round, leaving a visible border of burgundy beetroot around the outside. This contrast creates the appearance of a colorful iris surrounding the white of the eye.
3. Add the black olive pupils
Slice the black olives into very small rounds. Place one olive piece in the center of each feta circle to create a dark pupil. Press it gently into the feta so it stays in place. Keep the pupils centered for a neat appearance, or position a few slightly off-center to give the edible eyeballs a funny, watchful expression.
4. Prepare the arugula base
Spread the fresh arugula evenly across a large serving platter. Fluff the leaves slightly so the salad has height without becoming too crowded. The peppery green arugula provides a strong color contrast against the dark red beetroot and white feta, helping the eyeball designs stand out clearly.
5. Make the lemon dressing
Whisk together the olive oil, lemon juice, honey, salt, and black pepper in a small bowl. Continue whisking until the dressing looks smooth and lightly emulsified. The bright lemon flavor balances the earthy beetroot, while the small amount of honey adds just enough sweetness.
6. Arrange the edible eyeballs
Carefully place the decorated beet-and-feta eyeballs across the arugula. Spread them throughout the platter rather than clustering them in one area, allowing each eyeball to remain clearly visible. You can also place a few plain beetroot pieces between them to make the arrangement look more like a complete salad.
7. Add the spooky finishing details
Use a small spoon or squeeze bottle to create thin, irregular streaks of balsamic glaze around and partially beneath selected eyeballs. Keep the lines delicate and uneven so they resemble bloodshot veins without overwhelming the dish. Avoid covering the feta pupils or the main beetroot designs.
8. Dress the salad before serving
Drizzle the lemon dressing lightly over the arugula and plain beetroot pieces, taking care not to pour it directly over the decorated eyeballs. Serve immediately so the arugula remains crisp and the feta retains its clean white appearance.
Tip
For the sharpest-looking eyeballs, use chilled cooked beetroot and firm feta. If your feta is crumbly, gently press it into small compact rounds with your fingers before placing it on the beet slices. Assemble the eyeballs shortly before serving so the beetroot does not stain the feta too heavily.
5. Spiderweb Taco Salad
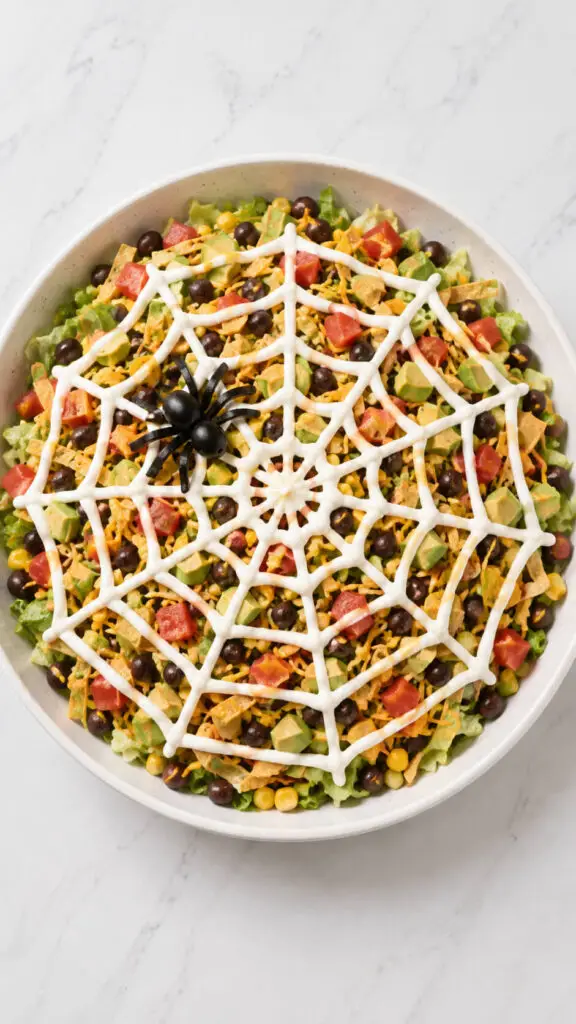
Give a hearty taco salad a spooky centerpiece by turning sour cream into a spiderweb.
Layer crisp lettuce, seasoned beans, corn, tomatoes, avocado, cheese, and tortilla strips in a shallow serving bowl.
Spoon sour cream into a piping bag, draw several circles over the top, then drag a toothpick from the center outward to create the web.
Place a black-olive spider in the middle, using thin strips of olive for legs.
It is filling enough to count as dinner and forgiving enough that nobody will notice if your spider looks slightly more “creative” than creepy.
Ingredients
- 6 cups crisp romaine lettuce, shredded
- 1 cup seasoned cooked ground beef or turkey
- 1 cup black beans, drained and rinsed
- 1 cup sweet corn, drained
- 1 cup cherry tomatoes, halved
- 1 avocado, diced
- ¾ cup shredded cheddar cheese
- 1 cup crunchy tortilla strips
- ½ cup sour cream
- ½ cup black olives
- 2 tablespoons chopped fresh cilantro
- ¼ cup salsa
- 1 tablespoon lime juice
- ½ teaspoon chili powder
- Salt, to taste
Instructions
1. Cook and season the taco meat
Cook the ground beef or turkey in a skillet over medium heat until completely browned and cooked through. Drain excess fat, then stir in the chili powder and a spoonful of salsa. Let the meat cool slightly before adding it to the salad so it does not wilt the lettuce.
2. Prepare the fresh vegetables
Wash and dry the romaine lettuce thoroughly, then shred it into bite-sized pieces. Halve the cherry tomatoes, dice the avocado, and rinse and drain the black beans. Keeping the vegetables fairly dry is important because excess moisture can make the taco salad soggy.
3. Build the colorful salad base
Spread the romaine evenly across a wide, shallow serving bowl or platter. Arrange the seasoned taco meat, black beans, corn, tomatoes, avocado, and shredded cheddar in distinct sections or scatter them naturally over the lettuce. Keep the surface relatively level so the Halloween decoration will sit neatly on top.
4. Add the crunchy tortilla strips
Scatter the tortilla strips over the salad, concentrating some around the outer edges while leaving the center reasonably clear. The strips provide a satisfying crunch and also give the salad a rustic taco-night appearance without interfering with the spiderweb design.
5. Pipe the sour-cream spiderweb
Spoon the sour cream into a small piping bag or resealable plastic bag and snip off a tiny corner. Pipe a small circle in the center of the salad, followed by several larger circles around it. Drag a toothpick from the center outward through the circles at regular intervals to create a recognizable spiderweb pattern.
6. Create the edible olive spider
Use one whole black olive for the spider’s body and cut another olive into thin strips for the legs. Carefully position the olive body on the spiderweb, then arrange the strips around it to create eight curved legs. Keep the spider small enough that it complements the web rather than covering the salad design.
7. Finish the taco salad
Drizzle a little lime juice over the avocado and sprinkle fresh cilantro across the salad. Add salsa on the side or in small dollops around the edges. Serve immediately so the lettuce and tortilla strips remain crisp and the sour-cream spiderweb stays sharply defined.
Tip
Make the spiderweb just before serving. If it sits too long, moisture from the sour cream and vegetables can soften the tortilla strips and blur the design. For an especially clean web, use thick sour cream straight from the refrigerator and pipe slowly in steady circles.
6. Monster Face Greek Salad
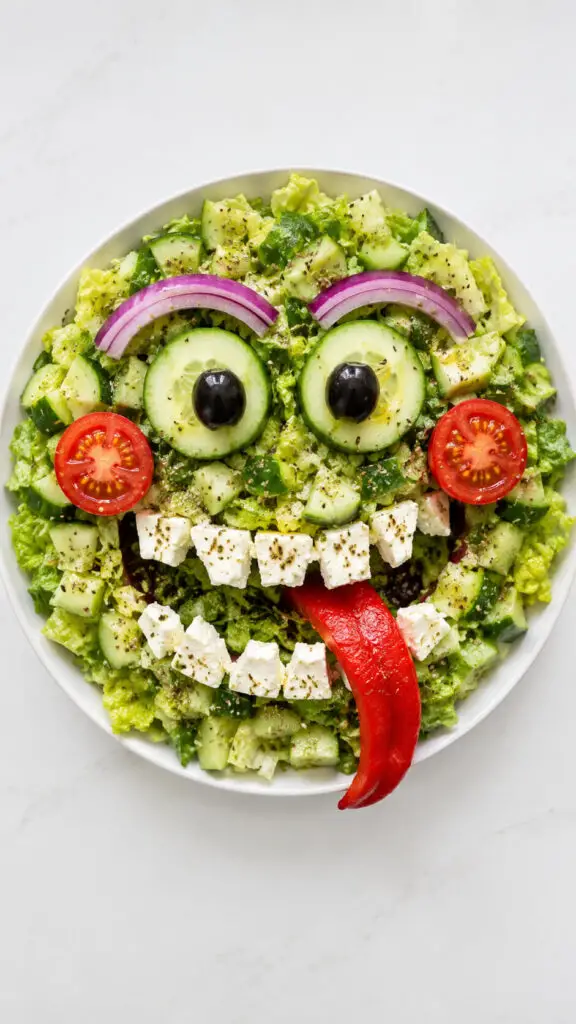
Let the vegetables do the decorating with a giant monster face built from a Greek salad.
Spread chopped romaine or cucumber across a platter, then use tomato halves for cheeks, olives for eyes, red onion for eyebrows, and feta cubes for crooked teeth.
A long strip of roasted red pepper makes an excellent monster tongue.
The beauty of this idea is that there is no precise carving involved—you simply arrange familiar ingredients until a funny face appears.
Serve with oregano, olive oil, lemon, and feta for a bright Mediterranean salad that disappears quickly from party tables.
Ingredients
- 4 cups chopped romaine lettuce
- 1 large cucumber, sliced
- 1 cup cherry tomatoes, halved
- ½ cup black olives
- ½ small red onion, thinly sliced
- ¾ cup feta cheese, cut into small irregular cubes
- 1 large roasted red pepper
- 2 tablespoons extra-virgin olive oil
- 1 tablespoon fresh lemon juice
- 1 teaspoon dried oregano
- ¼ teaspoon salt
- ⅛ teaspoon black pepper
Instructions
1. Prepare the fresh vegetables
Wash and thoroughly dry the romaine, cucumber, tomatoes, and red onion. Chop the romaine into bite-sized pieces, slice the cucumber, halve the cherry tomatoes, and cut the red onion into thin strips. Keeping the vegetables dry helps the finished monster face stay neat instead of becoming watery.
2. Make the lemon dressing
Whisk the olive oil, lemon juice, oregano, salt, and black pepper together in a small bowl. The dressing should taste bright and slightly tangy, complementing the creamy feta and fresh vegetables. Set it aside while you assemble the face so you can dress the salad at the end.
3. Create the monster face
Spread the chopped romaine onto a large serving platter, shaping it into a large rounded face. Arrange the cucumber slices around and across the lettuce to add texture and create a green background. Leave enough open space for the facial features to be clearly recognizable from above.
4. Add the monster’s cheeks
Place halved cherry tomatoes on the lower left and lower right portions of the salad to form two bright red monster cheeks. Keep the tomatoes relatively close to the center and arrange them in slightly uneven clusters so the face looks playful and homemade rather than perfectly symmetrical.
5. Build the monster’s eyes and eyebrows
Use black olives to create two large eyes near the upper center of the face. For extra character, place small pieces of feta or cucumber inside the olive shapes as highlights. Arrange thin strips of red onion above the eyes as expressive, crooked eyebrows, giving the monster a funny and slightly mischievous expression.
6. Create the crooked teeth
Arrange the irregular feta cubes across the center of the salad to form a wide, uneven monster smile. Leave small gaps between the pieces so they resemble individual crooked teeth. Vary the angles and sizes rather than lining them up perfectly—the uneven appearance makes the Halloween character much more convincing.
7. Add the monster tongue
Cut the roasted red pepper into one long, narrow strip. Place it below the feta teeth and curve it downward and slightly to one side so it looks like a silly monster tongue sticking out. Leave part of the pepper extending beyond the mouth for a more exaggerated expression.
8. Drizzle the salad before serving
Once the monster face is completely assembled, drizzle the lemon-oregano dressing lightly over the lettuce and vegetables. Avoid heavily coating the feta teeth, olive eyes, and roasted pepper tongue so the facial design remains easy to see. Serve immediately while the romaine and cucumber are still crisp.
Tip
Build the monster face on a large, flat platter rather than in a deep bowl. The flatter surface makes the facial features much easier to arrange and ensures guests can see the entire design from across the table. For an especially funny face, make the eyebrows uneven and let the red pepper tongue curl dramatically to one side.
7. Snake-Shaped Pasta Salad
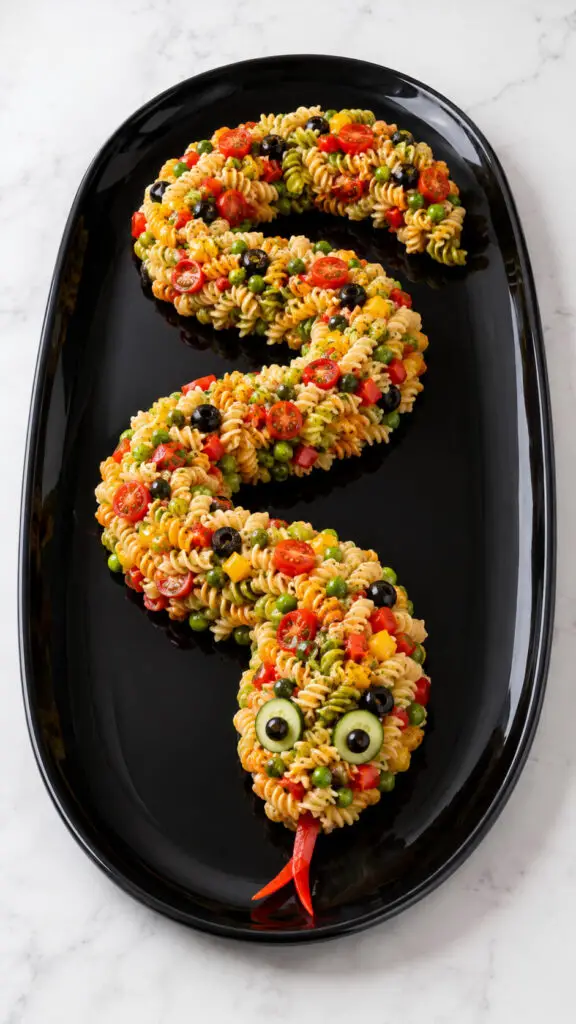
A snake salad is one of those Halloween dishes that makes guests stop walking and come back for a second look.
Prepare a colorful pasta salad with rotini, peas, bell peppers, olives, cherry tomatoes, and a creamy or Italian-style dressing.
Instead of serving it in a bowl, arrange the pasta in a long, winding snake shape on a platter.
Use cucumber slices for eyes and a thin red pepper strip for the tongue.
Keep the body thick enough to look substantial and add lettuce around the edges like grass.
It is playful, generous, and excellent for feeding a crowd.
Ingredients
- 12 oz (340 g) rotini pasta
- 1 cup green peas, cooked and cooled
- 1 red bell pepper, diced
- 1 yellow bell pepper, diced
- 1 cup cherry tomatoes, halved
- ½ cup black olives, sliced
- ½ cup cucumber, finely diced
- ½ cup Italian dressing
- 2 tablespoons chopped fresh parsley
- ½ teaspoon dried oregano
- ½ teaspoon salt
- ¼ teaspoon black pepper
- 2 cucumber slices for the eyes
- 2 small black olive pieces for the pupils
- 1 thin strip of red bell pepper for the tongue
Instructions
1. Cook the pasta
Bring a large pot of salted water to a boil and cook the rotini according to the package directions until al dente. Drain the pasta thoroughly, then rinse it briefly under cold water to stop the cooking process. Let it cool completely so the warm pasta does not soften the vegetables or make the dressing oily.
2. Prepare the vegetables
While the pasta cools, dice the red and yellow bell peppers and cucumber, halve the cherry tomatoes, and slice the black olives. Keep the vegetables relatively small so they mix easily with the spiral pasta while still providing plenty of bright color throughout the salad.
3. Combine the pasta and vegetables
Place the cooled rotini in a large mixing bowl. Add the peas, diced red and yellow bell peppers, cherry tomatoes, sliced black olives, and diced cucumber. Gently toss everything together, taking care not to crush the tomatoes or break the pasta spirals.
4. Season the pasta salad
Pour the Italian dressing over the pasta mixture, then add the chopped parsley, oregano, salt, and black pepper. Toss gently until the dressing coats the pasta and vegetables evenly. Taste the salad and add a little more seasoning or dressing if necessary.
5. Chill the salad
Cover the bowl and refrigerate the pasta salad for at least 30 minutes. Chilling allows the flavors to blend and makes the salad easier to shape. Give it a gentle toss before arranging it so the vegetables and dressing are evenly distributed throughout the pasta.
6. Shape the snake
Transfer the pasta salad onto a large serving platter and use your hands or a large spoon to form it into a long, thick, winding snake shape. Create several gentle curves rather than making the body perfectly straight. Keep the pasta packed together enough that the snake holds its shape.
7. Create the snake’s face
At one end of the pasta snake, place two cucumber slices as eyes and position a small black olive piece in the center of each cucumber slice as a pupil. Add the thin red bell pepper strip at the front to create a playful forked tongue. Adjust the pasta around the head so the face remains clearly visible.
Tip
For the best presentation, reserve a few colorful vegetables, black olives, and peas before mixing the salad. Use them to decorate the finished snake after shaping it. If you’re serving this at a Halloween party, make the snake shortly before guests arrive so its winding shape stays neat and the cucumber eyes remain crisp.
8. Graveyard Garden Salad
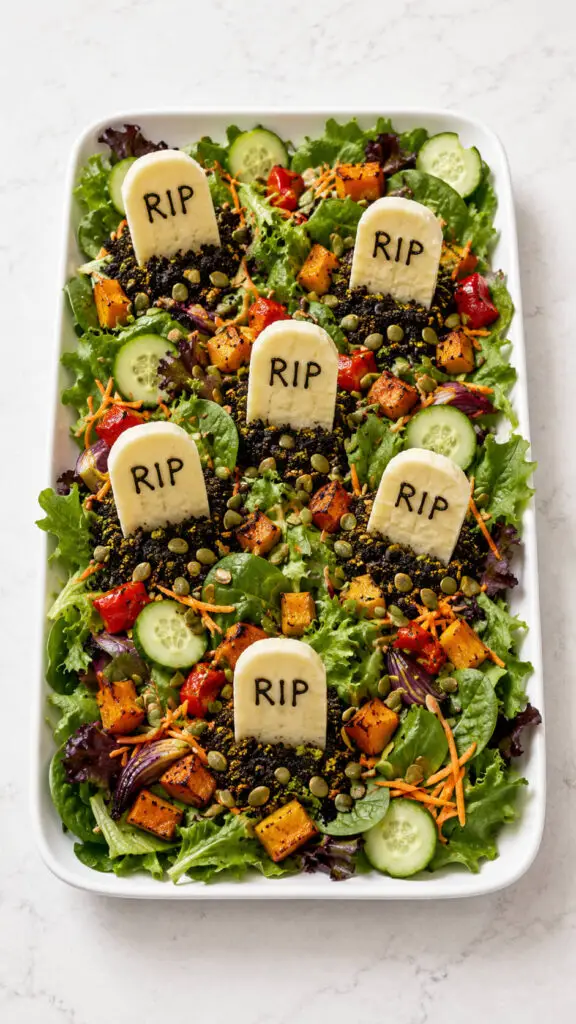
Build a little edible graveyard right on top of a simple green salad.
Start with mixed leaves, cucumber, shredded carrots, and roasted vegetables, then create tiny tombstones from slices of cheese or sturdy crackers.
Write “RIP” using a food-safe edible marker or a tiny piping of balsamic reduction.
Crushed dark crackers can become the “soil,” while black olives make surprisingly convincing little stones.
Add roasted pumpkin seeds for crunch.
This presentation works especially well for family dinners because everyone can help decorate the graveyard before you bring it to the table.
Ingredients
- 5 cups mixed leafy greens
- 1 large cucumber, sliced
- 2 medium carrots, shredded
- 1 cup roasted sweet potato cubes
- ½ cup roasted red or yellow bell peppers
- 6–8 rectangular slices of firm white cheese, such as cheddar or provolone
- 3–4 dark whole-grain crackers
- ⅓ cup pumpkin seeds
- ¼ cup black olives, sliced
- 3 tablespoons balsamic glaze
- 2 tablespoons olive oil
- 1 tablespoon lemon juice
- ½ teaspoon honey
- ¼ teaspoon salt
- ⅛ teaspoon black pepper
Instructions
1. Prepare the vegetable graveyard base
Wash and dry the leafy greens thoroughly, then spread them evenly across a large serving platter. Arrange the cucumber slices and shredded carrots over the greens, leaving enough open space for the tombstones. Keep the surface relatively flat so the graveyard details can be seen clearly from above.
2. Roast the colorful vegetables
Roast the sweet potato cubes and bell pepper pieces until tender and lightly browned. Allow them to cool completely before adding them to the salad. Scatter the roasted vegetables across the leafy base, concentrating some pieces around the areas where you plan to place the edible tombstones.
3. Shape the edible tombstones
Cut the firm white cheese slices into simple tombstone shapes by rounding the top corners and narrowing the lower edges slightly. You can also use sturdy rectangular crackers if preferred. The tombstones do not need to be perfectly identical; slightly different shapes make the graveyard look more natural and homemade.
4. Add the RIP lettering
Use a tiny amount of balsamic glaze to carefully write “RIP” on each cheese tombstone. A toothpick, small piping bag, or squeeze bottle with a narrow opening can help you create the lettering. Let the glaze sit briefly so it becomes less likely to smear when the tombstones are positioned.
5. Create the dark soil effect
Crush the dark whole-grain crackers into small crumbs, keeping a mixture of fine and slightly larger pieces for a realistic texture. Sprinkle the crumbs around the bases of the tombstones rather than covering the entire salad. This creates small patches of edible “soil” while allowing the colorful vegetables to remain visible.
6. Place the grave markers
Insert the cheese or cracker tombstones vertically into the leafy salad, spacing them across the platter. Angle a few slightly instead of placing every marker perfectly straight. This gives the edible graveyard a playful, weathered appearance while making each tombstone easy for guests to see.
7. Finish the spooky garden
Scatter pumpkin seeds and sliced black olives around the salad for additional texture and dark Halloween contrast. Keep the decorations edible and relatively simple so the tombstones remain the main attraction. Drizzle the dressing lightly over the greens and vegetables without soaking the cheese markers.
8. Mix the dressing and serve
Whisk together the olive oil, lemon juice, honey, salt, and black pepper until combined. Drizzle it sparingly over the salad immediately before serving. For a particularly attractive presentation, leave some areas of the greens undressed so the different colors and graveyard details remain crisp and clearly defined.
Tip
Prepare the tombstones and roasted vegetables ahead of time, but assemble the graveyard shortly before serving. This keeps the greens crisp and prevents the cheese or crackers from becoming damp. For the most convincing presentation, use a large, shallow white platter so the entire edible graveyard can be seen at once.
9. Pumpkin Patch Couscous Salad
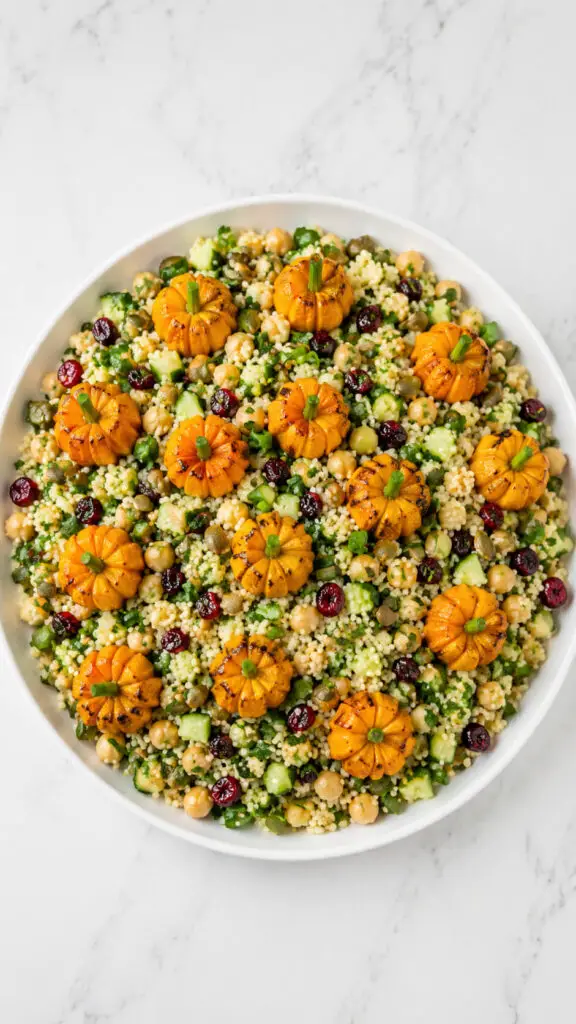
Transform a fluffy couscous salad into a miniature pumpkin patch using roasted squash or small balls of orange vegetables.
Toss couscous with parsley, cucumber, chickpeas, dried cranberries, and a lemony dressing, then arrange roasted pumpkin cubes across the top like little pumpkins.
Add tiny pieces of green onion as stems and scatter pumpkin seeds around them.
The orange-and-green combination immediately feels festive without requiring complicated food carving.
It is also a practical make-ahead option: prepare the couscous earlier in the day and add the decorative pumpkin pieces just before serving.
Ingredients
- 1 cup dry couscous
- 1 cup boiling vegetable broth or water
- 2 cups pumpkin or butternut squash, cut into small cubes
- 1 cup cucumber, finely diced
- ¾ cup cooked chickpeas, drained and rinsed
- ½ cup dried cranberries
- ¼ cup fresh parsley, finely chopped
- ¼ cup pumpkin seeds
- 2 tablespoons olive oil
- 1 tablespoon lemon juice
- 1 teaspoon honey or maple syrup
- ½ teaspoon ground cumin
- ½ teaspoon salt
- ¼ teaspoon black pepper
- 2 green onions, cut into short thin pieces for the pumpkin stems
Instructions
1. Roast the pumpkin pieces
Preheat the oven to 400°F (200°C). Toss the pumpkin cubes with 1 tablespoon of olive oil, cumin, salt, and black pepper. Spread them in a single layer on a baking sheet and roast for about 20–25 minutes, turning once, until tender and lightly browned around the edges. Let them cool slightly before decorating the salad.
2. Prepare the fluffy couscous
Place the couscous in a large heatproof bowl and pour over the boiling vegetable broth or water. Cover tightly and let it stand for about 5 minutes, or according to the package directions. Fluff thoroughly with a fork, separating any clumps, then allow the couscous to cool to room temperature.
3. Mix the fresh salad ingredients
Add the diced cucumber, chickpeas, dried cranberries, and chopped parsley to the cooled couscous. Toss gently until everything is evenly distributed. The combination of pale couscous, green cucumber and parsley, creamy chickpeas, and red cranberries gives the salad a lovely autumn color palette.
4. Whisk the dressing
Combine the remaining olive oil with the lemon juice and honey or maple syrup in a small bowl. Whisk until smooth and slightly glossy. Pour the dressing over the couscous mixture and toss gently so the grains and vegetables are lightly coated without becoming soggy.
5. Shape the pumpkin patch
Transfer the dressed couscous salad to a large serving platter and spread it into an even, slightly rounded layer. Arrange the roasted pumpkin cubes across the top, grouping some together so they resemble individual pumpkins growing throughout a miniature pumpkin patch. Leave enough couscous visible between the pumpkin pieces to preserve the garden-like appearance.
6. Add the pumpkin stems
Cut the green onions into short, narrow pieces and carefully place one piece on top of each roasted pumpkin cube. These little green stems make the orange pieces instantly more recognizable as miniature pumpkins and add another fresh pop of color.
7. Scatter the pumpkin seeds
Finish the platter by sprinkling pumpkin seeds naturally around the roasted pumpkin pieces. Concentrate a few seeds near the “pumpkins” while leaving other areas of the couscous exposed. Serve at room temperature or slightly chilled so the roasted pumpkin remains pleasant against the fresh couscous mixture.
Tip
For the best pumpkin-patch effect, cut the roasted pumpkin into fairly uniform cubes and avoid over-roasting them. You want the pieces tender enough to eat but firm enough to hold their shape when arranged on top. Add the green onion stems and pumpkin seeds shortly before serving so the decoration looks fresh and crisp.
10. Witch’s Cauldron Salad
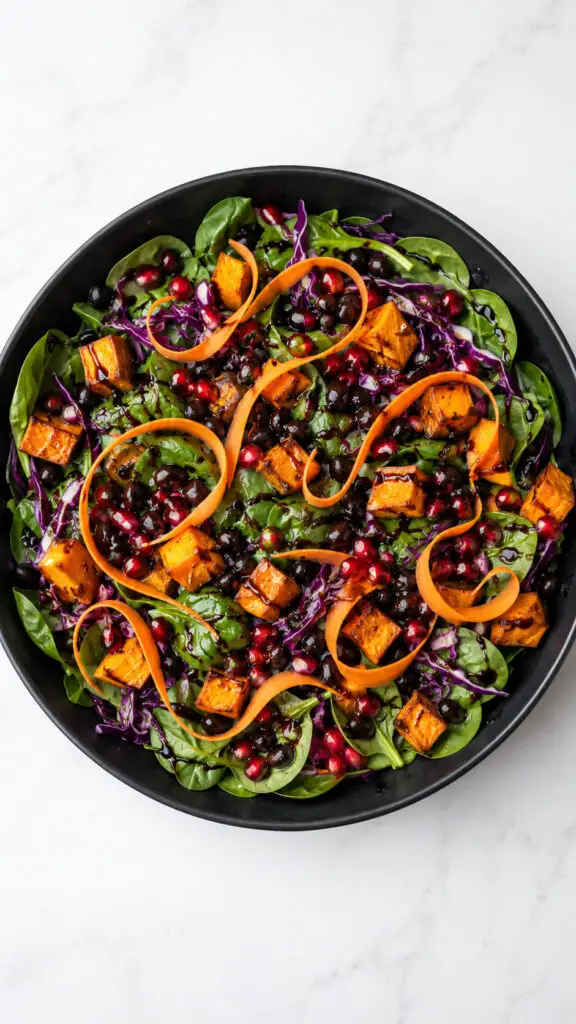
Serve a dark, dramatic salad inside a black bowl to create the illusion of a witch’s bubbling cauldron.
Combine baby spinach, purple cabbage, black beans, roasted sweet potato, and pomegranate seeds for plenty of Halloween color.
Let the pomegranate seeds look like tiny jewels floating through the mixture.
For extra theater, place a few long carrot ribbons over the top like magical swirls.
A maple-balsamic dressing gives the salad a slightly sweet autumn flavor.
Put the bowl on a wooden board surrounded by rosemary “herbs” and a few safe Halloween decorations for a full witchy centerpiece.
Ingredients
- 5 cups baby spinach
- 2 cups finely shredded purple cabbage
- 1 cup cooked black beans, rinsed and drained
- 1½ cups roasted sweet potato cubes
- ½ cup pomegranate seeds
- 1 medium carrot
- 2 tablespoons pumpkin seeds
- 2 tablespoons olive oil
- 1 tablespoon maple syrup
- 1½ tablespoons balsamic vinegar
- 1 teaspoon Dijon mustard
- ¼ teaspoon salt
- ⅛ teaspoon black pepper
Instructions
1. Roast the sweet potatoes
Preheat the oven to 425°F (220°C). Cut the sweet potato into small, bite-sized cubes and toss them with 1 tablespoon of olive oil. Spread them in a single layer on a baking sheet and roast for about 20–25 minutes, turning once, until the edges are lightly browned and the centers are tender. Allow them to cool slightly before adding them to the salad.
2. Prepare the maple-balsamic dressing
Whisk together the remaining olive oil, maple syrup, balsamic vinegar, Dijon mustard, salt, and black pepper in a small bowl. Continue whisking until the dressing looks smooth and slightly glossy. The combination should taste pleasantly sweet and tangy, giving the earthy vegetables a lively finish.
3. Prepare the carrot ribbons
Peel the carrot and use a vegetable peeler to shave it lengthwise into long, thin ribbons. Gently curl the ribbons with your fingers or loosely coil them into swirls. These will create the magical-looking wisps across the top of the salad, so keep them long enough to make distinct curves.
4. Build the cauldron base
Place a deep black serving bowl on your work surface and fill it with the baby spinach. Add the shredded purple cabbage, spreading it throughout the spinach so the dark purple strands remain visible. The black bowl should resemble a witch’s cauldron while the colorful ingredients create the “magic” inside.
5. Add the beans and sweet potatoes
Scatter the black beans and roasted sweet potato cubes over the greens. Distribute them rather than mixing everything aggressively, allowing the black, orange, purple, and green colors to remain distinct. The roasted sweet potatoes should be cool enough that they do not wilt the spinach.
6. Scatter the pomegranate seeds and pumpkin seeds
Sprinkle the pomegranate seeds over the surface, allowing their bright red color to peek through the darker vegetables. Add the pumpkin seeds for crunch and contrast. The pomegranate should look almost like tiny jewels floating throughout the cauldron.
7. Create the magical swirls
Place the prepared carrot ribbons across the top of the salad, curling them into loose spirals and flowing shapes. Arrange a few ribbons toward the center and others closer to the edges. Avoid covering the entire salad—the goal is to create the appearance of mysterious magical wisps while keeping the colorful ingredients visible.
8. Finish with the dressing
Drizzle the maple-balsamic dressing lightly over the salad immediately before serving. Use a thin stream rather than flooding the surface so the spinach and colorful toppings remain distinct. For the prettiest presentation, reserve a little dressing for guests who prefer a more heavily dressed salad.
Tip
For the best “witch’s cauldron” effect, use a wide, deep black serving bowl rather than a shallow platter. Prepare the carrot ribbons and dressing ahead of time, but add the dressing and carrot swirls just before serving. This keeps the spinach crisp and the carrot ribbons fresh, while preserving that dramatic top-down Halloween presentation.
11. Frankenstein Avocado Salad
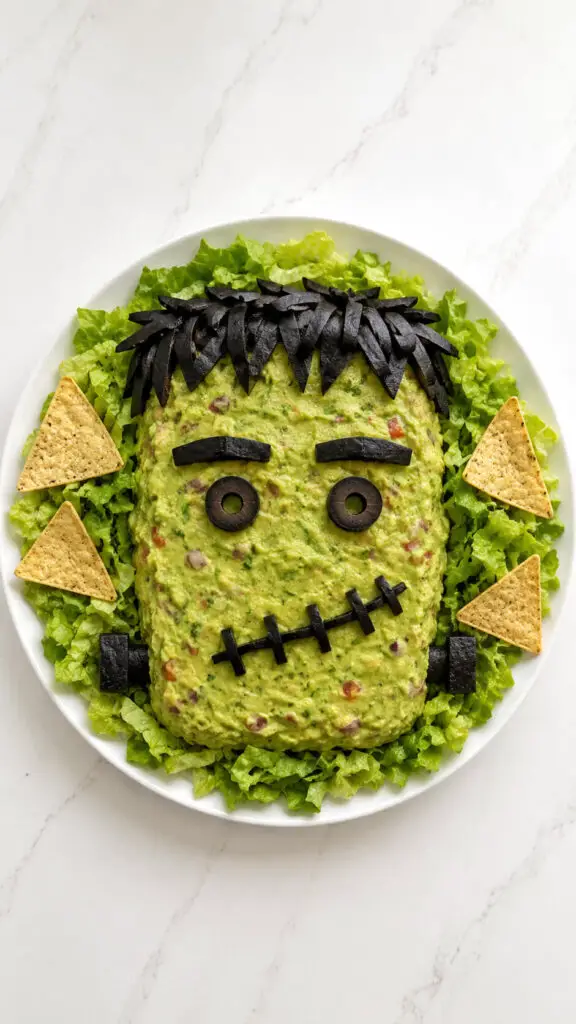
Make Frankenstein surprisingly delicious with a creamy avocado salad arranged into his famous square-ish green face.
Mash avocado with lime, cilantro, tomato, and a little red onion, then spread it into a rectangular shape on a platter.
Use black olives for hair, eyebrows, eyes, and a stitched mouth, while small tortilla pieces can become the neck bolts.
Surround the face with crunchy lettuce or tortilla chips.
This is essentially a festive guacamole-style salad, so it is perfect beside tacos, grilled meats, or Halloween nachos—and it requires much less carving than a pumpkin.
Ingredients
- 3 ripe avocados
- 1 tablespoon fresh lime juice
- 2 tablespoons chopped fresh cilantro
- ½ cup diced tomato
- 2 tablespoons finely diced red onion
- ¼ teaspoon salt
- ⅛ teaspoon black pepper
- ½ cup black olives, sliced
- 2 small flour or corn tortilla pieces, cut into rectangles
- 2 small pieces of black olive or dark vegetable for the neck bolts
- 2 cups crisp lettuce, chopped
- ½ cup tortilla chips, for serving
Instructions
1. Prepare the avocado mixture
Cut the avocados in half, remove the pits, and scoop the flesh into a bowl. Mash gently with a fork, leaving a little texture rather than making it completely smooth. Stir in the lime juice, cilantro, diced tomato, red onion, salt, and black pepper until everything is evenly combined.
2. Shape the Frankenstein face
Spoon the avocado mixture onto a large white serving platter and use the back of a spoon to shape it into a roughly rectangular face. Keep the surface relatively smooth and the edges defined so the Frankenstein design is easy to recognize from above.
3. Create Frankenstein’s hair
Arrange thin black olive slices along the top edge of the avocado face to form Frankenstein’s messy, jagged hair. Make some pieces slightly uneven and point them downward onto the green face for a more recognizable monster appearance.
4. Add the eyes and eyebrows
Use small round pieces of black olive to create two eyes, spacing them evenly across the upper portion of the face. Add short, slightly angled olive strips above each eye to form thick Frankenstein-style eyebrows. Keep the features bold enough to remain visible against the green avocado.
5. Make the stitched mouth
Arrange small pieces of sliced black olive into a long, slightly crooked horizontal mouth. Add several tiny vertical olive pieces crossing the mouth to mimic Frankenstein’s signature stitches. A slightly uneven expression makes the face more playful and homemade.
6. Add the neck and bolts
Place two small rectangular tortilla pieces beneath the bottom corners of the avocado face to suggest Frankenstein’s neck bolts. Add the small dark olive pieces at their ends to make the bolts more recognizable. Keep the neck pieces close to the face so the overall design remains compact.
7. Frame the face with lettuce
Scatter crisp chopped lettuce around the Frankenstein face, leaving enough space around the avocado to preserve its rectangular outline. The green lettuce adds freshness while also giving the platter a fuller salad appearance without interfering with the facial details.
8. Add the tortilla chips
Arrange a few tortilla chips around the outer edge of the lettuce rather than directly over the Frankenstein face. They add crunch and make the avocado salad easy to scoop and enjoy. Avoid overcrowding the platter so the monster remains the main attraction.
9. Serve the salad immediately
Serve the Frankenstein avocado salad soon after assembling it for the brightest color and freshest texture. The lime juice helps slow avocado browning, but the face will look its best when freshly prepared. Place it on the table as a centerpiece alongside tacos, grilled foods, or other Halloween party dishes.
Tip
For the cleanest Frankenstein face, chill the avocado mixture for about 10 minutes before shaping it. If you want especially sharp facial features, use a spoon or small offset spatula to straighten the edges after spreading. Prepare the olive decorations in advance, but wait until just before serving to assemble the face so the avocado stays fresh and vibrant.
12. Mummy Caesar Salad
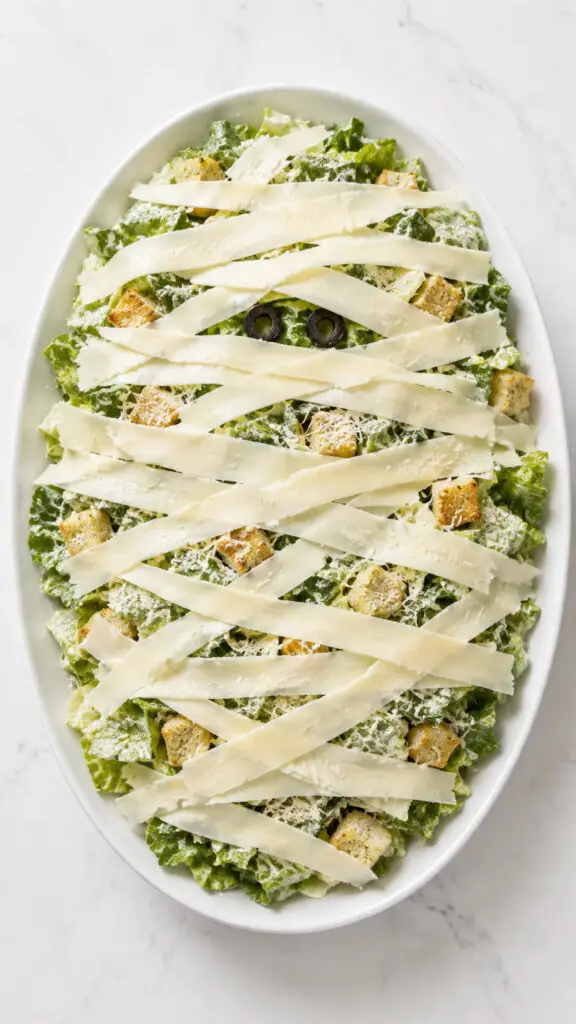
Wrap a familiar Caesar salad in Halloween fun by creating a mummy effect across the top.
Toss crisp romaine with Caesar dressing, Parmesan, and crunchy croutons, then arrange thin strips of Parmesan cheese or mozzarella across the surface in slightly uneven horizontal lines.
Leave two small spaces for olive eyes peeking through the “wrappings.” The result looks like a mummy has wandered straight into the salad bowl.
Make the salad just before serving so the lettuce stays crisp, and keep extra dressing on the side for guests who like their Caesar particularly creamy.
Ingredients
- 2 large romaine lettuce hearts, chopped
- ½ cup Caesar dressing
- ½ cup freshly grated Parmesan cheese
- 1 cup Caesar croutons
- 4 ounces mozzarella cheese
- 2 large black olives
- ¼ teaspoon freshly ground black pepper
- 1 tablespoon extra Parmesan, for finishing
Instructions
1. Chop the romaine lettuce
Wash and thoroughly dry the romaine lettuce before chopping it into bite-sized pieces. Keeping the lettuce very dry is important because excess water can dilute the Caesar dressing and make the finished salad limp. Place the chopped lettuce in a large bowl and set it aside while you prepare the other ingredients.
2. Toss the lettuce with Caesar dressing
Add the Caesar dressing to the chopped romaine and gently toss until the leaves are lightly coated. Avoid adding too much dressing at once; the salad should look creamy but still have plenty of crisp green lettuce showing. Season with freshly ground black pepper for a little extra flavor.
3. Add the Parmesan and croutons
Sprinkle the grated Parmesan over the dressed lettuce and gently toss once more. Add the croutons and fold them through carefully so they remain crunchy. Reserve a few croutons for scattering around the top if you want additional texture and visual interest.
4. Shape the salad into a mummy
Transfer the Caesar salad to a wide, shallow white serving platter and gently shape it into a slightly rounded rectangular mound. A shallow platter works best because it gives you plenty of surface area for creating the mummy’s bandages while keeping the salad easy to serve.
5. Cut the mozzarella into mummy bandages
Slice the mozzarella into long, thin strips of varying lengths. They do not need to be perfectly straight—in fact, slightly uneven strips will make the mummy look more realistic and homemade. Keep the strips thin enough to drape naturally across the salad without completely covering the lettuce underneath.
6. Create the mummy’s wrappings
Lay the mozzarella strips across the salad in overlapping horizontal and slightly diagonal lines. Leave small gaps between some of the strips so the green lettuce remains visible. Vary the direction and spacing rather than making the lines perfectly uniform, giving the mummy a playful, hand-wrapped appearance.
7. Add the mummy eyes
Cut two tiny pieces from the black olives and place them in an open area near the upper center of the mozzarella wrappings. Position the olive pieces close together so they look like two eyes peeking through the bandages. Keep them clearly visible rather than burying them underneath the cheese.
8. Finish and serve the salad
Scatter the reserved croutons and a little extra Parmesan around the visible edges of the salad. Serve the mummy immediately so the romaine stays crisp and the mozzarella strips maintain their distinct bandage-like appearance. If making it ahead, refrigerate the dressed lettuce separately and assemble the mummy design shortly before serving.
Tip
For the best mummy effect, use low-moisture mozzarella rather than very wet fresh mozzarella. It is easier to slice into neat strips and will sit nicely across the salad without releasing too much liquid. Keep the cheese strips slightly irregular—the less perfect they look, the more convincing your little Halloween mummy will be.
13. Spider Deviled-Egg Salad
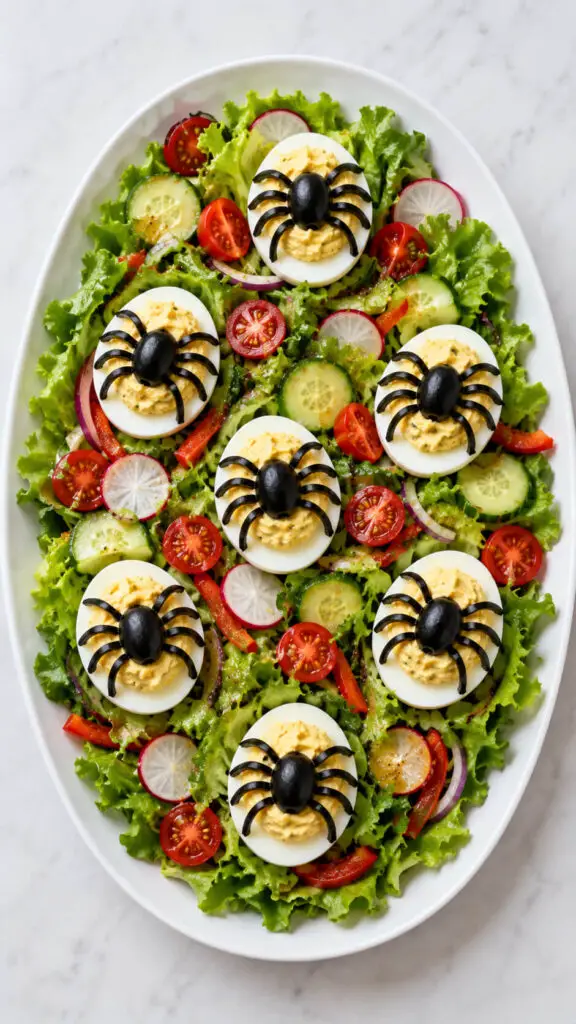
For something a little more substantial, combine a leafy salad with spooky spider-topped deviled eggs.
Prepare classic deviled eggs and decorate each half with a whole black olive body and thin olive strips for eight little legs.
Arrange them around a platter of lettuce, cucumber, radishes, and tomatoes rather than hiding them inside the salad.
The spiders become edible decorations as well as protein-rich toppings.
A tangy mustard vinaigrette keeps the vegetables bright and fresh.
This is particularly handy for parties where guests need something more filling than a bowl of greens.
Ingredients
- 6 large eggs
- 3 tablespoons mayonnaise
- 1 teaspoon yellow mustard
- ¼ teaspoon salt
- ⅛ teaspoon black pepper
- 2 cups chopped crisp lettuce
- 1 small cucumber, thinly sliced
- 4 radishes, thinly sliced
- 1 cup cherry tomatoes, halved
- 12 black olives
- 1 teaspoon chopped fresh parsley, optional
Instructions
1. Boil the eggs until firm
Place the eggs in a saucepan and cover them with cold water. Bring the water to a boil, then reduce the heat and cook for about 10–12 minutes. Transfer the eggs immediately to a bowl of ice water and let them cool completely. This makes the shells easier to remove and helps keep the egg whites smooth.
2. Prepare the deviled-egg filling
Peel the cooled eggs carefully and slice each one lengthwise. Remove the yolks and place them in a small bowl. Mash the yolks with mayonnaise, mustard, salt, and black pepper until creamy and smooth. Taste the filling and adjust the seasoning if needed.
3. Fill the egg whites generously
Spoon or pipe the creamy yolk mixture back into the hollow centers of the egg whites. Add enough filling to create a slightly rounded mound rather than leaving the centers flat. Keep the edges of the egg whites clean so the finished spider decorations look neat and easy to recognize.
4. Build the fresh salad base
Spread the chopped lettuce across a large serving platter, creating an even green base. Arrange the cucumber slices, radishes, and halved cherry tomatoes throughout the lettuce. Keep the vegetables colorful and visible rather than burying them under the eggs. Pat the vegetables dry before arranging them so excess moisture does not make the platter watery.
5. Create the olive spiders
Use one whole black olive for the body of each spider and place it directly on top of the deviled-egg filling. Slice additional black olives into very thin strips to create the spider legs. Arrange four strips on each side of the olive body, giving every spider eight clearly visible legs.
6. Arrange the spiders among the vegetables
Place the decorated deviled eggs around the salad platter, spacing them evenly so the olive spiders are easy to see from above. Position some toward the center and others closer to the edges. If desired, sprinkle a small amount of fresh parsley over the vegetables for a little extra color without hiding the spider designs.
7. Serve the Halloween salad while fresh
Refrigerate the completed platter until you are ready to serve it. Bring it out shortly before the meal so the lettuce and vegetables remain crisp. Keep the salad chilled and avoid leaving it at room temperature for extended periods, particularly when serving outdoors during a Halloween gathering.
Tip
For especially convincing spiders, chill the black olives briefly before slicing them into legs. A small, sharp knife makes it much easier to cut thin, even strips. Assemble the spiders shortly before serving so the olive legs stay neatly positioned on the creamy deviled eggs instead of sliding around.
14. Monster Mouth Apple Salad
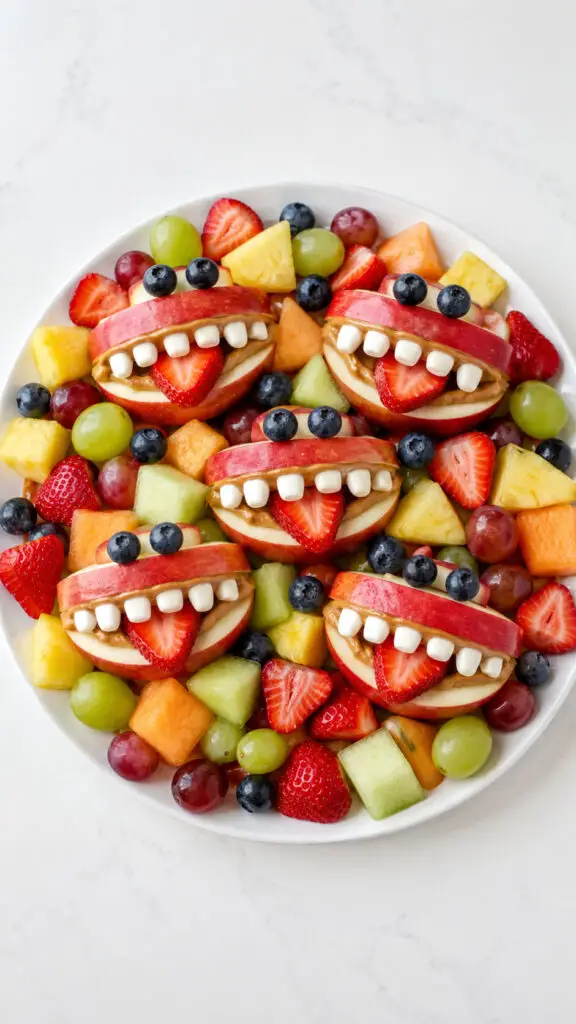
For a sweeter Halloween salad, create goofy monster mouths using apples, strawberries, and yogurt.
Cut apple wedges into curved “lips,” spread them with peanut or sunflower-seed butter, and tuck strawberry slices inside as tongues.
Small marshmallow pieces or yogurt-covered raisins can become silly teeth, while blueberries make fun eyes.
Arrange the finished monster mouths around a bowl of chopped fruit such as grapes, melon, and berries.
It is more playful than a traditional fruit salad and makes an excellent Halloween snack for children who may be too busy planning their candy haul to eat anything sensible.
Ingredients
- 2 large crisp apples, preferably red or green
- ¼ cup smooth peanut butter or sunflower-seed butter
- 4–5 strawberries
- ½ cup blueberries
- ½ cup seedless grapes, halved
- ½ cup pineapple chunks
- ½ cup cantaloupe or honeydew melon, cut into small pieces
- ¼ cup mini marshmallows or small yogurt-covered raisins
- 1 tablespoon lemon juice
Instructions
1. Prepare the apples
Wash and dry the apples thoroughly, then cut each apple into wedges about ½ inch thick. Each pair of wedges will become a monster mouth, so choose pieces with a naturally curved edge. Immediately brush the cut surfaces lightly with lemon juice to help prevent browning.
2. Slice the monster tongues
Wash and hull the strawberries, then cut them lengthwise into thin slices. Choose slices that are long enough to extend slightly beyond the apple wedges. These will become the bright red tongues inside the monster mouths, so gently curve or trim them if needed to create a playful shape.
3. Build the monster mouths
Spread a thin but generous layer of peanut butter or sunflower-seed butter over one side of each apple wedge. Place a strawberry slice on top, allowing part of it to stick out like a tongue. Add another apple wedge on top, butter-side facing the strawberry, to create an open mouth.
4. Add the silly teeth
Cut mini marshmallows into smaller pieces if necessary, then gently press them into the nut or seed butter along the upper and lower edges of each mouth. Arrange the pieces unevenly so the monsters have funny, crooked teeth rather than a perfectly straight smile. Yogurt-covered raisins can also work as rounded teeth.
5. Create the monster eyes
Place two blueberries above each apple mouth, using a small dab of peanut or sunflower-seed butter underneath each one to help them stay in place. For extra personality, position the eyes at slightly different angles so some monsters look surprised, goofy, or mischievous.
6. Arrange the fruit around the monsters
Spread halved grapes, pineapple chunks, melon pieces, and remaining blueberries across a large platter. Arrange the finished monster mouths among the fruit, leaving enough space around each one so the faces remain easy to see. The mixture of red, green, yellow, orange, and blue makes the platter especially festive.
7. Serve the monster mouths fresh
Serve the salad soon after assembling it for the best texture and appearance. If preparing it ahead, keep the fruit chilled and assemble the apple mouths shortly before serving. This helps the apples stay crisp and keeps the strawberry tongues and marshmallow teeth looking fresh.
Tip
Use sunflower-seed butter instead of peanut butter if you’re serving the salad at a school or party where nut allergies may be a concern. For the funniest presentation, make each monster slightly different—one with a crooked tongue, another with oversized teeth, and another with lopsided eyes. The imperfect faces are what make this Halloween salad so charming.
15. Spiderweb Pasta Salad
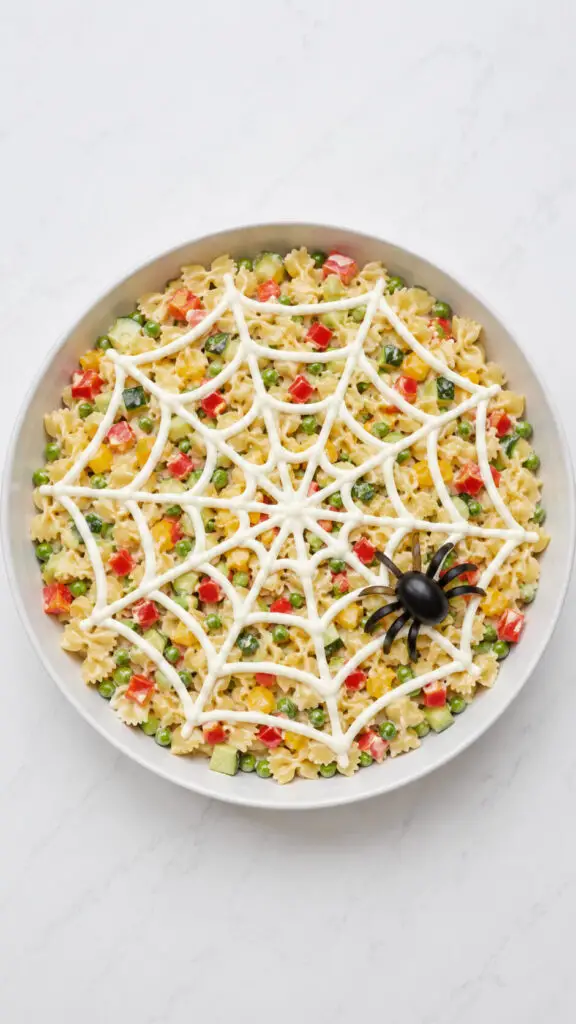
Give a creamy pasta salad a completely different Halloween look by creating a dramatic spiderweb pattern across the top.
Use bow-tie or shell pasta with peas, diced peppers, cucumber, and a light creamy dressing.
Spread the salad in a shallow round dish, then pipe thin circles of dressing from the center outward.
Drag a toothpick through the circles to form the web. Add one olive spider near the edge instead of directly in the center.
The shallow presentation makes the design much easier to see, turning an everyday pasta salad into a proper Halloween centerpiece.
Ingredients
- 8 ounces bow-tie or shell pasta
- 1 cup frozen green peas, thawed
- ½ cup red bell pepper, finely diced
- ½ cup yellow bell pepper, finely diced
- ½ cup cucumber, finely diced
- ½ cup mayonnaise
- ¼ cup plain Greek yogurt
- 1 tablespoon lemon juice
- 1 teaspoon Dijon mustard
- ½ teaspoon garlic powder
- ½ teaspoon salt
- ¼ teaspoon black pepper
- 1 large black olive for the spider body
- 1 additional black olive for the spider legs
- 2 tablespoons creamy dressing, reserved for the spiderweb
Instructions
1. Cook the pasta
Bring a large pot of salted water to a boil and cook the bow-tie or shell pasta according to the package directions until tender but still slightly firm. Drain thoroughly and rinse briefly under cold water to stop the cooking process. Allow the pasta to cool completely before mixing it with the dressing.
2. Prepare the colorful vegetables
While the pasta cools, dice the red bell pepper, yellow bell pepper, and cucumber into small, even pieces. Thaw the green peas and pat them dry if they contain excess moisture. Keeping the vegetables fairly small helps them distribute evenly through the pasta while allowing their bright colors to remain visible.
3. Mix the creamy dressing
Whisk together the mayonnaise, Greek yogurt, lemon juice, Dijon mustard, garlic powder, salt, and black pepper in a bowl. Stir until the mixture is completely smooth. The combination of mayonnaise and yogurt gives the salad a creamy texture without making the dressing overly heavy, while lemon and mustard add a pleasant tang.
4. Combine the pasta and vegetables
Place the cooled pasta in a large mixing bowl and add the peas, red bell pepper, yellow bell pepper, and cucumber. Pour over the creamy dressing and gently toss everything together until the pasta and vegetables are evenly coated. Avoid vigorous stirring, which can break delicate pasta shapes.
5. Chill the pasta salad
Cover the bowl and refrigerate the salad for at least 30 minutes. This gives the flavors time to mingle and allows the dressing to cling nicely to the pasta. If the salad seems slightly dry after chilling, stir in a small spoonful of mayonnaise or yogurt before transferring it to the serving dish.
6. Shape the salad for the Halloween design
Transfer the pasta salad to a wide, shallow, round serving dish and gently spread it into an even layer. A shallow dish is important because it gives you plenty of visible surface area for the spiderweb. Smooth the top lightly without pressing the pasta down too firmly.
7. Pipe the spiderweb
Place the reserved creamy dressing into a piping bag or a small food-safe squeeze bottle. Pipe several thin concentric circles across the surface, starting near the center and working outward. Use a toothpick to gently drag lines from the center toward the edge at regular intervals, creating a recognizable spiderweb pattern.
8. Create the olive spider
Place one whole black olive near the edge or center of the web to form the spider’s body. Cut the second olive into thin strips and arrange them around the body as eight curved legs. Press the pieces gently into the dressing so they stay in position without disturbing the web.
Tip
Make the spiderweb shortly before serving for the sharpest design. If you prepare the pasta salad several hours ahead, refrigerate it without the web and spider, then decorate it just before guests arrive. A wide, shallow dish will also make the web much easier to see than a deep bowl.
16. Witch’s Hat Salad Platter
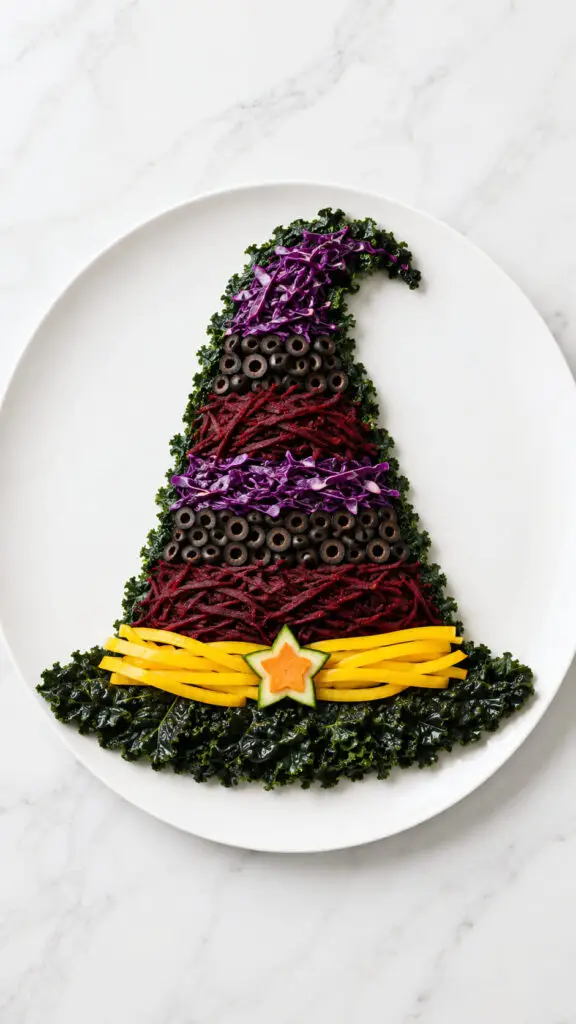
Create a whimsical witch’s hat using layers of leafy greens, purple cabbage, roasted beetroot, and sliced black olives.
Arrange the vegetables into a tall triangular hat shape, then create a colorful “belt” across the bottom with yellow bell pepper strips.
A cucumber or carrot star can sit on top as a playful finishing touch. Serve a bowl of dressing beside the platter rather than pouring it over the design.
This keeps the colors crisp and lets the hat remain recognizable throughout the meal.
It is especially fun for a Halloween buffet where presentation matters.
Ingredients
- 4 cups mixed leafy greens
- 2 cups finely shredded purple cabbage
- 1 medium cooked beetroot, thinly sliced
- ½ cup black olives, sliced
- 1 yellow bell pepper
- 1 small cucumber or carrot
- ½ cup chickpeas
- 2 tablespoons pumpkin seeds
- 2 tablespoons olive oil
- 1 tablespoon lemon juice
- 1 teaspoon Dijon mustard
- 1 teaspoon honey
- ¼ teaspoon salt
- ⅛ teaspoon black pepper
Instructions
1. Prepare the salad vegetables
Wash and dry the leafy greens thoroughly. Shred the purple cabbage into thin strips and slice the cooked beetroot into thin, manageable pieces. Slice the black olives and set everything aside. Keeping the vegetables relatively dry is important because excess moisture can make the finished witch’s hat lose its shape.
2. Make the dressing
Whisk together the olive oil, lemon juice, Dijon mustard, honey, salt, and black pepper in a small bowl. Continue whisking until the dressing looks smooth and slightly creamy. Keep it aside rather than tossing it with the vegetables immediately, since a dry arrangement will hold the witch’s hat shape much better.
3. Create the pointed hat shape
Spread the mixed leafy greens onto a large platter and begin arranging them into a tall, pointed triangular shape. Make the lower part wider and gradually narrow the vegetables toward the top to create the silhouette of a witch’s hat. Gently tuck stray leaves inward so the outline remains easy to recognize.
4. Add the purple and beetroot details
Layer shredded purple cabbage and thin beetroot slices over the leafy-green base, concentrating them inside the hat shape. Alternate the ingredients naturally so the hat has visible variations of green, purple, and deep red. Avoid completely covering the lettuce because the different colors help define the design.
5. Add the black olive details
Scatter sliced black olives across the hat, concentrating some around the pointed section and lower brim. The olives provide the deep black color that makes the Halloween design more dramatic. Keep enough space between the pieces so they look like intentional decorative details rather than one solid layer.
6. Create the yellow hatband
Cut the yellow bell pepper into long, thin strips. Arrange the strips horizontally across the lower portion of the hat to create a bright yellow band. Curve the strips slightly to follow the shape of the platter and make the band look integrated with the hat rather than simply placed across the salad.
7. Add the decorative buckle
Cut a small piece of cucumber or carrot into a simple star shape using a small cookie cutter or sharp knife. Place it over the yellow pepper band as the hat’s decorative buckle. Keep the shape small enough that it complements the design without covering too much of the colorful salad underneath.
8. Finish the platter
Scatter chickpeas and pumpkin seeds lightly around the hat and across a few open areas for extra texture and crunch. Drizzle the dressing sparingly over the vegetables immediately before serving, taking care not to flood the carefully arranged shape. Serve the salad while the ingredients are fresh and crisp.
Tip
For the sharpest witch’s hat silhouette, arrange the salad directly on the platter you plan to serve rather than transferring it afterward. Keep the dressing on the side if the salad needs to sit on a buffet for more than a few minutes. A large flat white platter also gives the dark vegetables plenty of contrast, making the witch’s hat instantly recognizable from above.
17. Halloween Monster Eye Fruit Salad
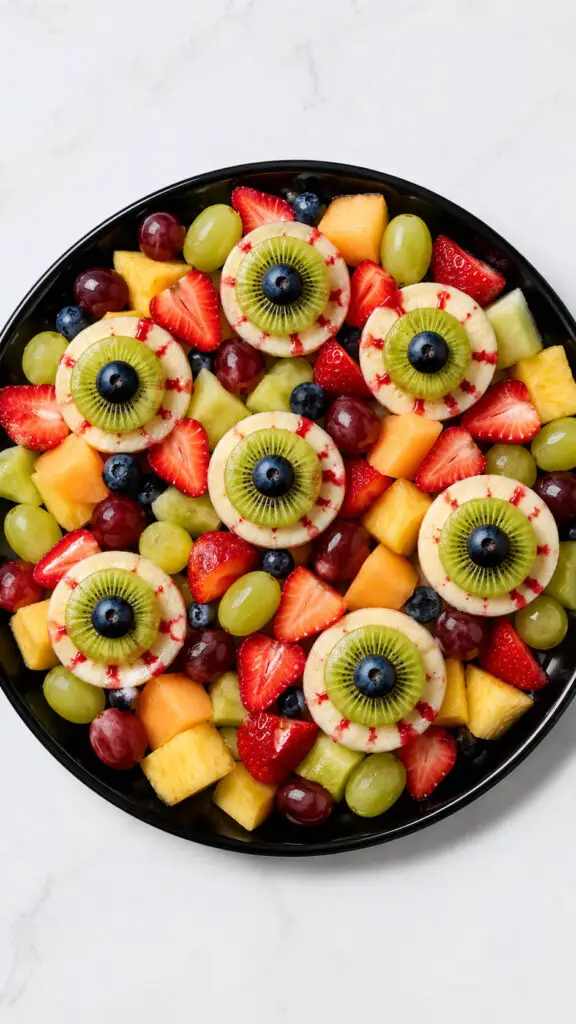
Finish with a fruit salad that looks like a bowlful of oversized monster eyes.
Use round slices of kiwi as green irises, blueberries as pupils, and banana slices as pale whites.
Arrange them over grapes, strawberries, melon, and pineapple, then add a few thin strawberry or raspberry streaks for a wonderfully creepy “bloodshot” effect.
Keep the fruit chilled and add the banana and kiwi shortly before serving for the freshest appearance.
It is colorful, naturally sweet, and a clever way to put something refreshing on a Halloween table otherwise crowded with chocolate and candy.
Ingredients
- 2 ripe but firm bananas
- 3 kiwis
- 1 cup blueberries
- 1 cup strawberries
- 1 cup seedless green or red grapes
- 1 cup pineapple chunks
- 1 cup cantaloupe or honeydew melon
- ½ cup raspberries
- 2 tablespoons raspberry or strawberry puree
- 1 tablespoon fresh lemon juice
Instructions
1. Prepare the fresh fruit
Wash the grapes, blueberries, strawberries, raspberries, and other fresh fruit thoroughly and pat them dry. Cut the pineapple and melon into bite-sized pieces. Slice the strawberries into thin pieces, reserving a few attractive slices for decorating the monster eyes.
2. Create the monster eye whites
Peel the bananas and cut them into round slices about ¼ inch thick. Choose slices that are relatively even in size because they will form the white part of the eyes. Lightly brush the banana slices with fresh lemon juice to help slow browning while adding a subtle fresh flavor.
3. Make the green irises
Peel the kiwis and cut them into thin round slices. Select slices that are similar in size to the banana pieces. Place one kiwi slice directly over the center of each banana slice. The bright green kiwi should leave a visible border of banana around the outside, creating a convincing monster-eye appearance.
4. Add the blueberry pupils
Place one blueberry in the center of each kiwi slice to create the pupil. If some blueberries are particularly large, use smaller berries for a more proportional appearance. Press them gently into the kiwi so they stay in place without crushing the fruit.
5. Arrange the colorful fruit base
Spread the grapes, pineapple, melon, remaining kiwi, strawberries, raspberries, and blueberries across a large serving platter. Arrange the fruit in a loose, colorful layer rather than mixing everything into a deep bowl. This makes the finished Halloween design easier to see from above.
6. Arrange the monster eyes
Carefully place the finished banana, kiwi, and blueberry eyes across the fruit. Position some eyes close together and others slightly apart so they look like a quirky group of monsters watching the table. Keep enough space between them to prevent the delicate banana and kiwi layers from getting disturbed.
7. Add the spooky bloodshot details
Use a small spoon or piping bag to drizzle very thin, irregular lines of raspberry or strawberry puree around selected monster eyes. Keep the streaks delicate and uneven so they resemble playful bloodshot veins rather than covering the fruit. Leave several eyes without streaks to create variety.
8. Chill the finished salad
Refrigerate the completed fruit salad for about 20–30 minutes before serving. Keep it covered loosely so the fruit remains fresh without disturbing the eye decorations. Serve it chilled while the bananas, kiwi, and berries are still bright and firm.
Tip
Make the monster eyes as close to serving time as possible. Bananas can brown and release moisture, which may soften the kiwi and make the eyes slide around. For an especially impressive Halloween presentation, prepare the other fruit ahead of time, then assemble the banana-kiwi-blueberry eyes shortly before guests arrive.