How to Fix a Leaky Kitchen Sink (6 Simple Steps)


A leaky kitchen sink is an annoyance that can disrupt your daily routine and potentially lead to bigger problems if left unaddressed.
The constant drip-drip sound, the wastage of water, and the fear of water damage can all contribute to a sense of frustration.
But worry not! In this guide, we will walk you through the step-by-step process of how to fix a leaky kitchen sink completely.
From identifying the source of the leak to implementing practical solutions, we’ve got you covered.
Let’s get started.
Identifying the Source of the Leak of The Kitchen Sink
When dealing with a leaky kitchen sink, the first and most crucial step is to identify the source of the leak.
Understanding where the water is coming from will help you determine the appropriate course of action for repair.
Here are some key points to consider when identifying the source of the leak:
Visual Inspection
Carefully examine the sink and surrounding areas to locate any visible signs of water accumulation or dripping. Check underneath the sink, around the faucet, and along the sink edges. Look for water stains, mold, or mildew, as they can indicate the presence of a leak.
Faucet Leaks

Leaky faucets are a common culprit. Check if the water is dripping from the spout or if there are any leaks around the base of the faucet handles. Remember that leaks can occur in both single-handle and double-handle faucets.
Sink Drain Leaks

The sink drain can be another potential source of leaks. Inspect the area where the drain pipe connects to the bottom of the sink. Look for water dripping or pooling around the drain or the P-trap, which is the curved pipe beneath the sink.
Sink Sprayer Leaks
If your sink has a sprayer, it is essential to check for leaks in its connection points. Examine the sprayer head, the hose, and the connection to the water supply pipe. Leaks in the sprayer can cause water to spray in unintended areas.
Joint and Seal Leaks
Leaks can also occur at the joints and seals of the sink. Inspect the connections where the sink meets the countertop and where the faucet connects to the sink. Pay attention to any signs of water seepage or moisture around these areas.
Time and Observation
In some cases, leaks may not be immediately noticeable. If you suspect a hidden leak, dry the sink area thoroughly and place a paper towel or a dry cloth underneath the suspect areas. Check periodically over the next few hours to see if there is any moisture or water accumulation.
Step by Step on How to Fix a Leaky Kitchen Sink
Fixing a leaky kitchen sink can seem like a daunting task, but with the right guidance and minimum effort, you can successfully repair it yourself.
Tools needed:
- Adjustable wrench
- Wrench or pliers
- Bucket
- Plumber’s putty
- Pliers
- Putty knife or caulk remover
- Waterproof silicone caulk or plumber’s putty
Here’s a step-by-step guide on how to fix a leaky kitchen sink:
Step 1: Shut off the Water
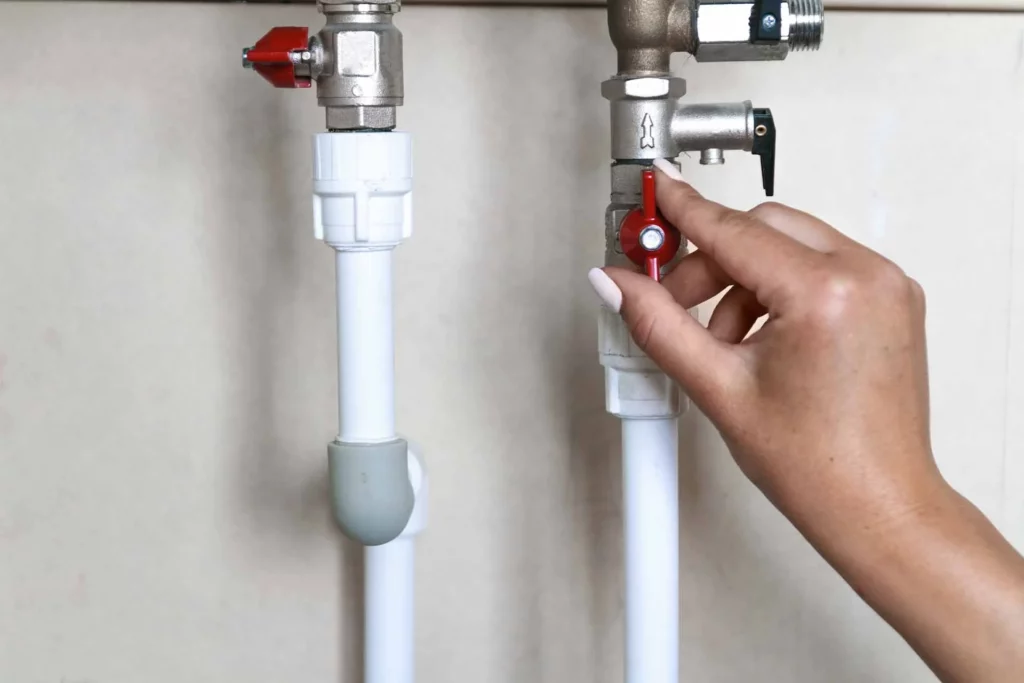
Before you start any repairs, turn off the water supply to the sink. Locate the shutoff valves underneath the sink and close them to prevent water from flowing.
Step 2: Fixing a Leaky Faucet
1. For Compression Faucets
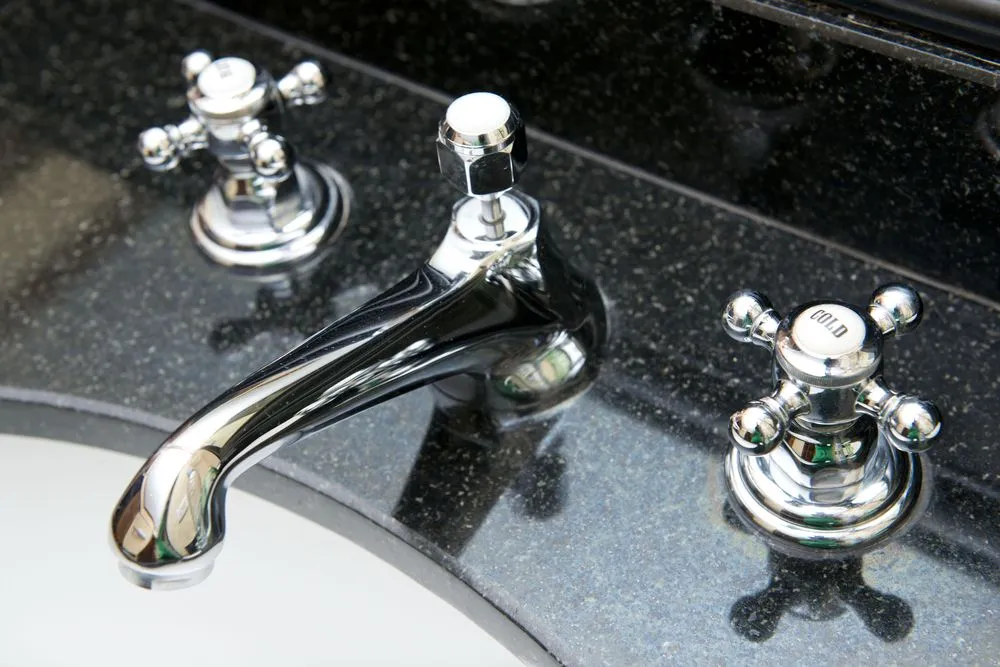
These faucets usually have separate hot and cold water handles. To fix a leak, start by removing the decorative cap on the handle and unscrewing the handle. Tighten the packing nut inside the handle with an adjustable wrench. If the leak persists, replace the rubber washer or O-ring inside the valve seat.
2. For Cartridge Faucets

These types of faucets have a single handle that controls both hot and cold water. Remove the handle and cartridge using a wrench or pliers. Inspect the cartridge for any damage or wear. Replace the cartridge if necessary.
Step 3: Repairing a Leaky Sink Drain
1. Check the P-Trap
Place a bucket underneath the P-trap (the curved pipe beneath the sink) to catch any water. Loosen the slip nuts at each end of the P-trap and remove them. Inspect the washers for damage and replace them if needed. Clean out any debris or clogs in the P-trap before reattaching it.
2. Replace the Drain Basket
If the leak persists, the drain basket may be the culprit. Remove the old drain basket by disconnecting it from the sink using a wrench. Clean the area and apply a small amount of plumber’s putty to the underside of the new drain basket. Insert it into the sink and tighten the mounting nut underneath.
Step 4: Fixing a Leaky Sink Sprayer
1. Check the Connections
Inspect the connection between the sprayer hose and the water supply pipe. Ensure it is tightly screwed on. If it’s loose, use pliers to tighten the connection.
2. Replace the Sprayer Hose
If the sprayer hose is damaged or worn out, it may be causing the leak. Remove the old hose by unscrewing it from the sprayer head and the water supply pipe. Install the new hose, making sure it is securely tightened.
Step 5: Sealing Leaky Sink Joints
1. Clean the Area
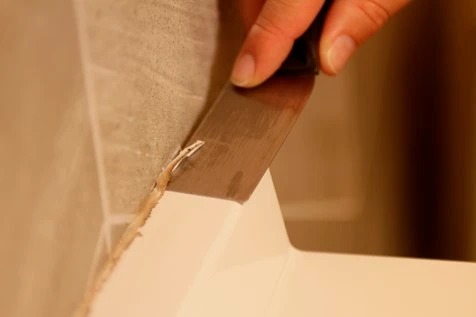
Remove any old caulk or putty from the joints using a putty knife or a caulk remover.
2. Apply Caulk or Putty
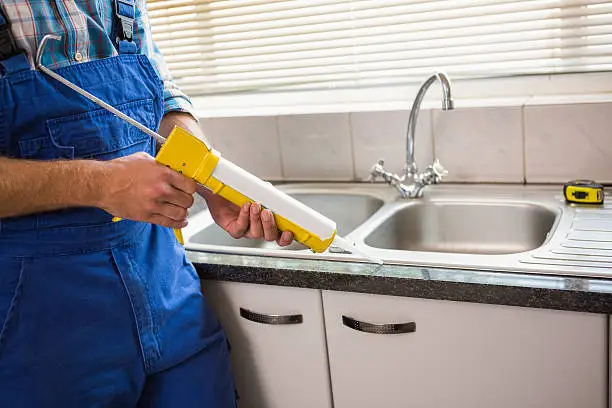
Use a waterproof silicone caulk or plumber’s putty to seal the joints between the sink and the countertop. Apply a thin and uniform layer, then proceed to smoothen it using your finger or a caulk tool.
Step 6: Turn on the Water
Once you have completed the repairs, turn the water supply back on and check for any leaks. Carefully inspect all the repaired areas to ensure they are dry and secure.
Maintenance Tips to Prevent Future Leaks in Your Kitchen Sink
Preventing future leaks in your kitchen sink is essential to avoid the hassle and potential damage that can arise. Here are some maintenance tips to help you keep your kitchen sink leak-free:
Regular Inspection
Periodically inspect your sink, faucet, and drain for any signs of wear, damage, or leaks. Look for water stains, drips, or pooling water around the sink area. Catching small issues early can prevent them from escalating into bigger problems.
Promptly Address Dripping Faucets
A faucet that continuously drips not only results in water wastage but can also eventually cause leaks. Repair any leaks promptly by replacing worn-out washers, O-rings, or cartridges. Regularly check and maintain the faucet to ensure its proper functioning.
Clean and Clear Drains
Prevent clogs that may cause water to back up and potentially damage your sink. Avoid pouring grease, coffee grounds, and food scraps down the drain. Use drain screens or stoppers to catch debris and clean them regularly.
Avoid Excessive Force
Be gentle when using the faucet handles or sprayer. Avoid forcing or over-tightening valves, as it can lead to damage and leaks. Treat the sink components with care to prolong their lifespan.
Check and Tighten Connections
Regularly inspect the connections of the sink, faucet, and sprayer. Ensure that all the connections are tight and secure. If you notice any loose fittings, use the appropriate tools to tighten them.
Maintain Proper Caulking
Check the caulking around the sink edges and joints regularly. If you notice any cracks or gaps, remove the old caulk and reapply a fresh bead of waterproof silicone caulk. This helps to maintain a watertight seal and prevents water from seeping into the gaps.
Keep Countertop Dry
After using the sink, wipe the countertop dry to prevent prolonged exposure to water. Excessive moisture can weaken caulking and lead to leaks.
Educate Household Members
Teach everyone in your household about proper sink usage and maintenance. Emphasize the importance of reporting and addressing leaks promptly.
Schedule Professional Plumbing Maintenance
Consider scheduling regular professional plumbing inspections and maintenance to detect and address any general potential issues before they become major problems. A professional plumber can provide a thorough assessment and ensure the optimal functioning of your kitchen sink.
FAQs
How do I know if my kitchen sink is leaking?
Signs of a leaky kitchen sink include water pooling around the sink, water stains or damage to the cabinet underneath the sink, dripping sounds, or increased water usage. Visual inspection and checking for moisture or water accumulation are good starting points.
Can I fix a leaky kitchen sink myself?
Yes, many common kitchen sink leaks can be fixed by homeowners with basic DIY skills. Simple repairs such as replacing washers, O-rings, or cartridges in faucets, tightening connections, or resealing joints can often resolve the issue. However, more complex plumbing problems may require professional assistance.
After completing the repairs, how do I check for leaks?
Turn on the water supply and carefully inspect all the repaired areas for any signs of leaks. Look for water drips, moisture, or pooling. If everything appears dry and secure, the repairs were successful.
Wrap Up
Fixing a leaky kitchen sink is a manageable task that can save you from unnecessary headaches and water wastage.
By following the step-by-step processes outlined in this article, you can easily identify the source of the leak and apply the appropriate solution.
Whether it’s a faulty seal, a loose connection, or a worn-out component, taking prompt action and employing the right tools will help you restore your kitchen sink to its leak-free state.
Remember, regular maintenance and vigilance are key to preventing future leaks and ensuring the smooth functioning of your kitchen plumbing.